背景 近期决定补齐一下算法方面的知识,因为是非计算机科班出身,没有系统学过 C++数据结构和算法 这门课,在算法方面的知识很薄弱,想要从应用层往下深入就很困难。
Android 应用开发做需求时完全用不到算法,性能优化时是规避JVM内存泄漏,按照Android系统的规则来处理,相当于是在别人预设好的算法环境上来适配自己的代码。
所以打算借着刷算法题,把一些算法的实现记录下来,方便以后回顾。然后对于重难点进行系统的学习。
数组和字符串常用操作 在 C++ 算法题中,字符串(std::string)和数组(通常是 std::vector 或原生数组)是最常用的数据结构之一。熟练掌握它们的常见操作和标准库函数,可以极大提高编码效率和代码可读性。
一、字符串(std::string)的常见操作和库函数 C++ 中的字符串使用 std::string 类,定义在 <string> 头文件中。
1. 构造与初始化 #include <string>
using namespace std ;
string s1 ; // 空字符串
string s2 = "hello" ; // 从C风格字符串构造
string s3 ( 5 , 'a' ); // "aaaaa"
string s4 ( s2 ); // 拷贝构造
string s5 ( s2 , 1 , 3 ); // 从s2的第1位置开始取3个字符 -> "ell"
2. 访问元素 char c1 = s2 [ 1 ]; // 'e',不检查越界
char c2 = s2 . at ( 1 ); // 'e',越界会抛出异常
int len = s2 . length (); // 或 s2.size(),返回字符串长度
bool isEmpty = s2 . empty (); // 是否为空
3. 遍历字符串 // 无下标,用于拼接比较多
for ( char c : s2 ) {
cout << c ;
}
// 或者下标遍历
for ( int i = 0 ; i < s2 . size (); ++ i ) {
cout << s2 [ i ];
}
4. 修改字符串 s2 . append ( " world" ); // s2变为"hello world"
// append可以追加字符串,不可以追加字符类型
// 追加字符可以使用push_back
s2 . push_back ( '!' ); // s2变为"hello world!"
// 也可以使用 += 追加字符或字符串
s2 += "!" ;
s2 . insert ( 5 , " " ); // 在第5位置插入空格 -> "hello world!"
s2 . insert ( s2 . end (), s3 . begin (), s3 . end ()); // 在s2末尾插入s3
s2 . erase ( 5 , 1 ); // 从第5位置删除1个字符
s2 . replace ( 0 , 5 , "hi" ); // 将[0,5)替换为"hi" -> "hi world!"
// 翻转字符串的某个区间
void reverseString ( string & s , int start , int end ) {
while ( start < end ) {
swap ( s [ start ++ ], s [ end -- ]);
}
}
// 使用库函数翻转
reverse ( s2 . begin (), s2 . begin () + 5 ); // 翻转字符串的前5个字符 "hello world!" -> "olleH world!"
5. 查找与替换 size_t pos = s2 . find ( "world" ); // 查找子串,返回起始索引,找不到返回 string::npos
if ( pos != string :: npos ) {
cout << "Found at: " << pos ;
}
pos = s2 . rfind ( "o" ); // 从后往前查找
s2 . replace ( pos , 1 , "a" ); // 替换找到的字符
// 判断前缀/后缀
bool starts = s2 . substr ( 0 , 2 ) == "he" ; // 手动判断前缀
bool startsWithHe = s2 . compare ( 0 , 2 , "he" ) == 0 ; // 更标准但麻烦
// C++20起有 starts_with() 和 ends_with()
C++20 新增:
s.starts_with("he")s.ends_with("ld!")6. 截取子串 string sub = s2 . substr ( 6 , 5 ); // 从第6位置开始,取5个字符 -> "world"
7. 转换大小写(需手动实现或使用算法) 标准库没有直接提供,但可以:
// 转小写/大写一般要自己写循环或者使用<cctype>
for ( char & c : s2 ) {
c = tolower ( c ); // 需要 #include <cctype>
}
// 使用transform
transform ( s2 . begin (), s2 . end (), s2 . begin (), :: toupper ); // 转大写
8. 字符串分割 / 拼接(通常需要自己实现或使用 stringstream) 拼接多个字符串可以用 + 或 append() 或 += 分割字符串一般用 stringstream + getline(..., delim) 示例(按空格分割):
string line = "a b c" ;
stringstream ss ( line );
string word ;
while ( ss >> word ) {
cout << word << endl ;
}
二、数组相关操作(原生数组 vs std::vector) 1. 原生数组(C-style array) 定义与初始化 int arr [ 5 ] = { 1 , 2 , 3 , 4 , 5 };
int arr2 [] = { 10 , 20 , 30 }; // 自动推导大小
常见操作 访问:arr[i] 长度:无法直接获取 ,除非额外保存 size 遍历:for 循环 排序等功能需要借助 <algorithm> 中的算法,传入首尾指针 翻转一个数组的某个区间:
void reverseArray ( int arr [], int start , int end ) {
while ( start < end ) {
swap ( arr [ start ++ ], arr [ end -- ]);
}
}
2. std::vector 动态数组 定义在 <vector> 头文件中。
构造与初始化 #include <vector>
using namespace std ;
vector < int > v1 ; // 空vector
vector < int > v2 ( 5 , 10 ); // 5个元素,都是10
vector < int > v3 = { 1 , 2 , 3 }; // 列表初始化
vector < int > v4 ( v3 ); // 拷贝构造
vector < int > v5 ( v3 . begin (), v3 . end ()); // 用迭代器范围构造
常用操作 获取信息 int size = v1 . size (); // 元素个数
bool isEmpty = v1 . empty (); // 是否为空
访问元素 int first = v3 [ 0 ]; // 不检查边界
int second = v3 . at ( 1 ); // 检查边界,越界抛异常
int last = v3 . back (); // 最后一个元素
int first2 = v3 . front (); // 第一个元素
修改容器 v1 . push_back ( 100 ); // 尾部插入
v1 . pop_back (); // 尾部删除
v1 . insert ( v1 . begin () + 1 , 99 ); // 在第1位置后插入99
v1 . erase ( v1 . begin ()); // 删除第一个元素
v1 . clear (); // 清空所有元素
遍历 // 下标遍历
for ( int i = 0 ; i < v1 . size (); ++ i ) {
cout << v1 [ i ];
}
// 迭代器遍历
for ( auto it = v1 . begin (); it != v1 . end (); ++ it ) {
cout << * it ;
}
// 范围for遍历(推荐)
for ( int x : v1 ) {
cout << x ;
}
排序 #include <algorithm>
sort ( v1 . begin (), v1 . end ()); // 升序排序
sort ( v1 . begin (), v1 . end (), greater < int > ()); // 降序排序
查找 auto it = find ( v1 . begin (), v1 . end (), 3 ); // 返回迭代器
if ( it != v1 . end ()) {
cout << "Found: " << * it ;
} else {
cout << "Not found" ;
}
去重(要先排序!) sort ( v1 . begin (), v1 . end ());
auto last = unique ( v1 . begin (), v1 . end ()); // 把重复的移到后面,返回新逻辑结尾
v1 . erase ( last , v1 . end ()); // 真正删除后面的重复元素
二维 vector vector < vector < int >> matrix ( 3 , vector < int > ( 4 , 0 )); // 3行4列,全0
三、常用算法库函数() 很多操作都可以用 <algorithm> 中的函数简化:
常用函数: 功能 函数 示例 排序 sort(begin, end)sort(v.begin(), v.end());逆序 reverse(begin, end)reverse(v.begin(), v.end());查找 find(begin, end, val)auto it = find(v.begin(), v.end(), 10);二分查找(必须有序) binary_search(begin, end, val)bool found = binary_search(v.begin(), v.end(), 10);二分查找边界 lower_bound, upper_bound用于查找第一个“不小于”或“大于”的位置 最大值/最小值 max(a, b), min(a, b),或 max_element, min_elementauto maxIt = max_element(v.begin(), v.end());交换 swap(a, b)swap(v[i], v[j]);填充 fill(begin, end, value)fill(v.begin(), v.end(), 0);拷贝 copy(src_begin, src_end, dest_begin)copy(src.begin(), src.end(), dest.begin());转换 transform可对每个元素做操作 填充指定次数 fill_n(dest_begin, count, value)
四、总结:字符串 & 数组常用操作速查 数据结构 常用操作 相关头文件 string 拼接(+)、查找(find)、截取(substr)、插入/删除、遍历、长度(.size()) <string>vector push_back/pop_back、insert/erase、sort/find、遍历、大小/容量 <vector>, <algorithm>原生数组 下标访问、配合算法库函数使用 <algorithm>, <cstring>(C风格字符串)通用算法 sort, find, reverse, min/max, transform 等 <algorithm>
推荐最佳实践:
优先使用 std::vector 而非原生数组 ,更安全、功能更强大。熟悉 <algorithm> 中的常用函数 ,比如 sort、find、reverse,能极大提升效率。字符串操作推荐用 std::string 的成员函数 ,比如 find、substr、append 等。注意边界条件 ,尤其在查找、删除、访问元素时。最长连续递增序列 最长连续递增序列
给定一个未经排序的整数数组,找到最长且 连续递增的子序列,并返回该序列的长度。

连续递增的子序列 可以由两个下标 l 和 r(l < r)确定,如果对于每个 l <= i < r,都有 nums[i] < nums[i + 1] ,那么子序列 [nums[l], nums[l + 1], ..., nums[r - 1], nums[r]] 就是连续递增子序列。

示例 1:
输入:nums = [1,3,5,4,7]
输出:3
解释:最长连续递增序列是 [1,3,5], 长度为3。
尽管 [1,3,5,7] 也是升序的子序列, 但它不是连续的,因为 5 和 7 在原数组里被 4 隔开。

示例 2:
输入:nums = [2,2,2,2,2]
输出:1
解释:最长连续递增序列是 [2], 长度为1。

提示:
1 <= nums.length <= 104
-109 <= nums[i] <= 109
思路1 不断记录更新 作为模拟题,翻译出:
维护一个变量 max_len 记录当前最长连续递增子序列的长度。 遍历数组 nums,如果当前元素小于下一个元素,则 max_len 加一。 遇到减小的时候,就重置临时变量,待下一次连续递增子序列开始。 class Solution {
public:
int findLengthOfLCIS ( vector < int >& nums ) {
int n = nums . size ();
if ( n < 1 )
return n ;
int lenth = 1 ;
int maxLenth = 1 ;
for ( int i = 0 ; i < n - 1 ; i ++ ) {
if ( nums [ i + 1 ] > nums [ i ]) {
lenth ++ ;
maxLenth = max ( lenth , maxLenth );
} else {
lenth = 1 ;
}
}
return maxLenth ;
}
};
最长连续序列 最长连续序列
给定一个未排序的整数数组 nums ,找出数字连续的最长序列(不要求序列元素在原数组中连续)的长度。

请你设计并实现时间复杂度为 O(n) 的算法解决此问题。

示例 1:
输入:nums = [100,4,200,1,3,2]
输出:4
解释:最长数字连续序列是 [1, 2, 3, 4]。它的长度为 4。

示例 2:
输入:nums = [0,3,7,2,5,8,4,6,0,1]
输出:9

示例 3:
输入:nums = [1,0,1,2]
输出:3

提示:
0 <= nums.length <= 105
-109 <= nums[i] <= 109
思路1 hashset查找 写法思路上和上一题一样,就是对照遍历的对象成了hashset。
先将所有元素加入到一个 hashset 中。 遍历数组中的每个元素,如果hashset中没有比当前元素数值小1的元素 ,说明当前元素是递增数列的开头节点 ,往后每次查加1的数值,直到加1寻找失败,断开区间,更新最大长度。 如果断开后找到的元素非头节点,重置长度为1 class Solution {
public:
int longestConsecutive ( vector < int >& nums ) {
int n = nums . size ();
if ( n < 1 ) {
return n ;
}
unordered_set < int > tempSet ;
for ( int val : nums ) {
tempSet . insert ( val );
}
int lenth = 1 ;
int maxLenth = 1 ;
for ( const int & num : tempSet ) {
// 当前元素是前驱元素
if ( ! tempSet . count ( num - 1 )) {
int curretnNum = num ;
while ( tempSet . count ( curretnNum + 1 )) {
lenth ++ ;
curretnNum += 1 ;
maxLenth = max ( maxLenth , lenth );
}
}
// 非前驱元素了,重置lenth
lenth = 1 ;
}
return maxLenth ;
}
};
思路2 排序后遍历 先排序原数组,再从头遍历,记录当前连续递增序列的长度,遇到断开了,就更新最大长度。
class Solution {
public:
int longestConsecutive ( vector < int >& nums ) {
// 处理边界情况:数组为空或只有一个元素
int max = 0 , length = 0 ;
if ( nums . size () <= 1 ) {
return nums . size () ? 1 : 0 ; // 空数组返回0,单元素返回1
}
// 先对数组进行排序,将可能连续的数字放在一起
std :: sort ( nums . begin (), nums . end ());
// 遍历排序后的数组,寻找连续序列
for ( int i = 0 ; i < nums . size () - 1 ; i ++ ) {
// 如果相邻元素差值为1,说明是连续序列
if ( nums [ i + 1 ] - nums [ i ] == 1 ) {
length ++ ; // 当前连续序列长度加1
}
// 如果相邻元素相等,跳过重复元素,继续检查下一个
if ( nums [ i + 1 ] == nums [ i ]) {
continue ;
}
// 如果相邻元素差值不为1,说明连续序列中断
if ( nums [ i + 1 ] - nums [ i ] != 1 ) {
// 更新最大长度(length是间隔数,序列长度需要+1)
if ( length + 1 > max ) {
max = length + 1 ;
}
length = 0 ; // 重置当前序列长度
}
}
// 检查最后一个连续序列(循环结束时可能还有未统计的序列)
if ( length + 1 > max ) {
max = length + 1 ;
}
// 返回最大长度,如果max为0说明没有连续序列,返回1(至少有一个元素)
return max ? max : 1 ;
}
};
有趣的注入现象 这个 atexit 函数覆盖了力扣系统写入的运行时间文件:
力扣先执行:写入真实运行时间 → display_runtime.txt 程序退出时你的代码执行:写入 “0” → display_runtime.txt(覆盖之前的内容) int init = atexit ([]()
{
//力扣是从main开始进行计算的,这里先调用过ofstream让他初始化好,后面就不需要初始化了,结果会更快
ofstream ( "display_runtime.txt" ) << "0" ;
});
合并两个有序数组 合并两个有序数组
给你两个按 非递减顺序 排列的整数数组 nums1 和 nums2,另有两个整数 m 和 n,分别表示 nums1 和 nums2 中的元素数目。
请你 合并 nums2 到 nums1 中,使合并后的数组同样按 非递减顺序 排列。

注意:最终,合并后数组不应由函数返回,而是存储在数组 nums1
中。为了应对这种情况,nums1 的初始长度为 m + n,其中前 m
个元素表示应合并的元素,后 n 个元素为 0 ,应忽略。nums2 的长度为 n 。

示例 1:
输入:nums1 = [1,2,3,0,0,0], m = 3, nums2 = [2,5,6], n = 3
输出:[1,2,2,3,5,6]
解释:需要合并 [1,2,3] 和 [2,5,6] 。
合并结果是 [1,2,2,3,5,6] ,其中斜体加粗标注的为 nums1 中的元素。

示例 2:
输入:nums1 = [1], m = 1, nums2 = [], n = 0
输出:[1]
解释:需要合并 [1] 和 [] 。
合并结果是 [1] 。

示例 3:
输入:nums1 = [0], m = 0, nums2 = [1], n = 1
输出:[1]
解释:需要合并的数组是 [] 和 [1] 。
合并结果是 [1] 。
注意,因为 m = 0 ,所以 nums1 中没有元素。nums1 中仅存的 0

仅仅是为了确保合并结果可以顺利存放到 nums1 中。

提示:
nums1.length == m + n
nums2.length == n
0 <= m, n <= 200
1 <= m + n <= 200
-109 <= nums1[i], nums2[j] <= 109

进阶:你可以设计实现一个时间复杂度为 O(m + n) 的算法解决此问题吗?
思路1 模拟题 从后往前遍历比较 从后往前只遍历一次,将两个数组的有效位一起拿来比较,如果一个数组的有效位使用完了,就设置为负的最小值来比较:
class Solution {
public:
void merge ( vector < int >& nums1 , int m , vector < int >& nums2 , int n ) {
int idxm = m - 1 ;
int idxn = n - 1 ;
for ( int i = m + n - 1 ; i >= 0 ; i -- ) {
int currentm = idxm >= 0 ? nums1 [ idxm ] : - INT_MAX ;
int currentn = idxn >= 0 ? nums2 [ idxn ] : - INT_MAX ;
currentm > currentn ? idxm -- : idxn -- ;
nums1 [ i ] = max ( currentm , currentn );
}
}
};
思路2 优化思路1中的极值写法 使用 -INT_MAX 来作为比较值不太优雅,优化判断条。
可以填充为nums1有效位的情况是, (nums1中元素没有走完) && (nums2中元素比nums1小 || nums2已经走完了)
剩下的情况就填充nums2的有效位。
class Solution {
public:
void merge ( vector < int >& nums1 , int m , vector < int >& nums2 , int n ) {
int idxm = m - 1 ;
int idxn = n - 1 ;
for ( int i = m + n - 1 ; i >= 0 ; i -- ) {
if ( idxm >= 0 && ( idxn < 0 || nums1 [ idxm ] > nums2 [ idxn ])) {
nums1 [ i ] = nums1 [ idxm -- ];
} else {
nums1 [ i ] = nums2 [ idxn -- ];
}
}
}
};
思路3 从后往前填充 判断条件不同 因为nums1空间足够,可以直接两个数组一起对比遍历,从后往前遍历,每次取两个数组中较大的一个,放到nums1的最后面。
class Solution {
public:
void merge ( vector < int >& nums1 , int m , vector < int >& nums2 , int n ) {
int i = m - 1 , j = n - 1 , k = m + n - 1 ;
while ( i >= 0 && j >= 0 ) {
if ( nums1 [ i ] > nums2 [ j ]) {
nums1 [ k -- ] = nums1 [ i -- ];
} else {
nums1 [ k -- ] = nums2 [ j -- ];
}
}
// 如果nums2还有剩余元素
while ( j >= 0 ) {
nums1 [ k -- ] = nums2 [ j -- ];
}
}
};
如果第一个数组有效位比第二个数组多,那么第一个循环走完,整个nums1其实已经是自动排完序的了;
如果第二个数组元素比第一个数组有效位多,那么第一个循环走完,第二个数组还有剩余的元素,而且这些剩余元素都是最小的,第二遍循环将这些元素直接放到nums1的前面即可。
思路4 使用sort库函数 将第二个数组添加到第一个数组尾部,直接调用sort方法。
class Solution {
public:
void merge ( vector < int >& nums1 , int m , vector < int >& nums2 , int n ) {
for ( int i = 0 ; i != n ; ++ i ) {
nums1 [ m + i ] = nums2 [ i ];
}
sort ( nums1 . begin (), nums1 . end ());
}
};
移除元素 移除元素
给你一个数组 nums 和一个值 val,你需要 原地 移除所有数值等于 val 的元素。元素的顺序可能发生改变。然后返回 nums 中与 val 不同的元素的数量。

假设 nums 中不等于 val 的元素数量为 k,要通过此题,您需要执行以下操作:

更改 nums 数组,使 nums 的前 k 个元素包含不等于 val 的元素。nums 的其余元素和 nums 的大小并不重要。
返回 k。
用户评测:

评测机将使用以下代码测试您的解决方案:

int[] nums = [...]; // 输入数组
int val = ...; // 要移除的值
int[] expectedNums = [...]; // 长度正确的预期答案。
                            // 它以不等于 val 的值排序。

int k = removeElement(nums, val); // 调用你的实现

assert k == expectedNums.length;
sort(nums, 0, k); // 排序 nums 的前 k 个元素
for (int i = 0; i < actualLength; i++) {
    assert nums[i] == expectedNums[i];
}
如果所有的断言都通过,你的解决方案将会 通过。

示例 1:
输入:nums = [3,2,2,3], val = 3
输出:2, nums = [2,2,_,_]
解释:你的函数函数应该返回 k = 2, 并且 nums 中的前两个元素均为 2。
你在返回的 k 个元素之外留下了什么并不重要(因此它们并不计入评测)。

示例 2:
输入:nums = [0,1,2,2,3,0,4,2], val = 2
输出:5, nums = [0,1,4,0,3,_,_,_]
解释:你的函数应该返回 k = 5,并且 nums 中的前五个元素为 0,0,1,3,4。
注意这五个元素可以任意顺序返回。
你在返回的 k 个元素之外留下了什么并不重要(因此它们并不计入评测)。

提示:
0 <= nums.length <= 100
0 <= nums[i] <= 50
0 <= val <= 100
思路1 双指针 快慢指针,题目要求原地移除所有等于val的元素。快指针往前遍历,慢指针代表留存元素的位置。快指针的值不等于要移除元素时,说明这个值需要留存,将快指针的值复制到慢指针指向的位置,快慢指针同时往前;当快指针指向了要移除的元素时,此时慢指针一定也指向了要移除的元素,慢指针不动,此位置要接受下一个留存的值,只移动快指针。
class Solution {
public:
int removeElement ( vector < int >& nums , int val ) {
int n = nums . size ();
int left = 0 ;
for ( int right = 0 ; right < n ; right ++ ) {
if ( nums [ right ] != val ) {
nums [ left ] = nums [ right ];
left ++ ;
}
}
return left ;
}
};
删除有序数组中的重复项 删除有序数组中的重复项
给你一个 非严格递增排列 的数组 nums ,请你 原地 删除重复出现的元素,使每个元素 只出现一次 ,返回删除后数组的新长度。元素的 相对顺序 应该保持 一致 。然后返回 nums 中唯一元素的个数。

考虑 nums 的唯一元素的数量为 k ,你需要做以下事情确保你的题解可以被通过:

更改数组 nums ,使 nums 的前 k 个元素包含唯一元素,并按照它们最初在 nums 中出现的顺序排列。nums 的其余元素与 nums 的大小不重要。
返回 k 。
判题标准:

系统会用下面的代码来测试你的题解:

int[] nums = [...]; // 输入数组
int[] expectedNums = [...]; // 长度正确的期望答案

int k = removeDuplicates(nums); // 调用

assert k == expectedNums.length;
for (int i = 0; i < k; i++) {
    assert nums[i] == expectedNums[i];
}
如果所有断言都通过,那么您的题解将被 通过。

示例 1:
输入:nums = [1,1,2]
输出:2, nums = [1,2,_]
解释:函数应该返回新的长度 2 ,并且原数组 nums 的前两个元素被修改为 1, 2 。不需要考虑数组中超出新长度后面的元素。

示例 2:
输入:nums = [0,0,1,1,1,2,2,3,3,4]
输出:5, nums = [0,1,2,3,4]
解释:函数应该返回新的长度 5 , 并且原数组 nums 的前五个元素被修改为 0, 1, 2, 3, 4 。不需要考虑数组中超出新长度后面的元素。

提示:
1 <= nums.length <= 3 * 104
-104 <= nums[i] <= 104
nums 已按 非严格递增 排列
思路1 双指针 和上一题类似,快慢指针,快指针遍历数组,慢指针代表不重复元素的位置。快指针遍历到的元素如果和慢指针指向的元素不同,说明这个元素是不重复的,将快指针指向的元素复制到慢指针指向的位置,快慢指针同时往前;如果快指针指向的元素和慢指针指向的元素相同,说明这个元素是重复的,只移动快指针。慢指针停留在此处等待写入新的不重复元素。
class Solution {
public:
int removeDuplicates ( vector < int >& nums ) {
int n = nums . size ();
int left = 0 ;
for ( int right = 0 ; right < n ; right ++ ) {
if ( nums [ right ] != nums [ left ]) {
left ++ ;
nums [ left ] = nums [ right ];
}
}
// left 是下标,加1为长度
return left + 1 ;
}
};
删除有序数组中的重复项 II 删除有序数组中的重复项 II
给你一个有序数组 nums ,请你 原地 删除重复出现的元素,使得出现次数超过两次的元素只出现两次 ,返回删除后数组的新长度。

不要使用额外的数组空间,你必须在 原地 修改输入数组 并在使用 O(1) 额外空间的条件下完成。

说明:

为什么返回数值是整数,但输出的答案是数组呢?

请注意,输入数组是以「引用」方式传递的,这意味着在函数里修改输入数组对于调用者是可见的。

你可以想象内部操作如下:

// nums 是以“引用”方式传递的。也就是说,不对实参做任何拷贝
int len = removeDuplicates(nums);

// 在函数里修改输入数组对于调用者是可见的。
// 根据你的函数返回的长度, 它会打印出数组中 该长度范围内 的所有元素。
for (int i = 0; i < len; i++) {
    print(nums[i]);
}

示例 1:
输入:nums = [1,1,1,2,2,3]
输出:5, nums = [1,1,2,2,3]
解释:函数应返回新长度 length = 5, 并且原数组的前五个元素被修改为 1, 1, 2, 2, 3。 不需要考虑数组中超出新长度后面的元素。

示例 2:
输入:nums = [0,0,1,1,1,1,2,3,3]
输出:7, nums = [0,0,1,1,2,3,3]
解释:函数应返回新长度 length = 7, 并且原数组的前七个元素被修改为 0, 0, 1, 1, 2, 3, 3。不需要考虑数组中超出新长度后面的元素。

提示:
1 <= nums.length <= 3 * 104
-104 <= nums[i] <= 104
nums 已按升序排列
思路1 双指针 处理后的数组最短长度一定比2大,因为每个元素最多出现两次。所以短数组特殊处理,快慢指针起点直接从下标2开始。较上一题基础题,唯一的不同就是处理好留存元素和位置的判断条件。
这里因为是有序数组,所以从慢指针的前两个元素进行判断,表示当前元素是否和前两个元素重复。如果重复,说明当前元素需要被删除,只移动快指针;如果不重复,说明当前元素需要被保留,将快指针指向的元素复制到慢指针指向的位置,快慢指针同时往前。
class Solution {
public:
int removeDuplicates ( vector < int >& nums ) {
int n = nums . size ();
if ( n <= 2 ) {
return n ;
}
int slow = 2 , fast = 2 ;
while ( fast < n ) {
if ( nums [ slow - 2 ] != nums [ fast ]) {
nums [ slow ] = nums [ fast ];
++ slow ;
}
++ fast ;
}
return slow ;
}
};
多数元素 多数元素
给定一个大小为 n 的数组 nums ,返回其中的多数元素。多数元素是指在数组中出现次数 大于 ⌊ n/2 ⌋ 的元素。

你可以假设数组是非空的,并且给定的数组总是存在多数元素。

示例 1:
输入:nums = [3,2,3]
输出:3

示例 2:
输入:nums = [2,2,1,1,1,2,2]
输出:2

提示:
n == nums.length
1 <= n <= 5 * 104
-109 <= nums[i] <= 109
思路1 哈希表 用哈希表记录每个元素出现的次数,遍历哈希表,找到出现次数大于n/2的元素。
class Solution {
public:
int majorityElement ( vector < int >& nums ) {
int n = nums . size ();
unordered_map < int , int > map ;
for ( int i = 0 ; i < n ; i ++ ) {
map [ nums [ i ]] ++ ;
}
for ( auto it = map . begin (); it != map . end (); it ++ ) {
if ( it -> second > n / 2 ) {
return it -> first ;
}
}
return - 1 ;
}
};
找到出现次数最多的元素 如果不一定有出现次数大于 n/2 的元素,而是需要是找出现次数最多的元素 。相较于思路1,只需要遍历哈希表时,不断交换最大值,找到出现次数最多的元素即可。
class Solution {
public:
int majorityElement ( vector < int >& nums ) {
int n = nums . size ();
unordered_map < int , int > map ;
for ( int i = 0 ; i < n ; i ++ ) {
map [ nums [ i ]] ++ ;
}
int max = 0 ;
int maxItem = nums [ 0 ];
for ( auto it = map . cbegin (); it != map . cend (); it ++ ) {
if ( it -> second > max ) {
maxItem = it -> first ;
max = it -> second ;
}
}
return maxItem ;
}
};
排序后直接取中点的元素 如果将数组 nums 中的所有元素按照单调递增或单调递减的顺序排序,那么下标为 n/2 的元素(下标从 0 开始)一定是众数。
class Solution {
public:
int majorityElement ( vector < int >& nums ) {
int n = nums . size ();
sort ( nums . begin (), nums . end ());
return nums [ n / 2 ];
}
};
轮转数组 轮转数组
给定一个整数数组 nums,将数组中的元素向右轮转 k 个位置,其中 k 是非负数。

示例 1:
输入: nums = [1,2,3,4,5,6,7], k = 3
输出: [5,6,7,1,2,3,4]
解释:
向右轮转 1 步: [7,1,2,3,4,5,6]
向右轮转 2 步: [6,7,1,2,3,4,5]
向右轮转 3 步: [5,6,7,1,2,3,4]

示例 2:
输入:nums = [-1,-100,3,99], k = 2
输出:[3,99,-1,-100]
解释:
向右轮转 1 步: [99,-1,-100,3]
向右轮转 2 步: [3,99,-1,-100]

提示:
1 <= nums.length <= 105
-231 <= nums[i] <= 231 - 1
0 <= k <= 105
思路1 使用额外的数组直接承接 因为k有可能是大于n的,即有可能轮换一整轮还要多。所以原数组中,每个的元素位置为 k + i % n 取余。
class Solution {
public:
void rotate ( vector < int >& nums , int k ) {
int n = nums . size ();
vector < int > temp ( n );
for ( int i = 0 ; i < n ; i ++ ) {
temp [( k + i ) % n ] = nums [ i ];
}
nums = temp ;
}
};
思路2 上一个方案的变体 直接拼接nums两遍,找到轮转后的起始位置,从这里取值,取n次填到原数组中去。
class Solution {
public:
void rotate ( vector < int >& nums , int k ) {
int n = nums . size (); // 获取数组的长度
// 创建一个临时数组 temp,并将原数组 nums 的内容拷贝进去
vector < int > temp = nums ;
// 关键步骤:将原数组 nums 再次拼接到 temp 后面
// 这样就可以通过选取合适的起始位置,来得到旋转后的数组
temp . insert ( temp . end (), nums . begin (), nums . end ());
// 计算旋转的起始位置:
// 我们想把原数组向右旋转 k 个位置。
// 为了便于计算,我们令 start = n - k % n
// 注意:k 可能大于 n,所以要取模:k % n
int start = n - k % n ;
// 这 n 个连续元素,就是原数组旋转 k 次后的正确顺序
for ( int i = 0 ; i < n ; i ++ ) {
nums [ i ] = temp [ start + i ];
}
}
};
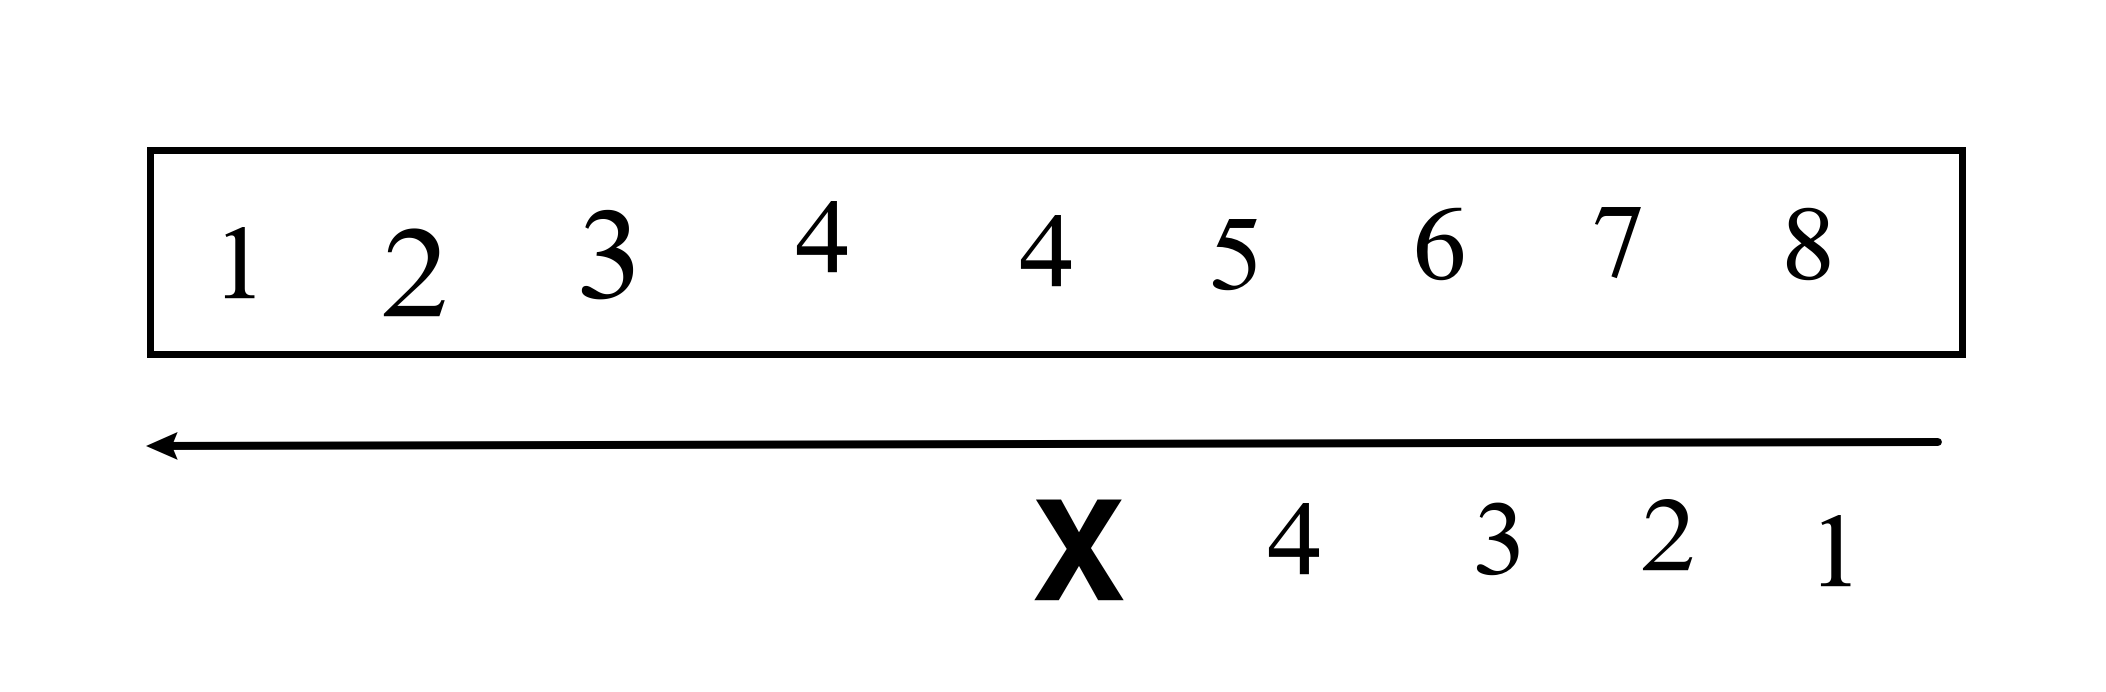
思路3 三次反转 流程如下表:
操作 结果 原始数组 1 2 3 4 5 6 7 翻转所有元素 7 6 5 4 3 2 1 翻转 [0,kmodn−1] 区间的元素 5 6 7 4 3 2 1 翻转 [kmodn,n−1] 区间的元素 5 6 7 1 2 3 4
class Solution {
public:
void reverse ( vector < int >& nums , int left , int right ) {
while ( left < right ) {
swap ( nums [ left ], nums [ right ]);
left ++ ;
right -- ;
}
}
void rotate ( vector < int >& nums , int k ) {
int n = nums . size ();
k %= n ;
reverse ( nums . begin (), nums . end ());
reverse ( nums . begin (), nums . begin () + k );
reverse ( nums . begin () + k , nums . end ());
}
};
字符串轮转 要求同上,将数组改为字符串:
class Solution {
public:
void rotate ( string & str , int k ) {
int n = str . size ();
string temp = str + str ;
int start = n - k % n ;
str = temp . substr ( start , n );
}
};
字符串的方法比数组简单,直接使用加号拼接,使用 substr 来取范围。
买卖股票的最佳时机 买卖股票的最佳时机
给定一个数组 prices ,它的第 i 个元素 prices[i] 表示一支给定股票第 i 天的价格。

你只能选择 某一天 买入这只股票,并选择在 未来的某一个不同的日子 卖出该股票。设计一个算法来计算你所能获取的最大利润。

返回你可以从这笔交易中获取的最大利润。如果你不能获取任何利润,返回 0 。


示例 1:

输入:[7,1,5,3,6,4]
输出:5
解释:在第 2 天(股票价格 = 1)的时候买入,在第 5 天(股票价格 = 6)的时候卖出,最大利润 = 6-1 = 5 。
     注意利润不能是 7-1 = 6, 因为卖出价格需要大于买入价格;同时,你不能在买入前卖出股票。
示例 2:

输入:prices = [7,6,4,3,1]
输出:0
解释:在这种情况下, 没有交易完成, 所以最大利润为 0。


提示:

1 <= prices.length <= 105
0 <= prices[i] <= 104
思路1 一次遍历 从左往右,碰到最小的就更新 min 值,代表买入时机。碰到差值最大的就更新 maxProfit 值,代表所能赚取的最大利润。
class Solution {
public:
int maxProfit ( vector < int >& prices ) {
int min = 10000 ;
int maxProfit = 0 ;
int n = prices . size ();
for ( int i = 0 ; i < n ; i ++ ) {
if ( prices [ i ] < min ) {
min = prices [ i ];
} else if ( prices [ i ] - min > maxProfit ) {
maxProfit = prices [ i ] - min ;
}
}
return maxProfit ;
}
};
买卖股票的最佳时机 II 买卖股票的最佳时机 II
给你一个整数数组 prices ,其中 prices[i] 表示某支股票第 i 天的价格。

在每一天,你可以决定是否购买和/或出售股票。你在任何时候 最多 只能持有 一股 股票。然而,你可以在 同一天 多次买卖该股票,但要确保你持有的股票不超过一股。

返回 你能获得的 最大 利润 。

示例 1:
输入:prices = [7,1,5,3,6,4]
输出:7
解释:在第 2 天(股票价格 = 1)的时候买入,在第 3 天(股票价格 = 5)的时候卖出, 这笔交易所能获得利润 = 5 - 1 = 4。
随后,在第 4 天(股票价格 = 3)的时候买入,在第 5 天(股票价格 = 6)的时候卖出, 这笔交易所能获得利润 = 6 - 3 = 3。
最大总利润为 4 + 3 = 7 。

示例 2:
输入:prices = [1,2,3,4,5]
输出:4
解释:在第 1 天(股票价格 = 1)的时候买入,在第 5 天 (股票价格 = 5)的时候卖出, 这笔交易所能获得利润 = 5 - 1 = 4。
最大总利润为 4 。

示例 3:
输入:prices = [7,6,4,3,1]
输出:0
解释:在这种情况下, 交易无法获得正利润,所以不参与交易可以获得最大利润,最大利润为 0。

提示:
1 <= prices.length <= 3 * 104
0 <= prices[i] <= 104
思路1 一次遍历 从左往右,碰到比前一天价格高的,就计算利润并加入到总利润中。即拥有所有收益,避开所有亏损, 这个计算方式和最优的买入卖出操作效果等价 。
class Solution {
public:
int maxProfit ( vector < int >& prices ) {
int maxProfit = 0 ;
int n = prices . size ();
for ( int i = 1 ; i < n ; i ++ ) {
if ( prices [ i ] > prices [ i - 1 ]) {
maxProfit += prices [ i ] - prices [ i - 1 ];
}
}
return maxProfit ;
}
};
跳跃游戏 跳跃游戏
给你一个非负整数数组 nums ,你最初位于数组的 第一个下标 。数组中的每个元素代表你在该位置可以跳跃的最大长度。

判断你是否能够到达最后一个下标,如果可以,返回 true ;否则,返回 false 。

示例 1:
输入:nums = [2,3,1,1,4]
输出:true
解释:可以先跳 1 步,从下标 0 到达下标 1, 然后再从下标 1 跳 3 步到达最后一个下标。

示例 2:
输入:nums = [3,2,1,0,4]
输出:false
解释:无论怎样,总会到达下标为 3 的位置。但该下标的最大跳跃长度是 0 , 所以永远不可能到达最后一个下标。

提示:
1 <= nums.length <= 104
0 <= nums[i] <= 105
思路1 贪心 根据题目的描述,只要存在一个位置 x,它本身可以到达,并且它跳跃的最大长度为 x+nums[x],这个值大于等于 y,即 x+nums[x]≥y,那么位置 y 也可以到达。
满足可达的条件之后,不断更新 x+nums[x] 这个最远可达的位置,最终这个值越过或者可以到达最后一个下标即为成功,否则失败。
class Solution {
public:
bool canJump ( vector < int >& nums ) {
int n = nums . size ();
int rightmost = 0 ;
for ( int i = 0 ; i < n ; ++ i ) {
// 判断当前位置 i 是否可达
if ( i <= rightmost ) {
// 更新最远可达位置
rightmost = max ( rightmost , i + nums [ i ]);
// 如果最远可达位置大于等于最后一个下标,返回 true
if ( rightmost >= n - 1 ) {
return true ;
}
}
}
// 如果遍历完成,最远可达位置还不到最后一个下标,返回 false
return false ;
}
};
跳跃游戏 II 跳跃游戏 II
给定一个长度为 n 的 0 索引整数数组 nums。初始位置在下标 0。

每个元素 nums[i] 表示从索引 i 向后跳转的最大长度。换句话说,如果你在索引 i 处,你可以跳转到任意 (i + j) 处:

0 <= j <= nums[i] 且 i + j < n

返回到达 n - 1 的最小跳跃次数。测试用例保证可以到达 n - 1。

示例 1:
输入: nums = [2,3,1,1,4]
输出: 2
解释: 跳到最后一个位置的最小跳跃数是 2。
     从下标为 0 跳到下标为 1 的位置,跳 1 步,然后跳 3 步到达数组的最后一个位置。

示例 2:
输入: nums = [2,3,0,1,4]
输出: 2

提示:
1 <= nums.length <= 104
0 <= nums[i] <= 1000
题目保证可以到达 n - 1
思路1 贪心 正向查找 每次到达某个位置时,计算可达位置之后可以跳跃的最远距离,记录下这个最远距离,当到达这个最远距离时,跳跃次数加一。 不管内部选取哪一个点作为下一个起跳点,经过这个最远边界时,一定只需要增加跳跃一次 。
在遍历数组时,我们不访问最后一个元素,这是因为在访问最后一个元素之前,我们的边界一定大于等于最后一个位置,否则就无法跳到最后一个位置了。如果访问最后一个元素,在边界正好为最后一个位置的情况下,我们会增加一次「不必要的跳跃次数」,因此我们不必访问最后一个元素。
class Solution {
public:
int jump ( vector < int >& nums ) {
int maxPos = 0 , n = nums . size (), end = 0 , step = 0 ;
for ( int i = 0 ; i < n - 1 ; i ++ ) {
if ( i <= maxPos ) {
maxPos = max ( maxPos , i + nums [ i ]);
if ( end == i ) {
end = maxPos ;
step ++ ;
}
}
}
return step ;
}
};
H指数 H指数
给你一个整数数组 citations ,其中 citations[i] 表示研究者的第 i 篇论文被引用的次数。计算并返回该研究者的 h 指数。

根据维基百科上 h 指数的定义:h 代表“高引用次数” ,一名科研人员的 h 指数 是指他(她)至少发表了 h 篇论文,并且 至少 有 h 篇论文被引用次数大于等于 h 。如果 h 有多种可能的值,h 指数 是其中最大的那个。

示例 1:
输入:citations = [3,0,6,1,5]
输出:3
解释:给定数组表示研究者总共有 5 篇论文,每篇论文相应的被引用了 3, 0, 6, 1, 5 次。
     由于研究者有 3 篇论文每篇 至少 被引用了 3 次,其余两篇论文每篇被引用 不多于 3 次,所以她的 h 指数是 3。

示例 2:
输入:citations = [1,3,1]
输出:1


提示:
n == citations.length
1 <= n <= 5000
0 <= citations[i] <= 1000
思路1 两遍遍历 按照题目描述的计算规则写逻辑即可,O(n^2) 的时间复杂度。
class Solution {
public:
int hIndex ( vector < int >& citations ) {
int n = citations . size (), hIndex = 0 ;
for ( int i = 0 ; i < n ; i ++ ) {
int count = 0 ;
for ( int j = 0 ; j < n ; j ++ ) {
if ( citations [ i ] <= citations [ j ] && citations [ i ] > count ) {
count ++ ;
}
}
hIndex = max ( hIndex , count );
}
return hIndex ;
}
};
排序后逆序遍历 根据 H 指数的定义,如果当前 H 指数为 h 并且在遍历过程中找到当前值 citations[i]>h,则说明我们找到了一篇被引用了至少 h+1 次的论文,所以将现有的 h 值加 1。继续遍历直到 h 无法继续增大。最后返回 h 作为最终答案。
class Solution {
public:
int hIndex ( vector < int >& citations ) {
int hIndex = 0 , i = citations . size () - 1 ;
sort ( citations . begin (), citations . end ());
while ( i >= 0 && citations [ i ] > hIndex ) {
hIndex ++ ;
i -- ;
}
return hIndex ;
}
};
O(1) 时间插入、删除和获取随机元素 O(1) 时间插入、删除和获取随机元素
实现RandomizedSet 类:

RandomizedSet() 初始化 RandomizedSet 对象
bool insert(int val) 当元素 val 不存在时,向集合中插入该项,并返回 true ;否则,返回 false 。
bool remove(int val) 当元素 val 存在时,从集合中移除该项,并返回 true ;否则,返回 false 。
int getRandom() 随机返回现有集合中的一项(测试用例保证调用此方法时集合中至少存在一个元素)。每个元素应该有 相同的概率 被返回。
你必须实现类的所有函数,并满足每个函数的 平均 时间复杂度为 O(1) 。

示例:
输入
["RandomizedSet", "insert", "remove", "insert", "getRandom", "remove", "insert", "getRandom"]
[[], [1], [2], [2], [], [1], [2], []]
输出
[null, true, false, true, 2, true, false, 2]

解释
RandomizedSet randomizedSet = new RandomizedSet();
randomizedSet.insert(1); // 向集合中插入 1 。返回 true 表示 1 被成功地插入。
randomizedSet.remove(2); // 返回 false ,表示集合中不存在 2 。
randomizedSet.insert(2); // 向集合中插入 2 。返回 true 。集合现在包含 [1,2] 。
randomizedSet.getRandom(); // getRandom 应随机返回 1 或 2 。
randomizedSet.remove(1); // 从集合中移除 1 ,返回 true 。集合现在包含 [2] 。
randomizedSet.insert(2); // 2 已在集合中,所以返回 false 。
randomizedSet.getRandom(); // 由于 2 是集合中唯一的数字,getRandom 总是返回 2 。

提示:
-231 <= val <= 231 - 1
最多调用 insert、remove 和 getRandom 函数 2 * 105 次
在调用 getRandom 方法时,数据结构中 至少存在一个 元素。
思路1 哈希表 + 数组 要求实现 O(1) 时间的插入、删除和获取随机元素操作。已知哈希表的搜索元素复杂度是 O(1) ,即插入删除很快,但是无下标,无法完成随机获取元素。而动态数组可以根据下标随机获取元素,但是插入和删除,搜索元素的复杂度是O(n),可以将二者结合起来,数组用来实际的存储元素,哈希表来记录下标和元素值。
class RandomizedSet {
public:
RandomizedSet () {
srand (( unsigned ) time ( NULL ));
}
bool insert ( int val ) {
if ( indices . count ( val )) {
return false ;
}
int index = nums . size ();
nums . emplace_back ( val );
indices [ val ] = index ;
return true ;
}
bool remove ( int val ) {
if ( ! indices . count ( val )) {
return false ;
}
int index = indices [ val ];
int last = nums . back ();
nums [ index ] = last ;
indices [ last ] = index ;
nums . pop_back ();
indices . erase ( val );
return true ;
}
int getRandom () {
// 测试用例保证调用此方法时集合中至少存在一个元素
int randomIndex = rand () % nums . size ();
return nums [ randomIndex ];
}
private:
vector < int > nums ;
unordered_map < int , int > indices ;
};
srand((unsigned)time(NULL)); 根据程序运行时间,生成随机数种子。rand() 函数根据这个种子生成随机数。如果不设置种子,rand() 函数会根据一个默认的种子生成随机数,这会导致每次运行程序时生成的随机数序列相同。
插入操作时,首先判断 val 是否在哈希表中,如果已经存在则返回 false,如果不存在则插入 val,操作如下:如果 val 不在哈希表中,将 val 插入变长数组的末尾; 在添加 val 之前的变长数组长度为 val 所在下标 index,将 val 和下标 index 存入哈希表; 返回 true。 删除操作时,首先判断 val 是否在哈希表中,如果不存在则返回 false,如果存在则删除 val,操作如下:从哈希表中获得 val 的下标 index; 将变长数组的最后一个元素 last 移动到下标 index 处,在哈希表中将 last 的下标更新为 index; 在变长数组中删除最后一个元素,在哈希表中删除 val; 返回 true。 删除操作的重点在于将变长数组的最后一个元素移动到待删除元素的下标处,然后删除变长数组的最后一个元素。该操作的时间复杂度是 O(1),且可以保证在删除操作之后变长数组中的所有元素的下标都连续,方便插入操作和获取随机元素操作。
获取随机元素操作时,由于变长数组中的所有元素的下标都连续,因此随机选取一个下标,返回变长数组中该下标处的元素。 除自身以外数组的乘积 除自身以外数组的乘积
给你一个整数数组 nums,返回 数组 answer ,其中 answer[i] 等于 nums 中除 nums[i] 之外其余各元素的乘积 。

题目数据 保证 数组 nums之中任意元素的全部前缀元素和后缀的乘积都在  32 位 整数范围内。

请 不要使用除法,且在 O(n) 时间复杂度内完成此题。

示例 1:
输入: nums = [1,2,3,4]
输出: [24,12,8,6]

示例 2:
输入: nums = [-1,1,0,-3,3]
输出: [0,0,9,0,0]

提示:
2 <= nums.length <= 105
-30 <= nums[i] <= 30
输入 保证 数组 answer[i] 在  32 位 整数范围内

进阶:你可以在 O(1) 的额外空间复杂度内完成这个题目吗?( 出于对空间复杂度分析的目的,输出数组 不被视为 额外空间。)
思路1 左右乘积列表 我们不必将所有数字的乘积除以给定索引处的数字得到相应的答案,而是利用索引左侧所有数字的乘积和右侧所有数字的乘积(即前缀与后缀)相乘得到答案。
对于给定索引 i,我们将使用它左边所有数字的乘积乘以右边所有数字的乘积。下面让我们更加具体的描述这个算法。
算法步骤:
初始化两个空数组 L 和 R。对于给定索引 i,L[i] 代表的是 i 左侧所有数字的乘积,R[i] 代表的是 i 右侧所有数字的乘积。 我们需要用两个循环来填充 L 和 R 数组的值。
对于数组 L,L[0] 应该是 1,因为第一个元素的左边没有元素。对于其他元素:L[i] = L[i-1] * nums[i-1]。 同理,对于数组 R,R[length-1] 应为 1。length 指的是输入数组的大小。其他元素:R[i] = R[i+1] * nums[i+1]。 当 R 和 L 数组填充完成,我们只需要在输入数组上迭代,且索引 i 处的值为:L[i] * R[i]。
class Solution {
public:
vector < int > productExceptSelf ( vector < int >& nums ) {
int n = nums . size ();
vector < int > multiNums ( n );
vector < int > left ( n , 0 );
vector < int > right ( n , 0 );
left [ 0 ] = 1 ;
for ( int i = 1 ; i < n ; i ++ ) {
// 此元素左侧所有乘积,为上一个left的总乘积,再乘以它左边的这个元素
left [ i ] = left [ i - 1 ] * nums [ i - 1 ];
}
right [ n - 1 ] = 1 ;
for ( int j = n - 2 ; j >= 0 ; j -- ) {
// 元素右边乘积,为之前的总乘积数值,再乘以其右边元素
right [ j ] = right [ j + 1 ] * nums [ j + 1 ];
}
for ( int i = 0 ; i < n ; i ++ ) {
multiNums [ i ] = left [ i ] * right [ i ];
}
return multiNums ;
}
};
加油站 加油站
在一条环路上有 n 个加油站,其中第 i 个加油站有汽油 gas[i] 升。

你有一辆油箱容量无限的的汽车,从第 i 个加油站开往第 i+1 个加油站需要消耗汽油 cost[i] 升。你从其中的一个加油站出发,开始时油箱为空。

给定两个整数数组 gas 和 cost ,如果你可以按顺序绕环路行驶一周,则返回出发时加油站的编号,否则返回 -1 。如果存在解,则 保证 它是 唯一 的。

示例 1:
输入: gas = [1,2,3,4,5], cost = [3,4,5,1,2]
输出: 3
解释:
从 3 号加油站(索引为 3 处)出发,可获得 4 升汽油。此时油箱有 = 0 + 4 = 4 升汽油
开往 4 号加油站,此时油箱有 4 - 1 + 5 = 8 升汽油
开往 0 号加油站,此时油箱有 8 - 2 + 1 = 7 升汽油
开往 1 号加油站,此时油箱有 7 - 3 + 2 = 6 升汽油
开往 2 号加油站,此时油箱有 6 - 4 + 3 = 5 升汽油
开往 3 号加油站,你需要消耗 5 升汽油,正好足够你返回到 3 号加油站。
因此,3 可为起始索引。

示例 2:
输入: gas = [2,3,4], cost = [3,4,3]
输出: -1
解释:
你不能从 0 号或 1 号加油站出发,因为没有足够的汽油可以让你行驶到下一个加油站。
我们从 2 号加油站出发,可以获得 4 升汽油。 此时油箱有 = 0 + 4 = 4 升汽油
开往 0 号加油站,此时油箱有 4 - 3 + 2 = 3 升汽油
开往 1 号加油站,此时油箱有 3 - 3 + 3 = 3 升汽油
你无法返回 2 号加油站,因为返程需要消耗 4 升汽油,但是你的油箱只有 3 升汽油。
因此,无论怎样,你都不可能绕环路行驶一周。

提示:
n == gas.length == cost.length
1 <= n <= 105
0 <= gas[i], cost[i] <= 104
输入保证答案唯一。
思路1 嵌套循环(时间超限制) 构建了两个临时列表,gasExt和costExt,分别是gas和cost的扩展列表,长度为2n。方便从不同索引位置开始走一轮。
每到一个站点,都计算一次剩余油量,小于0就说明从这个站点出发不能走完全程,尝试下一个站点。如果剩余油量大于等于0,说明走完一轮了。
class Solution {
public:
int canCompleteCircuit ( vector < int >& gas , vector < int >& cost ) {
int n = gas . size ();
vector < int > gasExt = {};
gasExt . insert ( gasExt . end (), gas . begin (), gas . end ());
gasExt . insert ( gasExt . end (), gas . begin (), gas . end ());
vector < int > costExt = {};
costExt . insert ( costExt . end (), cost . begin (), cost . end ());
costExt . insert ( costExt . end (), cost . begin (), cost . end ());
for ( int i = 0 ; i < n ; i ++ ) {
int gasRemain = 0 ;
// 尝试从位置0出发,计算本轮的耗油量
for ( int j = i ; j < n + i ; j ++ ) {
gasRemain = gasRemain + gasExt [ j ] - costExt [ j ];
// 中途不够了,开始下一轮
if ( gasRemain < 0 ) {
break ;
}
}
if ( gasRemain < 0 ) {
continue ;
}
// 油量足够,返回这个索引
if ( gasRemain >= 0 ) {
return i ;
}
}
return - 1 ;
}
};
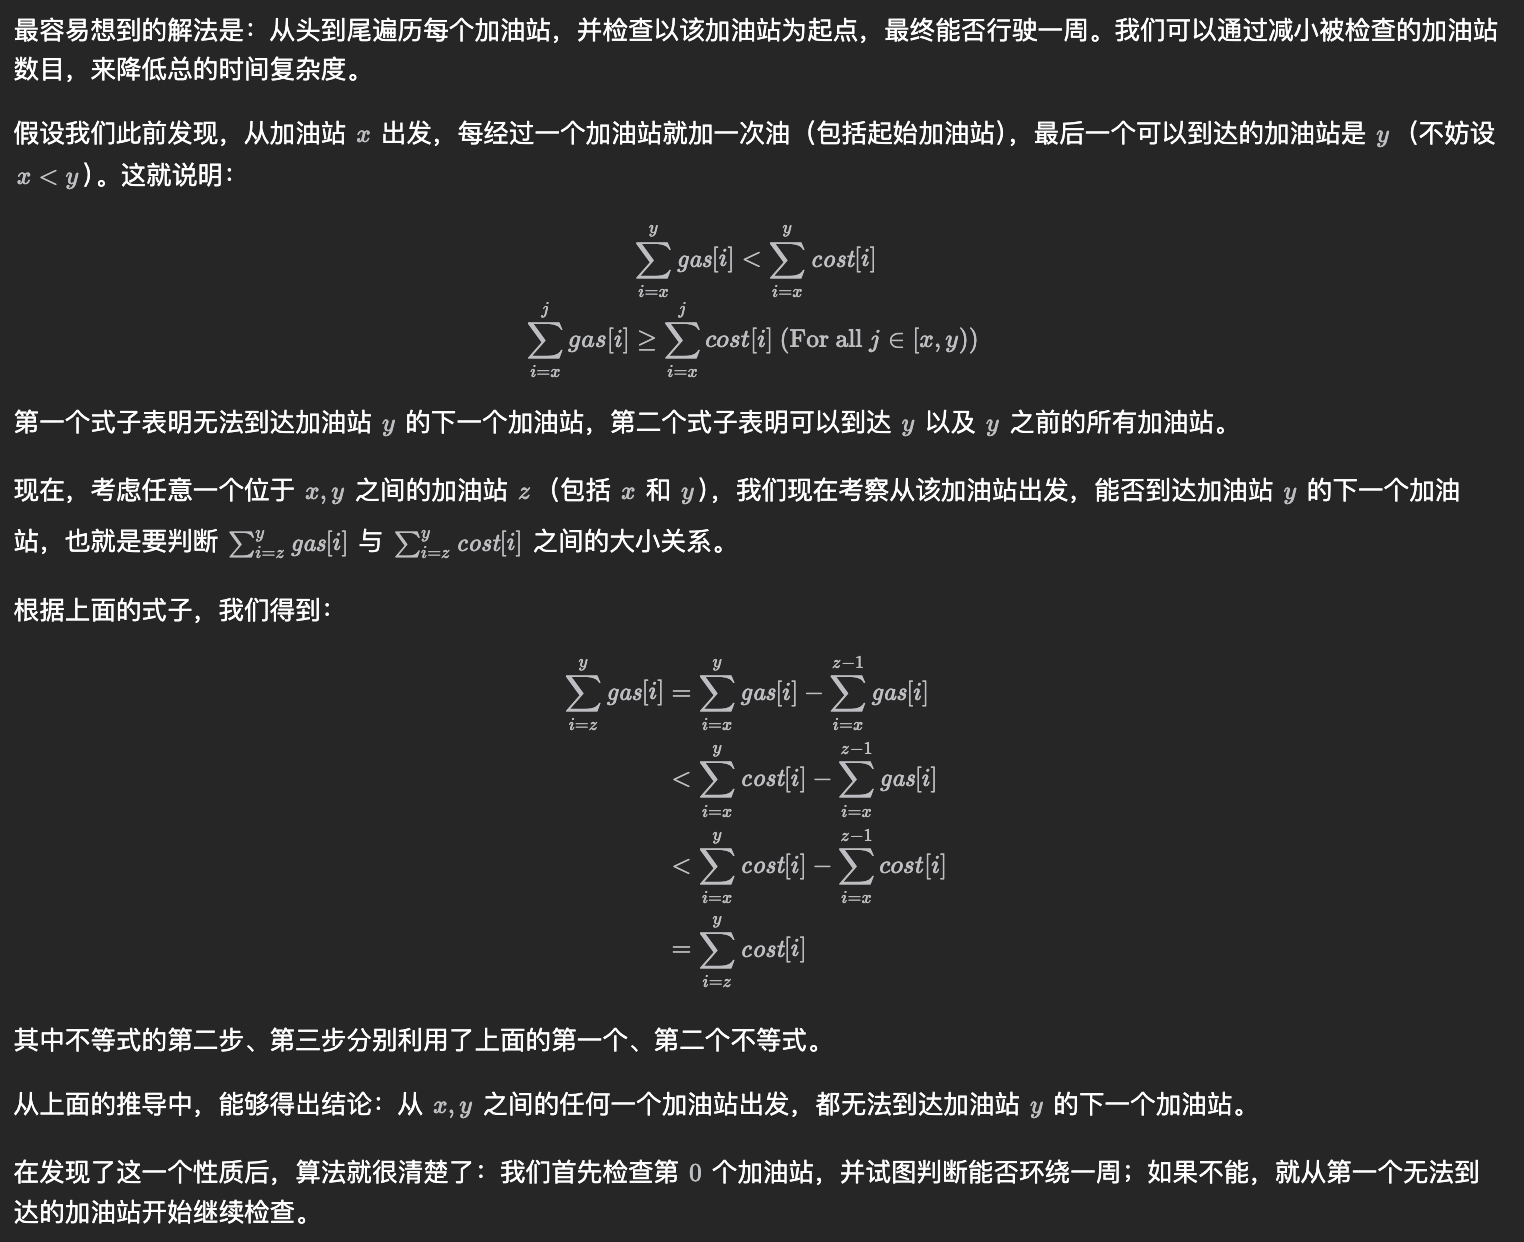
官方 贪心算法 待理解疏通:
class Solution {
public:
int canCompleteCircuit ( vector < int >& gas , vector < int >& cost ) {
int n = gas . size ();
int i = 0 ;
while ( i < n ) {
int sumOfGas = 0 , sumOfCost = 0 ;
int cnt = 0 ;
while ( cnt < n ) {
int j = ( i + cnt ) % n ;
sumOfGas += gas [ j ];
sumOfCost += cost [ j ];
if ( sumOfCost > sumOfGas ) {
break ;
}
cnt ++ ;
}
if ( cnt == n ) {
return i ;
} else {
i = i + cnt + 1 ;
}
}
return - 1 ;
}
};
分发糖果 分发糖果
n 个孩子站成一排。给你一个整数数组 ratings 表示每个孩子的评分。

你需要按照以下要求,给这些孩子分发糖果:

每个孩子至少分配到 1 个糖果。
相邻两个孩子中,评分更高的那个会获得更多的糖果。
请你给每个孩子分发糖果,计算并返回需要准备的 最少糖果数目 。

示例 1:
输入:ratings = [1,0,2]
输出:5
解释:你可以分别给第一个、第二个、第三个孩子分发 2、1、2 颗糖果。

示例 2:
输入:ratings = [1,2,2]
输出:4
解释:你可以分别给第一个、第二个、第三个孩子分发 1、2、1 颗糖果。
     第三个孩子只得到 1 颗糖果,这满足题面中的两个条件。

提示:
n == ratings.length
1 <= n <= 2 * 104
0 <= ratings[i] <= 2 * 104
左右各遍历一次取最大值 为了满足上述两个条件,一个常用且高效的解法是: 分别 从左到右 和 从右到左 遍历两次,确保两边相邻的约束都满足,然后取两边较大的那个值作为每个孩子最终的糖果数。
class Solution {
public:
int candy ( vector < int >& ratings ) {
int n = ratings . size (); // 获取孩子数量
// 初始化一个数组left,用于存储每个孩子从左到右比较时应该得到的糖果数
vector < int > left ( n );
// 第一个孩子至少给1颗糖果
left [ 0 ] = 1 ;
// 从左到右遍历,处理递增序列
for ( int i = 1 ; i < n ; i ++ ) {
if ( ratings [ i ] > ratings [ i - 1 ]) {
// 如果当前孩子评分比左边高,则糖果数比左边多1
left [ i ] = left [ i - 1 ] + 1 ;
} else {
// 否则,当前孩子至少给1颗糖果
left [ i ] = 1 ;
}
}
// right变量记录从右到左遍历时当前孩子应得的糖果数
int right = 1 ;
// 初始总数为最后一个孩子的较大值(left和right的初始值)
// 做从右往左遍历过程中,把左侧的结果考虑进去,一起算出总结果
int count = max ( right , left [ n - 1 ]);
// 从右到左遍历,处理递减序列
for ( int i = n - 2 ; i >= 0 ; i -- ) {
if ( ratings [ i ] > ratings [ i + 1 ]) {
// 如果当前孩子评分比右边高,则糖果数比右边多1
right = right + 1 ;
} else {
// 否则,当前孩子至少给1颗糖果
right = 1 ;
}
// 对于每个孩子,取左右两个方向计算值的较大者,保证同时满足两个条件
count += max ( right , left [ i ]);
}
return count ; // 返回总糖果数
}
};
接雨水 接雨水
给定 n 个非负整数表示每个宽度为 1 的柱子的高度图,计算按此排列的柱子,下雨之后能接多少雨水。
示例 1:
输入:height = [0,1,0,2,1,0,1,3,2,1,2,1]
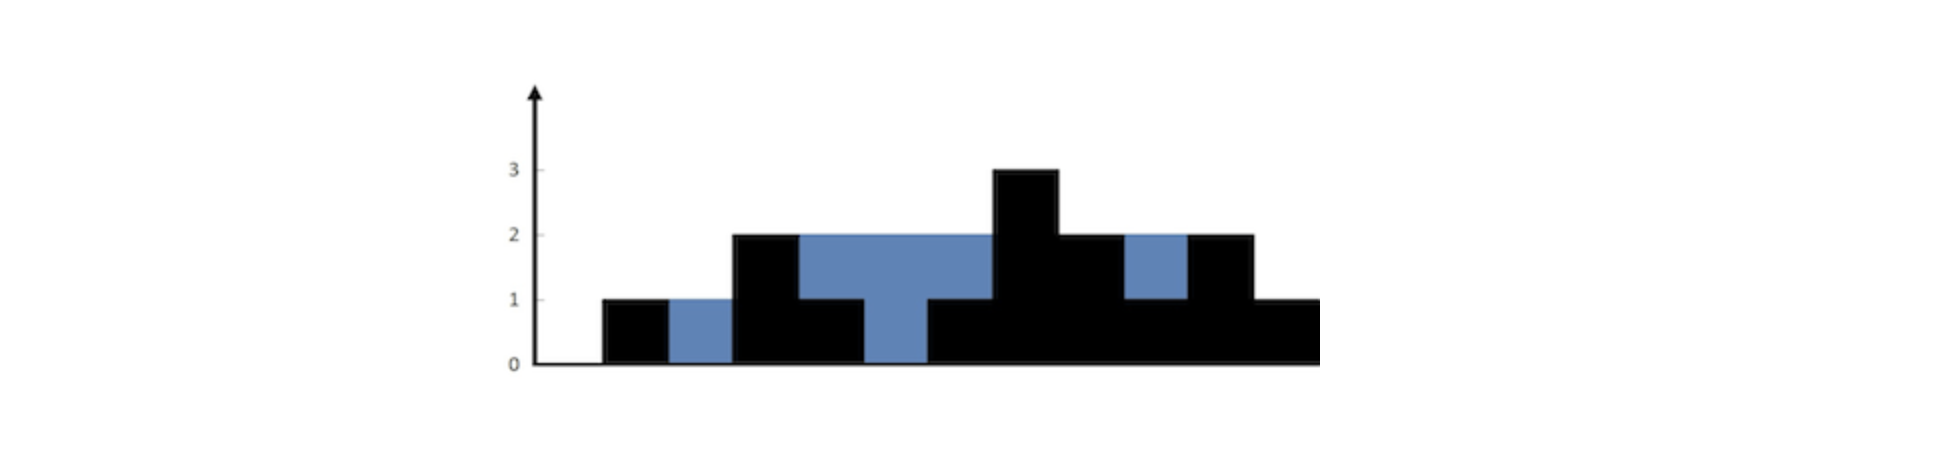
输出:6
解释:上面是由数组 [0,1,0,2,1,0,1,3,2,1,2,1] 表示的高度图,在这种情况下,可以接 6 个单位的雨水(蓝色部分表示雨水)。
示例 2:
输入:height = [4,2,0,3,2,5]
输出:9
提示:
n == height.length
1 <= n <= 2 * 104
0 <= height[i] <= 105
实例1配图:
思路1 动态规划 对于下标 i,下雨后水能到达的最大高度等于下标 i 两边的最大高度的最小值,下标 i 处能接的雨水量等于下标 i 处的水能到达的最大高度减去 height[i]。
不能遍历到每一个下标处都遍历一次左右元素找最高值,这样时间复杂度就是O(n^2)了。可以利用 除自身以外数组的乘积 这题的思想,遍历多次,动态维护两个列表。
创建两个长度为 n 的数组 leftMax 和 rightMax 。对于 0≤i<n ,leftMax[i] 表示下标 i 及其左边的位置中,height 的最大高度,rightMax[i] 表示下标 i 及其右边的位置中,height 的最大高度。
显然,leftMax[0]=height[0],rightMax[n−1]=height[n−1] 。两个数组的其余元素的计算如下:
当 1≤i≤n−1 时,leftMax[i]=max(leftMax[i−1],height[i]);
当 0≤i≤n−2 时,rightMax[i]=max(rightMax[i+1],height[i])。
因此可以正向遍历数组 height 得到数组 leftMax 的每个元素值,反向遍历数组 height 得到数组 rightMax 的每个元素值。
在得到数组 leftMax 和 rightMax 的每个元素值之后,对于 0≤i<n ,下标 i 处能接的雨水量等于 min(leftMax[i],rightMax[i])−height[i]。遍历每个下标位置即可得到能接的雨水总量。
class Solution {
public:
int trap ( vector < int >& height ) {
int n = height . size ();
int count = 0 ;
vector < int > leftMax ( n );
vector < int > rightMax ( n );
// 初始化leftMax数组,从左到右遍历,记录每个位置左边的最大高度
int leftMaxTemp = height [ 0 ];
for ( int i = 0 ; i < n ; i ++ ) {
leftMaxTemp = max ( leftMaxTemp , height [ i ]);
leftMax [ i ] = leftMaxTemp ;
}
// 初始化rightMax数组,从右到左遍历,记录每个位置右边的最大高度
int rightMaxTemp = height [ n - 1 ];
for ( int i = n - 1 ; i >= 0 ; i -- ) {
rightMaxTemp = max ( rightMaxTemp , height [ i ]);
rightMax [ i ] = rightMaxTemp ;
}
// 计算每个位置的接水量,累加得到总接水量
for ( int i = 0 ; i < n ; i ++ ) {
int currentRain = min ( rightMax [ i ], leftMax [ i ]) - height [ i ];
if ( currentRain < 0 ) {
currentRain = 0 ;
}
count += currentRain ;
}
return count ;
}
};
小结 对于这种需要看 元素自身和其他所有元素的相对关系 的算法题,可以参考这两题的解法,还有分发糖果题目也是如此,左右各遍历一遍,取最大或者最小值,作为最终的正确结果。
罗马数字转整数 罗马数字转整数
罗马数字包含以下七种字符: I, V, X, L,C,D 和 M。

字符          数值
I             1
V             5
X             10
L             50
C             100
D             500
M             1000
例如, 罗马数字 2 写做 II ,即为两个并列的 1 。12 写做 XII ,即为 X + II 。 27 写做  XXVII, 即为 XX + V + II 。

通常情况下,罗马数字中小的数字在大的数字的右边。但也存在特例,例如 4 不写做 IIII,而是 IV。数字 1 在数字 5 的左边,所表示的数等于大数 5 减小数 1 得到的数值 4 。同样地,数字 9 表示为 IX。这个特殊的规则只适用于以下六种情况:

I 可以放在 V (5) 和 X (10) 的左边,来表示 4 和 9。
X 可以放在 L (50) 和 C (100) 的左边,来表示 40 和 90。
C 可以放在 D (500) 和 M (1000) 的左边,来表示 400 和 900。
给定一个罗马数字,将其转换成整数。

示例 1:
输入: s = "III"
输出: 3

示例 2:
输入: s = "IV"
输出: 4

示例 3:
输入: s = "IX"
输出: 9

示例 4:
输入: s = "LVIII"
输出: 58
解释: L = 50, V= 5, III = 3.

示例 5:
输入: s = "MCMXCIV"
输出: 1994
解释: M = 1000, CM = 900, XC = 90, IV = 4.

提示:
1 <= s.length <= 15
s 仅含字符 ('I', 'V', 'X', 'L', 'C', 'D', 'M')
题目数据保证 s 是一个有效的罗马数字,且表示整数在范围 [1, 3999] 内
题目所给测试用例皆符合罗马数字书写规则,不会出现跨位等情况。
IL 和 IM 这样的例子并不符合题目要求,49 应该写作 XLIX,999 应该写作 CMXCIX 。
关于罗马数字的详尽书写规则,可以参考 罗马数字 - 百度百科。
思路1 模拟 通常情况下,罗马数字中小的数字在大的数字的右边。若输入的字符串满足该情况,那么可以将每个字符视作一个单独的值,累加每个字符对应的数值即可。
例如 XXVII 可视作 X+X+V+I+I=10+10+5+1+1=27。
即一般都是大数在左边,小数在右边,所以可以直接累加每个字符对应的数值,若一个数字右侧的数字比它大,则将该数字的符号取反。
例如 XIV 可视作 X−I+V=10−1+5=14。
class Solution {
private:
unordered_map < char , int > numMap = {
{ 'I' , 1 }, { 'V' , 5 }, { 'X' , 10 }, { 'L' , 50 },
{ 'C' , 100 }, { 'D' , 500 }, { 'M' , 1000 },
};
public:
int romanToInt ( string s ) {
int n = s . size ();
int num = 0 ;
int count = 0 ;
for ( int i = 0 ; i < n - 1 ; i ++ ) {
if ( numMap [ s [ i ]] < numMap [ s [ i + 1 ]]) {
count -= numMap [ s [ i ]];
} else {
count += numMap [ s [ i ]];
}
}
count += numMap [ s [ n - 1 ]];
return count ;
}
};
整数转罗马数字 整数转罗马数字
七个不同的符号代表罗马数字,其值如下:

符号	值
I	1
V	5
X	10
L	50
C	100
D	500
M	1000
罗马数字是通过添加从最高到最低的小数位值的转换而形成的。将小数位值转换为罗马数字有以下规则:

如果该值不是以 4 或 9 开头,请选择可以从输入中减去的最大值的符号,将该符号附加到结果,减去其值,然后将其余部分转换为罗马数字。
如果该值以 4 或 9 开头,使用 减法形式,表示从以下符号中减去一个符号,例如 4 是 5 (V) 减 1 (I): IV ,9 是 10 (X) 减 1 (I):IX。仅使用以下减法形式:4 (IV),9 (IX),40 (XL),90 (XC),400 (CD) 和 900 (CM)。
只有 10 的次方(I, X, C, M)最多可以连续附加 3 次以代表 10 的倍数。你不能多次附加 5 (V),50 (L) 或 500 (D)。如果需要将符号附加4次,请使用 减法形式。
给定一个整数,将其转换为罗马数字。

示例 1:
输入:num = 3749
输出: "MMMDCCXLIX"
解释:
3000 = MMM 由于 1000 (M) + 1000 (M) + 1000 (M)
 700 = DCC 由于 500 (D) + 100 (C) + 100 (C)
  40 = XL 由于 50 (L) 减 10 (X)
   9 = IX 由于 10 (X) 减 1 (I)
注意:49 不是 50 (L) 减 1 (I) 因为转换是基于小数位

示例 2:
输入:num = 58
输出:"LVIII"
解释:
50 = L
 8 = VIII

示例 3:
输入:num = 1994
输出:"MCMXCIV"
解释:
1000 = M
 900 = CM
  90 = XC
   4 = IV

提示:
1 <= num <= 3999
思路1 遍历搜索法 维护四个map,对应从个位到千位上0-9的罗马数字。解析出每个位上的数字,根据罗马数字的规则,将其转换为罗马数字。
const string thousands [] = { "" , "M" , "MM" , "MMM" };
const string hundreds [] = { "" , "C" , "CC" , "CCC" , "CD" ,
"D" , "DC" , "DCC" , "DCCC" , "CM" };
const string tens [] = { "" , "X" , "XX" , "XXX" , "XL" ,
"L" , "LX" , "LXX" , "LXXX" , "XC" };
const string ones [] = { "" , "I" , "II" , "III" , "IV" ,
"V" , "VI" , "VII" , "VIII" , "IX" };
class Solution {
public:
string intToRoman ( int num ) {
int thousand = num / 1000 ;
int hundred = num % 1000 / 100 ;
int ten = num % 100 / 10 ;
int unit = num % 10 ;
return thousands [ thousand ] + hundreds [ hundred ] +
tens [ ten ] + ones [ unit ];
}
};
最后一个单词的长度 最后一个单词的长度
给你一个字符串 s,由若干单词组成,单词前后用一些空格字符隔开。返回字符串中 最后一个 单词的长度。

单词 是指仅由字母组成、不包含任何空格字符的最大子字符串。

示例 1:
输入:s = "Hello World"
输出:5
解释:最后一个单词是“World”,长度为 5。

示例 2:
输入:s = "   fly me   to   the moon  "
输出:4
解释:最后一个单词是“moon”,长度为 4。

示例 3:
输入:s = "luffy is still joyboy"
输出:6
解释:最后一个单词是长度为 6 的“joyboy”。

提示:
1 <= s.length <= 104
s 仅有英文字母和空格 ' ' 组成
s 中至少存在一个单词
思路1 kotlin速通 使用扩展函数可以光速解题:
class Solution {
fun lengthOfLastWord ( s : String ) = s . split ( " " ). filter { it . isNotEmpty ()}. last (). length
}
思路2 使用两个标记位记录位置 从后往前倒序遍历 ,记录下第一个有效非空字符和第一个有效字符之前的空格位置 ,计算二者差值即为长度;处理一下字符串一开始就是有效字符的边界情况。
class Solution {
public:
int lengthOfLastWord ( string s ) {
int n = s . size ();
int lastNotEmpty = - 1 ;
int lastSpaceBeforeString = - 1 ;
int size = 0 ;
for ( int i = n - 1 ; i >= 0 ; i -- ) {
if ( s [ i ] != ' ' && lastNotEmpty == - 1 ) {
lastNotEmpty = i ;
}
if ( s [ i ] == ' ' && lastNotEmpty != - 1 ) {
lastSpaceBeforeString = i ;
size = lastNotEmpty - lastSpaceBeforeString ;
break ;
}
// 处理开头就是有效位的情况
if ( i == 0 && lastSpaceBeforeString == - 1 ) {
size = lastNotEmpty + 1 ;
}
}
return size ;
}
};
最长公共前缀 最长公共前缀
编写一个函数来查找字符串数组中的最长公共前缀。

如果不存在公共前缀,返回空字符串 ""。

示例 1:
输入:strs = ["flower","flow","flight"]
输出:"fl"

示例 2:
输入:strs = ["dog","racecar","car"]
输出:""
解释:输入不存在公共前缀。

提示:
1 <= strs.length <= 200
0 <= strs[i].length <= 200
strs[i] 如果非空,则仅由小写英文字母组成
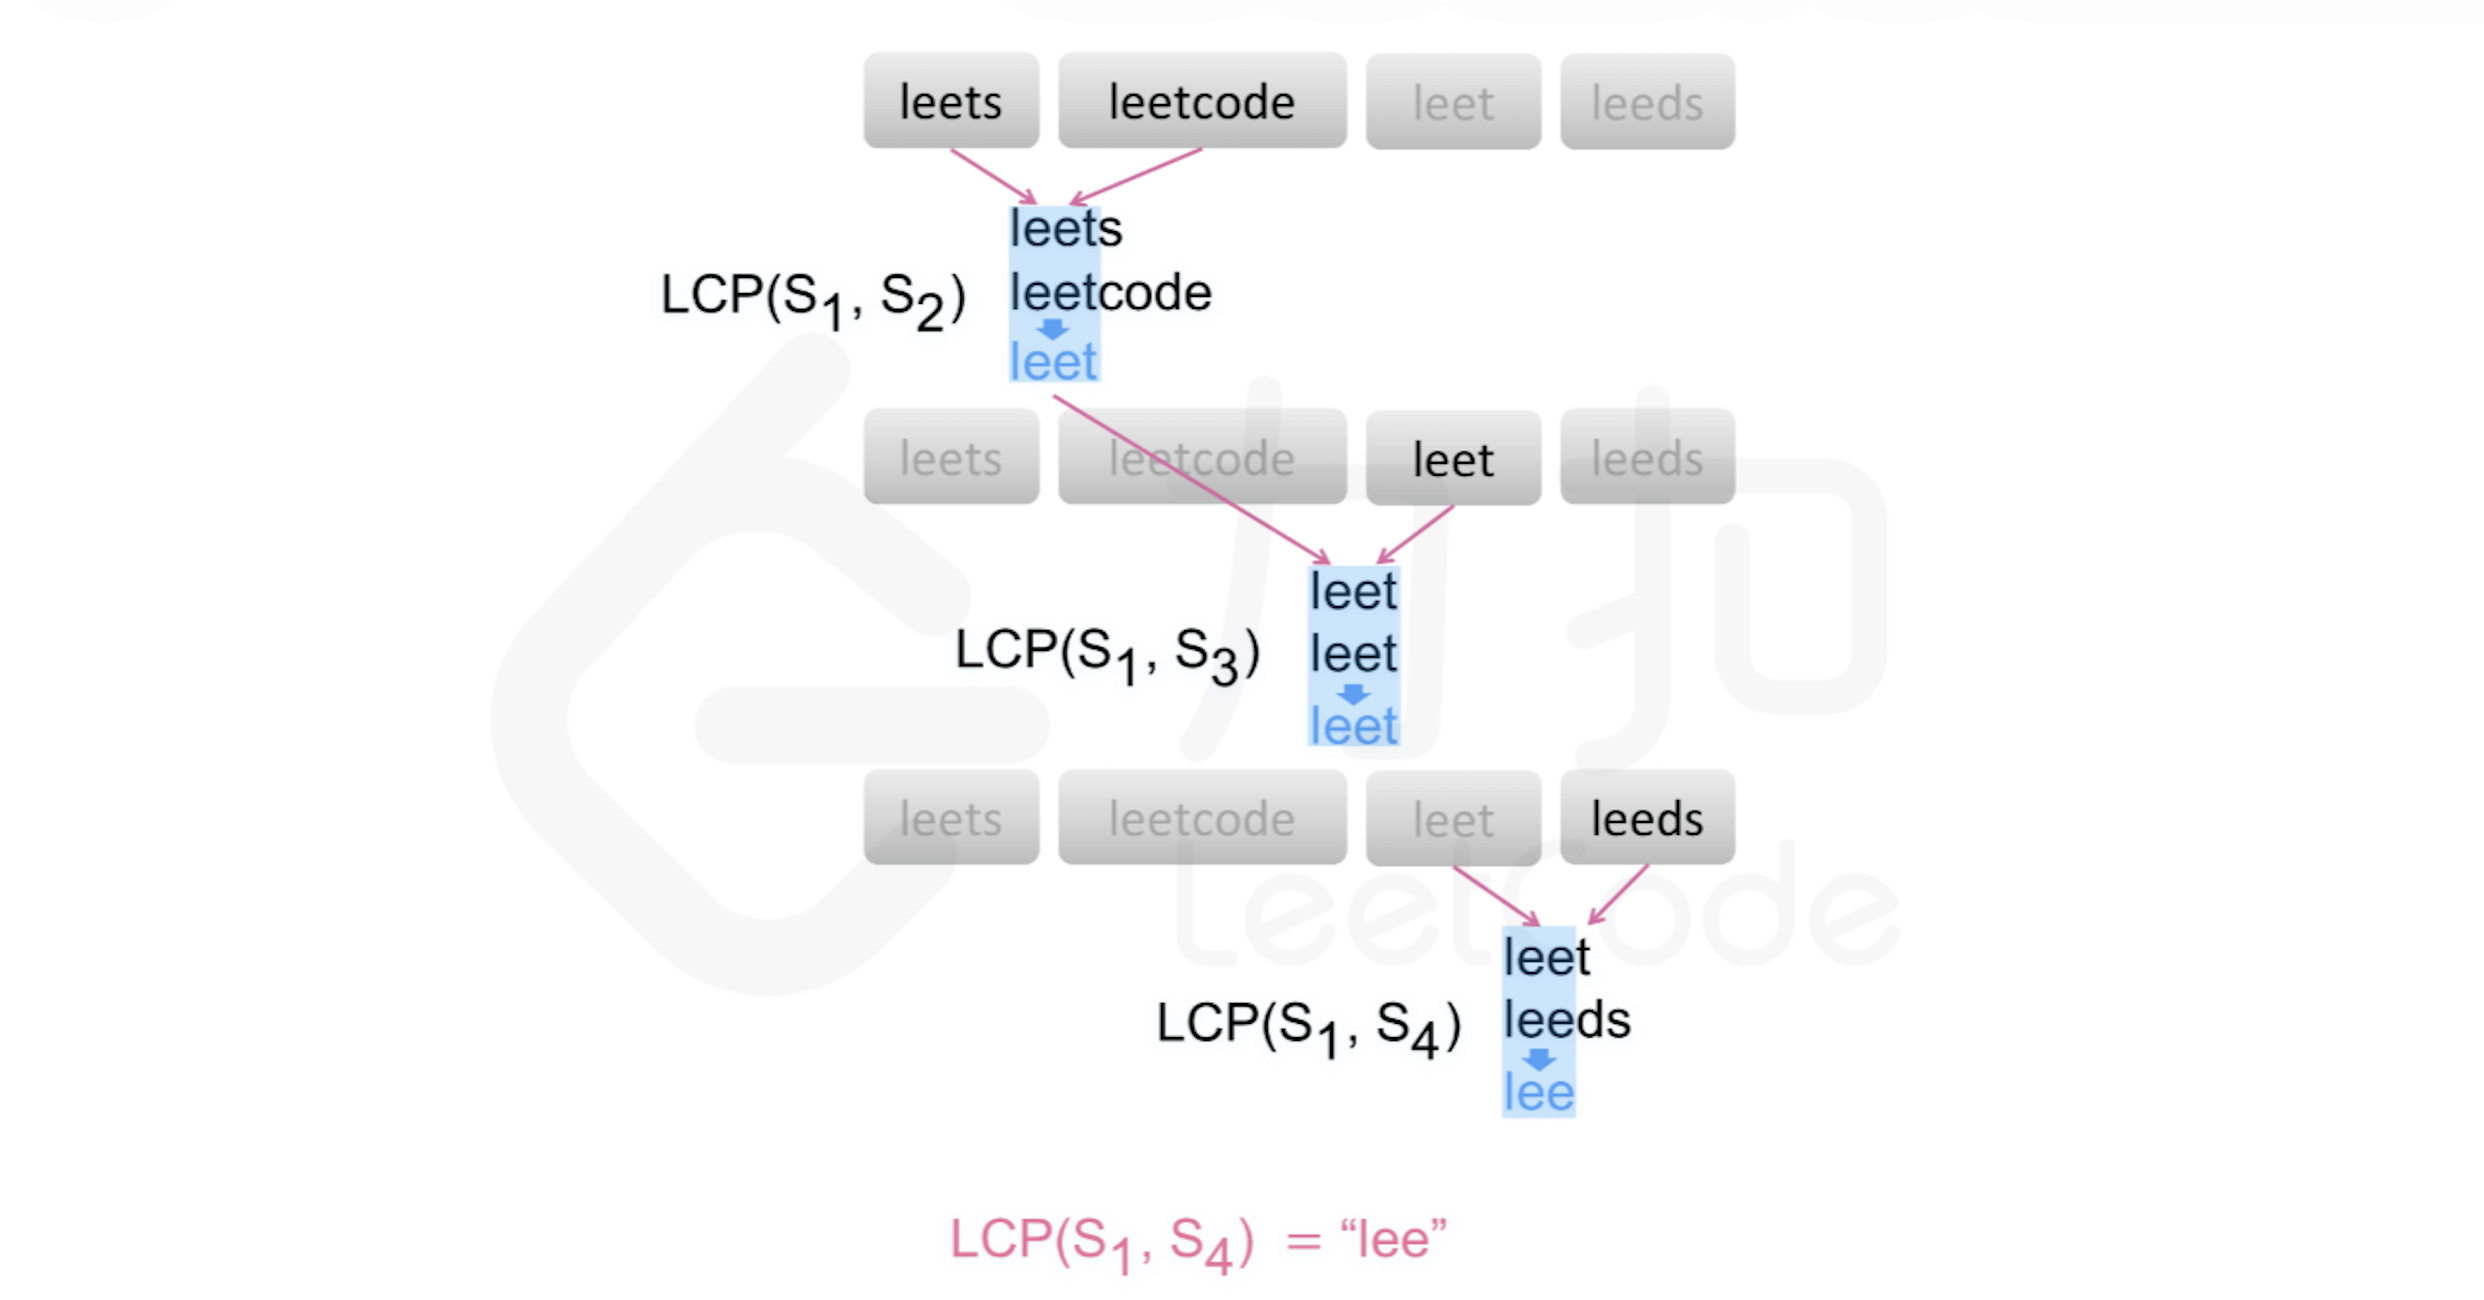
思路1 水平扫描 从前往后遍历字符串数组中的每个字符串,对于每个遍历到的字符串,更新最长公共前缀,当遍历完所有的字符串以后,即可得到字符串数组中的最长公共前缀。
如果在尚未遍历完所有的字符串时,最长公共前缀已经是空串,则最长公共前缀一定是空串,因此不需要继续遍历剩下的字符串,直接返回空串即可。
class Solution {
public:
string longestCommonPrefix ( vector < string >& strs ) {
int n = strs . size ();
if ( n == 0 ) {
return "" ;
}
string longestPrefix = strs [ 0 ];
for ( int i = 1 ; i < n ; i ++ ) {
string commonPrefix = commonPrefixBetweenPair ( longestPrefix , strs [ i ]);
longestPrefix = commonPrefix ;
if ( longestPrefix == "" ) {
break ;
}
}
return longestPrefix ;
}
string commonPrefixBetweenPair ( string & s1 , string & s2 ) {
int n = min ( s1 . size (), s2 . size ());
int index = 0 ;
while ( index <= n && s1 [ index ] == s2 [ index ]) {
index ++ ;
}
return s1 . substr ( 0 , index );
}
};
151. 反转字符串中的单词 反转字符串中的单词
给你一个字符串 s ,请你反转字符串中 单词 的顺序。

单词 是由非空格字符组成的字符串。s 中使用至少一个空格将字符串中的 单词 分隔开。

返回 单词 顺序颠倒且 单词 之间用单个空格连接的结果字符串。

注意:输入字符串 s中可能会存在前导空格、尾随空格或者单词间的多个空格。返回的结果字符串中,单词间应当仅用单个空格分隔,且不包含任何额外的空格。

示例 1:
输入:s = "the sky is blue"
输出:"blue is sky the"

示例 2:
输入:s = "  hello world  "
输出:"world hello"
解释:反转后的字符串中不能存在前导空格和尾随空格。

示例 3:
输入:s = "a good   example"
输出:"example good a"
解释:如果两个单词间有多余的空格,反转后的字符串需要将单词间的空格减少到仅有一个。

提示:
1 <= s.length <= 104
s 包含英文大小写字母、数字和空格 ' '
s 中 至少存在一个 单词

进阶:如果字符串在你使用的编程语言中是一种可变数据类型,请尝试使用 O(1) 额外空间复杂度的 原地 解法。
kotlin 速通 先分割倒序,再插入空格拼接。
class Solution {
fun reverseWords ( s : String )= s . split ( " " ). filter { it . isNotEmpty ()}. reversed (). joinToString ( " " );
}
joinToString 用于将集合中的元素连接成一个字符串,返回一个新的字符串。可以指定连接符、前缀、后缀等。
思路1 拆出每一个单词填入一个新的数组,最后倒序遍历拼接 首先去除字符串首尾的空格,然后从前往后遍历字符串,找到每个单词的起始位置和结束位置,将每个单词填入一个新的数组,最后倒序遍历数组拼接单词即可。
class Solution {
public:
string reverseWords ( string s ) {
int n = s . size ();
vector < string > validateWords ( n );
int left = 0 ;
int right = n - 1 ;
string result = "" ;
// 去掉字符串开头的空白字符
while ( left <= right && s [ left ] == ' ' )
++ left ;
// 去掉字符串末尾的空白字符
while ( left <= right && s [ right ] == ' ' )
-- right ;
string word = "" ;
int count = 0 ;
// left指向第一个有效单次起始位置,right指向最后一个单词末尾位置
while ( left <= right ) {
char c = s [ left ];
if ( c != ' ' ) {
word += c ;
} else if ( word . size () > 0 && c == ' ' ) {
validateWords [ count ] = word ;
word = "" ;
count ++ ;
}
left ++ ;
}
validateWords [ count ] = word ;
count ++ ;
for ( int i = count - 1 ; i >= 0 ; i -- ) {
result += validateWords [ i ];
if ( i != 0 ) {
result += " " ;
}
}
return result ;
}
};
将存放单词的 vector 换成 stack 实现,可以不用维护 count 这个标记:
class Solution {
public:
string reverseWords ( string s ) {
int n = s . size ();
stack < string > validateWords ;
int left = 0 ;
int right = n - 1 ;
string result = "" ;
// 去掉字符串开头的空白字符
while ( left <= right && s [ left ] == ' ' )
++ left ;
// 去掉字符串末尾的空白字符
while ( left <= right && s [ right ] == ' ' )
-- right ;
string word = "" ;
// left指向第一个有效单次起始位置,right指向最后一个单词末尾位置
while ( left <= right ) {
char c = s [ left ];
if ( c != ' ' ) {
word += c ;
} else if ( word . size () > 0 && c == ' ' ) {
validateWords . push ( word );
word = "" ;
}
left ++ ;
}
validateWords . push ( word );
while ( ! validateWords . empty ()) {
result += validateWords . top ();
validateWords . pop ();
if ( ! validateWords . empty ()) {
result += " " ;
}
}
return result ;
}
};
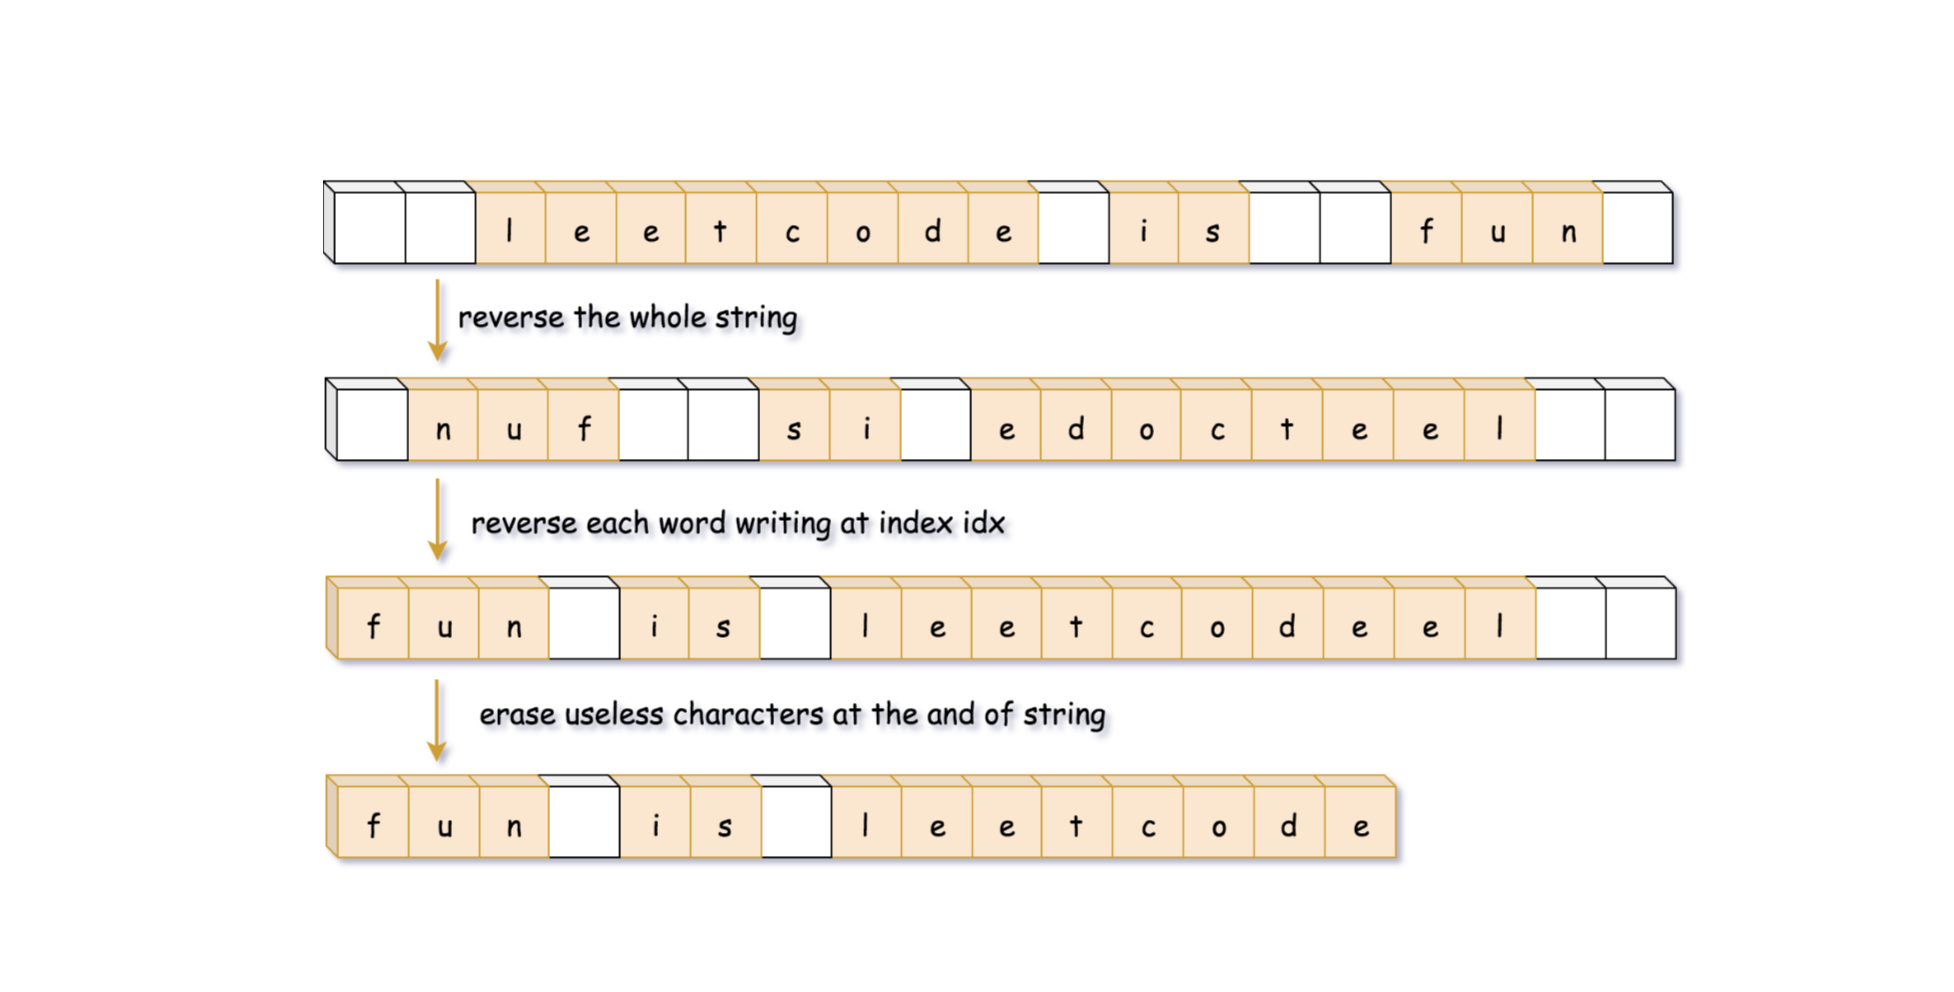
思路2 直接操作原字符串 操作原字符串,先将整个字符串反转,然后在遍历的过程中,消减空格,将遇到的每个单词反转,最后去除末尾多余的空格。
class Solution {
public:
string reverseWords ( string s ) {
// 反转整个字符串
reverse ( s . begin (), s . end ());
int n = s . size ();
int idx = 0 ;
for ( int start = 0 ; start < n ; ++ start ) {
if ( s [ start ] != ' ' ) {
// 填一个空白字符然后将idx移动到下一个单词的开头位置
if ( idx != 0 ) s [ idx ++ ] = ' ' ;
// 循环遍历至单词的末尾
int end = start ;
while ( end < n && s [ end ] != ' ' ) s [ idx ++ ] = s [ end ++ ];
// 反转整个单词
reverse ( s . begin () + idx - ( end - start ), s . begin () + idx );
// 更新start,去找下一个单词
start = end ;
}
}
s . erase ( s . begin () + idx , s . end ());
return s ;
}
};
Z 字形变换 Z 字形变换
将一个给定字符串 s 根据给定的行数 numRows ,以从上往下、从左到右进行 Z 字形排列。

比如输入字符串为 "PAYPALISHIRING" 行数为 3 时,排列如下:

P   A   H   N
A P L S I I G
Y   I   R
之后,你的输出需要从左往右逐行读取,产生出一个新的字符串,比如:"PAHNAPLSIIGYIR"。

请你实现这个将字符串进行指定行数变换的函数:

string convert(string s, int numRows);


示例 1:

输入:s = "PAYPALISHIRING", numRows = 3
输出:"PAHNAPLSIIGYIR"
示例 2:
输入:s = "PAYPALISHIRING", numRows = 4
输出:"PINALSIGYAHRPI"
解释:
P     I    N
A   L S  I G
Y A   H R
P     I
示例 3:

输入:s = "A", numRows = 1
输出:"A"


提示:

1 <= s.length <= 1000
s 由英文字母(小写和大写)、',' 和 '.' 组成
1 <= numRows <= 1000
官方题解 二维矩阵模拟
class Solution {
public:
string convert ( string s , int numRows ) {
int n = s . length (), r = numRows ;
if ( r == 1 || r >= n ) {
return s ;
}
int t = r * 2 - 2 ;
int c = ( n + t - 1 ) / t * ( r - 1 );
vector < string > mat ( r , string ( c , 0 ));
for ( int i = 0 , x = 0 , y = 0 ; i < n ; ++ i ) {
mat [ x ][ y ] = s [ i ];
if ( i % t < r - 1 ) {
++ x ; // 向下移动
} else {
-- x ;
++ y ; // 向右上移动
}
}
string ans ;
for ( auto & row : mat ) {
for ( char ch : row ) {
if ( ch ) {
ans += ch ;
}
}
}
return ans ;
}
};
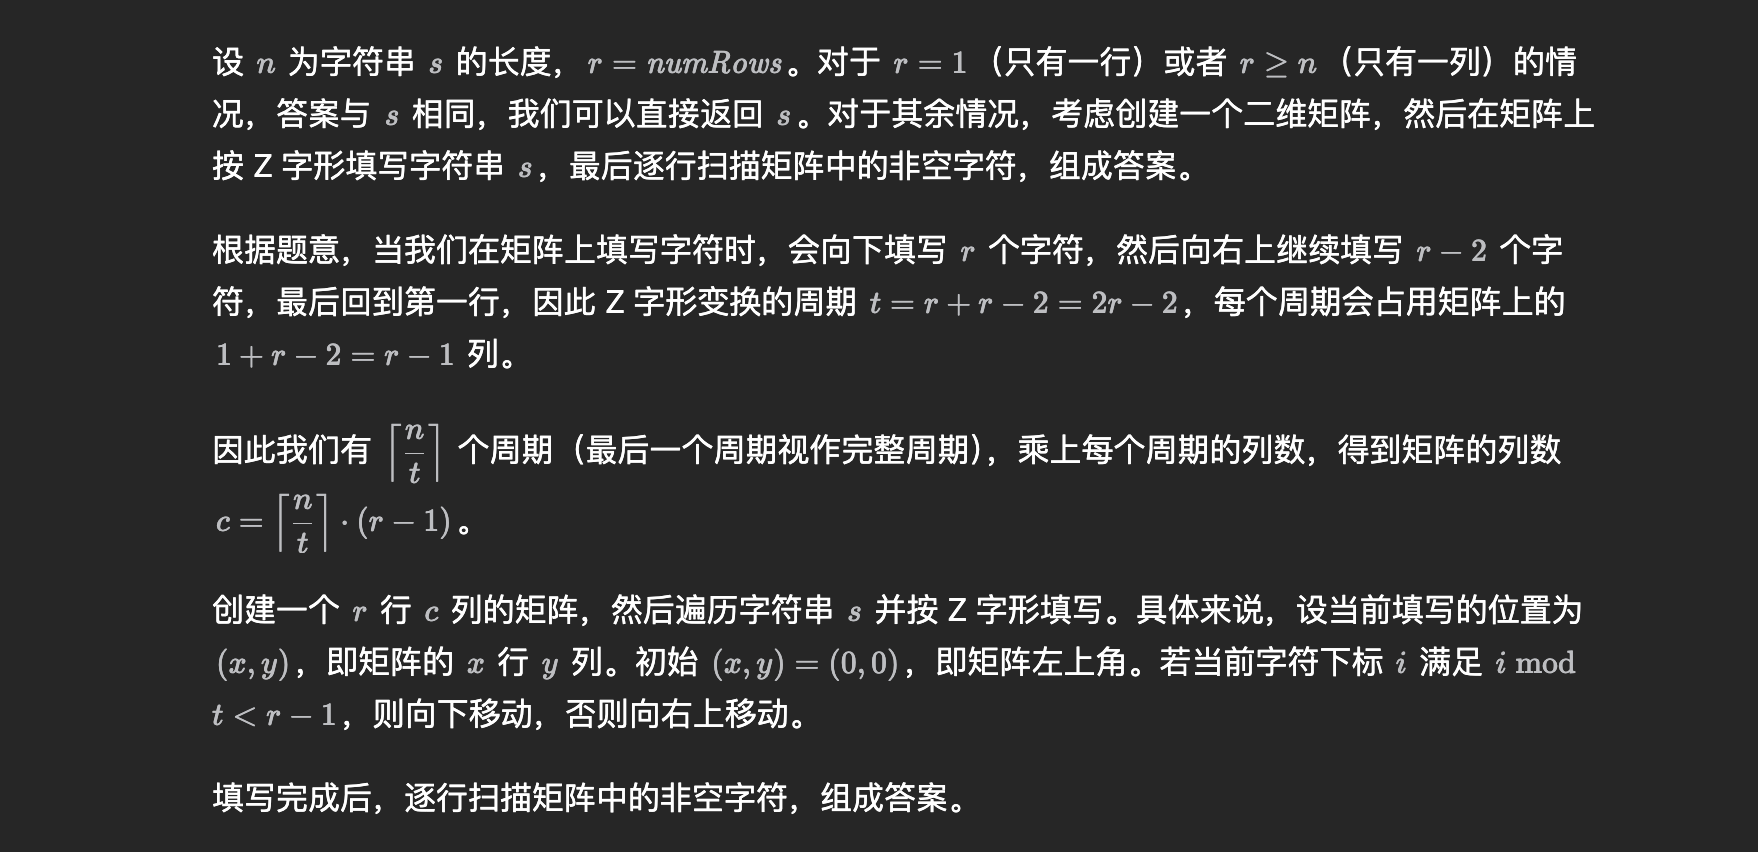
思路1 顺序填入,控制转向 不用在意元素的处于转换矩阵中的哪一列,只需要关注元素的处于转换矩阵中的哪一行。 将字符串元素按照Z形填入,就是从上往下填到最后一行 (numRows - 1) 的元素就转向,从下往上填,等填到最上面一行 (0) 了,接下来就再往下。
class Solution {
public:
string convert ( string s , int numRows ) {
int n = s . size ();
if ( numRows == 1 || n < numRows ) {
return s ;
}
// 预存矩阵,存放每一行的结果
vector < string > rows ( numRows );
// 转向标志位,触底和触顶反弹
int trunFlag = 1 ;
int index = 0 ;
for ( int i = 0 ; i < n ; i ++ ) {
rows [ index ]. push_back ( s [ i ]);
// 更新下一个元素下标
index += trunFlag ;
// 达到转向条件,变向
if ( index == numRows - 1 || index == 0 ) {
trunFlag = - trunFlag ;
}
}
string result ;
for ( auto row : rows ) {
result += row ;
}
return result ;
}
};
找出字符串的第一个匹配项下标 找出字符串的第一个匹配项下标
给你两个字符串 haystack 和 needle ,请你在 haystack 字符串中找出 needle 字符串的第一个匹配项的下标(下标从 0 开始)。如果 needle 不是 haystack 的一部分,则返回  -1 。

示例 1:
输入:haystack = "sadbutsad", needle = "sad"
输出:0
解释:"sad" 在下标 0 和 6 处匹配。
第一个匹配项的下标是 0 ,所以返回 0 。

示例 2:
输入:haystack = "leetcode", needle = "leeto"
输出:-1
解释:"leeto" 没有在 "leetcode" 中出现,所以返回 -1 。

提示:
1 <= haystack.length, needle.length <= 104
haystack 和 needle 仅由小写英文字符组成
思路1 借用找前缀那一题的思想 对 haystack 字符串进行遍历,找到第一个匹配的字符,判断以这个字符下标 i 为起始位置的子字符串是否和 needle 字符串为前缀重合的字符串。
将原问题简化为判断子字符串是否和 needle 字符串为前缀重合。
class Solution {
public:
int strStr ( string haystack , string needle ) {
int longLenth = haystack . size ();
int shortLenth = needle . size ();
// 长度判断,子串更长,直接判错
if ( longLenth < shortLenth ) {
return - 1 ;
}
for ( int i = 0 ; i < longLenth ; i ++ ) {
if ( haystack [ i ] == needle [ 0 ]) {
string cmp = haystack . substr ( i , longLenth - i );
// 找到公共前缀,返回下标
if ( findCommonPrefix ( cmp , needle )) {
return i ;
}
}
}
// 遍历完都没有找到公共前缀,返回-1
return - 1 ;
}
// 找公共前缀
bool findCommonPrefix ( string & s1 , string & s2 ) {
int n = s2 . size ();
for ( int i = 0 ; i < n ; i ++ ) {
if ( s1 [ i ] != s2 [ i ]) {
return false ;
}
}
return true ;
}
};
直接使用find函数 做完基础校验后,直接使用库函数 find 查找子字符串 needle 是否存在于 haystack 中。
class Solution {
public:
int strStr ( string haystack , string needle ) {
int longLenth = haystack . size ();
int shortLenth = needle . size ();
// 长度判断,子串更长,直接判错
if ( longLenth < shortLenth ) {
return - 1 ;
}
// 直接使用库函数
size_t pos = haystack . find ( needle );
if ( pos != string :: npos ) {
return pos ;
} else {
return - 1 ;
}
}
};
文本左右对齐 文本左右对齐
给定一个单词数组 words 和一个长度 maxWidth ,重新排版单词,使其成为每行恰好有 maxWidth 个字符,且左右两端对齐的文本。
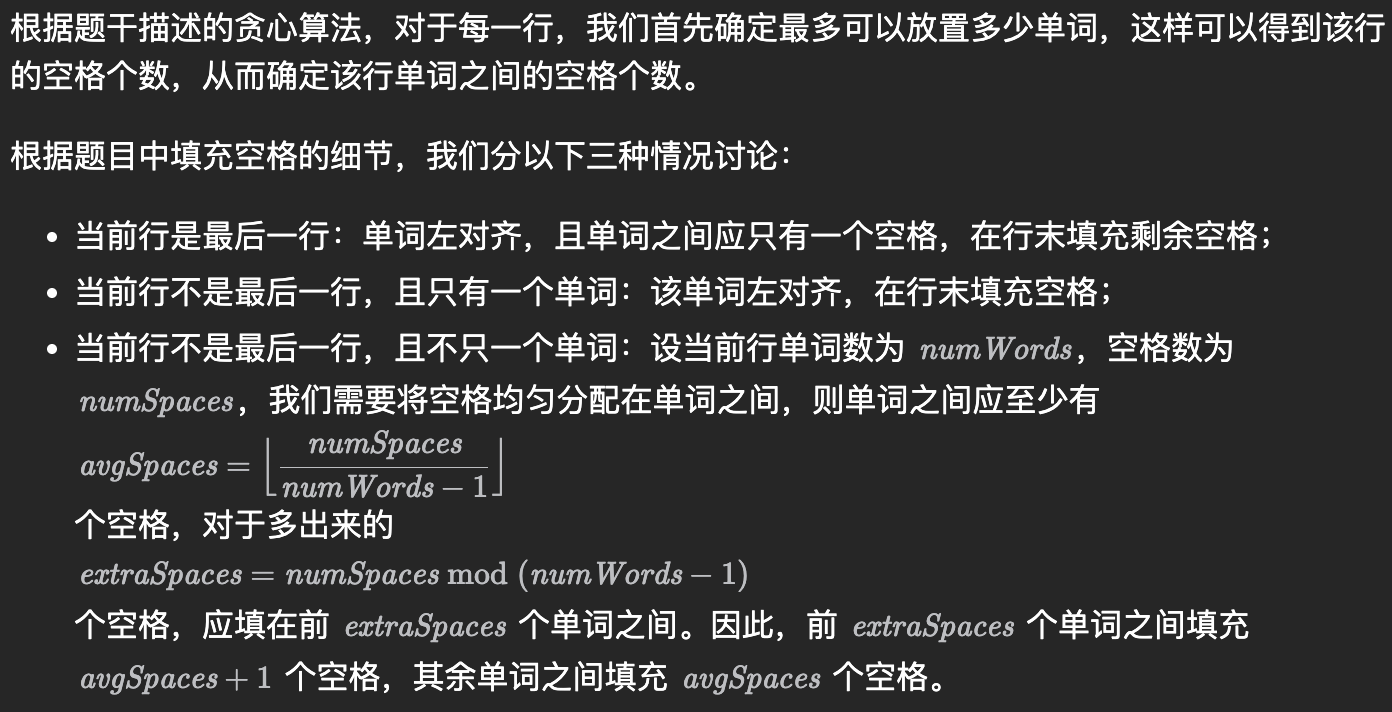
你应该使用 “贪心算法” 来放置给定的单词;也就是说,尽可能多地往每行中放置单词。必要时可用空格 ' ' 填充,使得每行恰好有 maxWidth 个字符。
要求尽可能均匀分配单词间的空格数量。如果某一行单词间的空格不能均匀分配,则左侧放置的空格数要多于右侧的空格数。
文本的最后一行应为左对齐,且单词之间不插入额外的空格。
注意:
单词是指由非空格字符组成的字符序列。
每个单词的长度大于 0,小于等于 maxWidth。
输入单词数组 words 至少包含一个单词。
示例 1:
输入: words = ["This", "is", "an", "example", "of", "text", "justification."], maxWidth = 16
输出:
[
"This is an",
"example of text",
"justification. "
]
示例 2:
输入:words = ["What","must","be","acknowledgment","shall","be"], maxWidth = 16
输出:
[
"What must be",
"acknowledgment ",
"shall be "
]
解释: 注意最后一行的格式应为 "shall be " 而不是 "shall be",
因为最后一行应为左对齐,而不是左右两端对齐。
第二行同样为左对齐,这是因为这行只包含一个单词。
示例 3:
输入:words = ["Science","is","what","we","understand","well","enough","to","explain","to","a","computer.","Art","is","everything","else","we","do"],maxWidth = 20
输出:
[
"Science is what we",
"understand well",
"enough to explain to",
"a computer. Art is",
"everything else we",
"do "
]
提示:
1 <= words.length <= 300
1 <= words[i].length <= 20
words[i] 由小写英文字母和符号组成
1 <= maxWidth <= 100
words[i].length <= maxWidth
思路1 模拟
class Solution {
// blank 返回长度为 n 的由空格组成的字符串
string blank ( int n ) {
return string ( n , ' ' );
}
// join 返回用 sep 拼接 [left, right) 范围内的 words 组成的字符串
string join ( vector < string > & words , int left , int right , string sep ) {
string s = words [ left ];
for ( int i = left + 1 ; i < right ; ++ i ) {
s += sep + words [ i ];
}
return s ;
}
public:
vector < string > fullJustify ( vector < string > & words , int maxWidth ) {
vector < string > ans ;
int right = 0 , n = words . size ();
while ( true ) {
int left = right ; // 当前行的第一个单词在 words 的位置
int sumLen = 0 ; // 统计这一行单词长度之和
// 循环确定当前行可以放多少单词,注意单词之间应至少有一个空格
while ( right < n && sumLen + words [ right ]. length () + right - left <= maxWidth ) {
sumLen += words [ right ++ ]. length ();
}
// 当前行是最后一行:单词左对齐,且单词之间应只有一个空格,在行末填充剩余空格
if ( right == n ) {
string s = join ( words , left , n , " " );
ans . emplace_back ( s + blank ( maxWidth - s . length ()));
return ans ;
}
int numWords = right - left ;
int numSpaces = maxWidth - sumLen ;
// 当前行只有一个单词:该单词左对齐,在行末填充剩余空格
if ( numWords == 1 ) {
ans . emplace_back ( words [ left ] + blank ( numSpaces ));
continue ;
}
// 当前行不只一个单词
int avgSpaces = numSpaces / ( numWords - 1 );
int extraSpaces = numSpaces % ( numWords - 1 );
string s1 = join ( words , left , left + extraSpaces + 1 , blank ( avgSpaces + 1 )); // 拼接额外加一个空格的单词
string s2 = join ( words , left + extraSpaces + 1 , right , blank ( avgSpaces )); // 拼接其余单词
ans . emplace_back ( s1 + blank ( avgSpaces ) + s2 );
}
}
};
字符串表示的数字相加 415.字符串相加
给定两个字符串形式的非负整数 num1 和num2 ,计算它们的和并同样以字符串形式返回。

你不能使用任何內建的用于处理大整数的库(比如 BigInteger), 也不能直接将输入的字符串转换为整数形式。

示例 1:
输入:num1 = "11", num2 = "123"
输出:"134"

示例 2:
输入:num1 = "456", num2 = "77"
输出:"533"

示例 3:
输入:num1 = "0", num2 = "0"
输出:"0"

提示:

1 <= num1.length, num2.length <= 104
num1 和num2 都只包含数字 0-9
num1 和num2 都不包含任何前导零
思路1 库函数 std::stoi() 函数可以将字符串转换为整数。 std::to_string() 函数可以将整数转换为字符串。
class Solution {
public:
string addStrings ( string num1 , string num2 ) {
return to_string ( stoi ( num1 ) + stoi ( num2 ));
}
};
在超出int范围会溢出。
模拟手工加法 从最低位到高位倒序遍历,对两个字符串数字的每一位进行加法运算,结果存储在一个新的字符串中。注意处理进位,超出10的进位在下一次遍历中加进去。
class Solution {
public:
string addStrings ( string num1 , string num2 ) {
int i = num1 . size () - 1 ;
int j = num2 . size () - 1 ;
int carry = 0 ;
string result = "" ;
// 从右往左逐位相加
while ( i >= 0 || j >= 0 || carry > 0 ) {
// 和字符0的ASCII值相减,得到当前位的数字int值
int digit1 = ( i >= 0 ) ? num1 [ i ] - '0' : 0 ;
int digit2 = ( j >= 0 ) ? num2 [ j ] - '0' : 0 ;
// 计算当前位的和,注意要加上上一次的进位
int sum = digit1 + digit2 + carry ;
carry = sum / 10 ; // 和大于10再进位
int current_digit = sum % 10 ; // 当前位取余数加到结果中
result . push_back ( current_digit + '0' );
i -- ;
j -- ;
}
// 反转结果字符串
reverse ( result . begin (), result . end ());
return result ;
}
};
最大子数组和 最大子数组和
给你一个整数数组 nums ,请你找出一个具有最大和的连续子数组(子数组最少包含一个元素),返回其最大和。

子数组是数组中的一个连续部分。

示例 1:
输入:nums = [-2,1,-3,4,-1,2,1,-5,4]
输出:6
解释:连续子数组 [4,-1,2,1] 的和最大,为 6 。

示例 2:
输入:nums = [1]
输出:1

示例 3:
输入:nums = [5,4,-1,7,8]
输出:23

提示:
1 <= nums.length <= 105
-104 <= nums[i] <= 104

进阶:如果你已经实现复杂度为 O(n) 的解法,尝试使用更为精妙的 分治法 求解。
思路1 动态规划 这题乍一看需要像是滑动窗口求解,但是数组无序,且不能改变元素顺序。所以无法判断滑动窗口的移动条件。
应该使用动态规划求解。
假设 nums 数组的长度是 n,下标从 0 到 n−1。
我们用 f(i) 代表以第 i 个数结尾的「连续子数组的最大和」,那么很显然我们要求的答案就是: \(\max_{0 \leq i \leq n-1} f(i)\)
因此我们只需要求出每个位置的 f(i),然后返回 f 数组中的最大值即可。 那么我们如何求 f(i) 呢? 我们可以考虑 nums[i] 单独成为一段还是加入 f(i−1) 对应的那一段,这取决于 nums[i] 和 f(i−1)+nums[i] 的大小,我们希望获得一个比较大的,于是可以写出这样的动态规划转移方程:
f(i)=max{f(i−1)+nums[i],nums[i]}
不难给出一个时间复杂度 O(n)、空间复杂度 O(n) 的实现,即用一个 f 数组来保存 f(i) 的值,用一个循环求出所有 f(i)。考虑到 f(i) 只和 f(i−1) 相关,于是我们可以只用一个变量 pre 来维护对于当前 f(i) 的 f(i−1) 的值是多少,从而让空间复杂度降低到 O(1),这有点类似 「滚动数组」 的思想。
class Solution {
public:
int maxSubArray ( vector < int >& nums ) {
int maxSum = nums [ 0 ];
int currentSum = nums [ 0 ];
for ( int i = 1 ; i < nums . size (); i ++ ) {
currentSum = max ( nums [ i ], currentSum + nums [ i ]);
maxSum = max ( maxSum , currentSum );
}
return maxSum ;
}
};
字母异位词分组 字母异位词分组
给你一个字符串数组,请你将 字母异位词 组合在一起。可以按任意顺序返回结果列表。

示例 1:
输入: strs = ["eat", "tea", "tan", "ate", "nat", "bat"]
输出: [["bat"],["nat","tan"],["ate","eat","tea"]]
解释:
在 strs 中没有字符串可以通过重新排列来形成 "bat"。
字符串 "nat" 和 "tan" 是字母异位词,因为它们可以重新排列以形成彼此。
字符串 "ate" ,"eat" 和 "tea" 是字母异位词,因为它们可以重新排列以形成彼此。

示例 2:
输入: strs = [""]
输出: [[""]]

示例 3:
输入: strs = ["a"]
输出: [["a"]]

提示:
1 <= strs.length <= 104
0 <= strs[i].length <= 100
strs[i] 仅包含小写字母
思路1 hash表对比 每个元素都是一个字符串,如果两个元素是互为异位词,这两个字符串排序之后的结果一定相同,可以将排序后的结果设为 key ,value就为一个string的动态数组,有相同的直接推送到value里面。最后取出来加入到结果数组里。
class Solution {
public:
vector < vector < string >> groupAnagrams ( vector < string >& strs ) {
int n = strs . size ();
// 最终结果
vector < vector < string >> ans ;
// 用来对比的hash表
unordered_map < string , vector < string >> mp ;
for ( string & str : strs ) {
string key = str ;
sort ( key . begin (), key . end ());
// 排序后的字符串作为key,互为异位词的元素全部加进去
mp [ key ]. emplace_back ( str );
}
// 遍历hash表,填到结果数组里
for ( auto it = mp . begin (); it != mp . end (); it ++ ) {
ans . emplace_back ( it -> second );
}
return ans ;
}
};
数组和字符串算法题总结 无论是数组还是字符串,在算法题中,它们本质上都是线性的数据结构 。字符串可以看作是一个字符数组,因此很多数组的技巧同样适用于字符串。解题的核心在于高效地遍历和操作这些线性序列 。
一、数组常见题型与解法 1. 双指针技巧 这是解决数组问题最常用、最核心的技巧之一,变化多端。
对撞指针 :两个指针从两端向中间移动。适用场景 :有序数组的二分查找。 两数之和、三数之和问题(当数组有序时)。 反转数组、判断回文。 示例 :在一个有序数组中找出两个数,使它们的和为 target。快慢指针 :两个指针以不同速度移动。适用场景 :判断链表是否有环(同样适用于数组的循环查找)。 原地删除有序数组中的重复项(LeetCode 26)。 移动零(LeetCode 283),将0移到数组末尾而不改变非零元素的相对顺序。 示例 :slow 指针指向下一个非零元素该放的位置,fast 指针遍历数组。滑动窗口 :双指针的一种特殊形式,维护一个窗口(子数组),通过移动左右指针来动态调整窗口大小。适用场景 :寻找满足条件的最长/最短子数组 或子字符串 。 求和/乘积大于/小于某值的子数组个数。 关键 :思考窗口何时扩大(右指针右移),何时收缩(左指针右移),以及如何更新结果。示例 :无重复字符的最长子串(LeetCode 3)、长度最小的子数组(LeetCode 209)。2. 前缀和 用于快速、频繁地计算子数组的区间和 。
核心思想 :预处理一个 prefix 数组,其中 prefix[i] 表示 nums[0] 到 nums[i-1] 的和(或 nums[0] 到 nums[i],看定义)。适用场景 :求任意区间 [i, j] 的和,公式为 prefix[j+1] - prefix[i]。 统计满足“子数组和为k”的子数组个数(常配合哈希表使用,记录前缀和出现的次数)。 示例 :和为 K 的子数组(LeetCode 560)。3. 模拟与数学 这类问题更考验对题意的理解和代码实现能力。
适用场景 :矩阵/二维数组的螺旋遍历(LeetCode 54)。 数组的旋转(LeetCode 189),常用多次反转的技巧。 下一个排列(LeetCode 31)。 寻找主元素(出现次数超过一半的元素,摩尔投票法)。 4. 哈希表 利用 std::unordered_map 或 std::unordered_set 实现 O(1) 时间复杂度的查找,是“空间换时间”的典范。
适用场景 :两数之和(LeetCode 1)的经典解法。 判断数组中是否存在重复元素。 与前缀和结合,解决“子数组和为k”的问题。 统计元素频率。 二、字符串常见题型与解法 字符串的很多技巧与数组相通,但也有其特殊性(如反转、子串匹配等)。
1. 双指针 适用场景 :判断回文串。 反转字符串(LeetCode 344)。 字符串压缩。 2. 滑动窗口 适用场景 :字符串的经典问题 :无重复字符的最长子串(LeetCode 3)。找到字符串中所有字母异位词(LeetCode 438)。 最小覆盖子串(LeetCode 76)。 3. 字符串匹配 - KMP 算法 用于解决子串查找 问题。
核心思想 :当匹配失败时,利用已匹配的信息(next数组/前缀表)跳过不必要的比较,将指针回退到合理的位置。适用场景 :判断一个字符串是否是另一个字符串的子串。 重复的子字符串问题(LeetCode 459)。 4. 字符串操作与模拟 适用场景 :字符串转换整数 (atoi)(LeetCode 8)。 验证IP地址(LeetCode 468)。 字符串解码(LeetCode 394),常用栈来解决。 翻转字符串里的单词(LeetCode 151),综合运用反转和双指针。 5. 哈希表与计数 适用场景 :有效的字母异位词(LeetCode 242)。 找到所有字母异位词的起始索引(可与滑动窗口结合)。 第一个只出现一次的字符。 三、通用解题思路与技巧 排序是利器 :很多复杂问题在排序后会变得简单(例如,双指针解决多数和问题)。但要注意排序是否会改变原始索引。空间换时间 :毫不犹豫地使用哈希表、辅助数组等来存储中间结果,这是优化时间复杂度的常用手段。边界条件 :数组/字符串为空、只有一个元素、所有元素相同等特殊情况一定要考虑。STL 的熟练运用 :vector: 动态数组,最常用。string: 提供了 find, substr 等方法,但要注意效率。unordered_map / unordered_set: 高效的哈希容器。stack / queue: 用于特定场景,如单调栈解决“下一个更大元素”问题。复杂度分析 :养成分析时间、空间复杂度的习惯,这有助于你选择最优解法。总结表格 类别 常见题型 核心解决方式 数组 两数/三数之和、子数组和 排序+双指针、哈希表、前缀和 子数组问题(最大和、满足条件) 滑动窗口、前缀和、动态规划(如最大子数组和) 去重、移动元素 快慢指针 旋转、螺旋矩阵 模拟、数学技巧(多次反转) 字符串 回文、反转 双指针 无重复最长子串、字母异位词 滑动窗口 子串查找/匹配 KMP算法 字符串解析、解码 模拟、栈 异位词判断、字符计数 哈希表
最后建议 :理论学习后,一定要去 LeetCode 或类似平台进行专题练习,将这些技巧内化为自己的解题能力。可以从“Top 100 Liked”问题列表开始,里面包含了大量数组和字符串的经典题目。
合并两个有序链表 合并两个有序链表
将两个升序链表合并为一个新的 升序 链表并返回。新链表是通过拼接给定的两个链表的所有节点组成的。
示例 1:
    输入:l1 = [1,2,4], l2 = [1,3,4]
    输出:[1,1,2,3,4,4]
示例 2:
    输入:l1 = [], l2 = []
    输出:[]
示例 3:
    输入:l1 = [], l2 = [0]
    输出:[0]

提示:
• 两个链表的节点数目范围是 [0, 50]
• -100 <= Node.val <= 100
• l1 和 l2 均按 非递减顺序 排列
思路 将其当作模拟题,新建一个头,将两个链表挨个遍历,比较大小,将较小的一个添加进新链表,再往后移动。
class Solution {
public:
ListNode * mergeTwoLists ( ListNode * list1 , ListNode * list2 ) {
ListNode * p = list1 ;
ListNode * q = list2 ;
if ( p == nullptr ){
return q ;
}
if ( q == nullptr ){
return p ;
}
// 选定p为基准
ListNode * newHead = new ListNode ( 0 , nullptr );
ListNode * x = newHead ;
while ( p != nullptr || q != nullptr ){
if ( p != nullptr ){
if ( q == nullptr || p -> val <= q -> val ){
x -> next = p ;
p = p -> next ;
x = x -> next ;
}
}
if ( q != nullptr ){
if ( p == nullptr || q -> val < p -> val ){
x -> next = q ;
q = q -> next ;
x = x -> next ;
}
}
}
return newHead -> next ;
}
};
官方题解 使用递归算法,设置一个比较函数,同时判断两个链表的头,每次都将更小的节点的next保留,再次调用比较函数,最后一层一层返回这个结果。也就是说,两个链表头部值较小的一个节点与剩下元素的 merge 操作结果合并。
我们直接将以上递归过程建模,同时需要考虑边界情况。 如果 l1 或者 l2 一开始就是空链表 ,那么没有任何操作需要合并,所以我们只需要返回非空链表。否则,我们要判断 l1 和 l2 哪一个链表的头节点的值更小,然后递归地决定下一个添加到结果里的节点。如果两个链表有一个为空,递归结束。
ListNode * mergeTwoLists ( ListNode * list1 , ListNode * list2 ) {
// list1已经遍历完,剩下的list2为更大的数字,直接加在尾部
if ( list1 == nullptr ) {
return list2 ;
} else if ( list2 == nullptr ) {
return list1 ;
} else if ( list1 -> val < list2 -> val ) {
// list1的值更小,保留list1这个元素的next指针,指向后面的更大的元素
list1 -> next = mergeTwoLists ( list1 -> next , list2 );
return list1 ;
} else {
list2 -> next = mergeTwoLists ( list1 , list2 -> next );
return list2 ;
}
}
找到两个相交链表的交点节点 找到两个相交链表的交点节点
给定两个单链表的头节点 headA 和 headB ,请找出并返回两个单链表相交的起始节点。如果两个链表没有交点,返回 null 。
图示两个链表在节点 c1 开始相交:
题目数据 保证 整个链式结构中不存在环。
注意,函数返回结果后,链表必须保持其原始结构 。

示例 1:
输入:intersectVal = 8, listA = [4,1,8,4,5], listB = [5,0,1,8,4,5], skipA = 2, skipB = 3
输出:Intersected at '8'
解释:相交节点的值为 8 (注意,如果两个链表相交则不能为 0)。
从各自的表头开始算起,链表 A 为 [4,1,8,4,5],链表 B 为 [5,0,1,8,4,5]。
在 A 中,相交节点前有 2 个节点;在 B 中,相交节点前有 3 个节点。

示例 2:
输入:intersectVal = 2, listA = [0,9,1,2,4], listB = [3,2,4], skipA = 3, skipB = 1
输出:Intersected at '2'
解释:相交节点的值为 2 (注意,如果两个链表相交则不能为 0)。
从各自的表头开始算起,链表 A 为 [0,9,1,2,4],链表 B 为 [3,2,4]。
在 A 中,相交节点前有 3 个节点;在 B 中,相交节点前有 1 个节点。

示例 3:
输入:intersectVal = 0, listA = [2,6,4], listB = [1,5], skipA = 3, skipB = 2
输出:null
解释:从各自的表头开始算起,链表 A 为 [2,6,4],链表 B 为 [1,5]。
由于这两个链表不相交,所以 intersectVal 必须为 0,而 skipA 和 skipB 可以是任意值。
这两个链表不相交,因此返回 null 。
思路1 判断共尾节点计算差值 先判断二者中有无空链表;两个链表相交必是同一个尾节点;计算是否共尾节点,同时计算出各自的长度,比较出长度差,将较长的那个先移动这个差值的距离,然后两个链表再一起移动,两个指针就会慢慢指向同节点,判断相等了返回即可。
class Solution {
public:
ListNode * getIntersectionNode ( ListNode * headA , ListNode * headB ) {
if ( headA == nullptr || headB == nullptr ){
return nullptr ;
}
ListNode * p = headA ;
ListNode * q = headB ;
int lenthA = 0 ;
int lenthB = 0 ;
while ( p -> next != nullptr ) {
p = p -> next ;
lenthA ++ ;
}
while ( q -> next != nullptr ) {
q = q -> next ;
lenthB ++ ;
}
if ( p != q ){
return nullptr ;
}
p = headA ;
q = headB ;
if ( lenthA > lenthB ){
int diff = lenthA - lenthB ;
while ( diff > 0 ){
p = p -> next ;
diff -- ;
}
}
if ( lenthA < lenthB ){
int diff = lenthB - lenthA ;
while ( diff > 0 ){
q = q -> next ;
diff -- ;
}
}
while ( p != q ){
p = p -> next ;
q = q -> next ;
}
return p ;
}
};
思路2 hash集合 unordered_set 判断两个链表是否相交,可以使用哈希集合存储链表节点。
首先遍历链表 headA,并将链表 headA 中的每个节点加入哈希集合中。然后遍历链表 headB,对于遍历到的每个节点,判断该节点是否在哈希集合中:
如果当前节点不在哈希集合中,则继续遍历下一个节点;
如果当前节点在哈希集合中,则后面的节点都在哈希集合中,即从当前节点开始的所有节点都在两个链表的相交部分,因此 在链表 headB 中遍历到的第一个在哈希集合中的节点就是两个链表相交的节点,返回该节点 。
如果链表 headB 中的所有节点都不在哈希集合中,则两个链表不相交,返回 null。
class Solution {
public:
ListNode * getIntersectionNode ( ListNode * headA , ListNode * headB ) {
unordered_set < ListNode *> visited ;
ListNode * temp = headA ;
while ( temp != nullptr ) {
visited . insert ( temp );
temp = temp -> next ;
}
temp = headB ;
while ( temp != nullptr ) {
if ( visited . count ( temp )) {
return temp ;
}
temp = temp -> next ;
}
return nullptr ;
}
};
翻转链表 翻转链表
给定单链表的头节点 head ,请反转链表,并返回反转后的链表的头节点。

示例 1:
    输入:head = [1,2,3,4,5]
    输出:[5,4,3,2,1]
示例 2:
    输入:head = [1,2]
    输出:[2,1]
示例 3:
    输入:head = []
    输出:[]

提示:
• 链表中节点的数目范围是 [0, 5000]
• -5000 <= Node.val <= 5000

进阶:链表可以选用迭代或递归方式完成反转。你能否用两种方法解决这道题?
思路 使用栈来暂存所有数据,出栈的时候新建一个头节点,来创建逆序链表。
使用 stack 容器处理,空间复杂度O(n)
ListNode * reverseList ( ListNode * head ) {
stack < int > temp ;
ListNode * p = head ;
while ( p != nullptr ){
cout << "value: " << p -> val << endl ;
temp . push ( p -> val );
p = p -> next ;
}
ListNode * newHead = new ListNode ();
ListNode * q = newHead ;
while ( ! temp . empty ()){
cout << "stack value: " << temp . top () << endl ;
ListNode * tempNode = new ListNode ( temp . top ());
q -> next = tempNode ;
q = q -> next ;
temp . pop ();
}
return newHead -> next ;
}
思路2 官方题解,遍历链表,使用两个指针来保存当前值和上一个的值,同时在循环中需要暂时存储下一个节点地址,防止断链。 循环时,将当前节点的next节点的next指针指向当前节点,当前节点的next指针指向上一个节点,然后当前节点和上一个节点都往后走。
// 只用了两个变量,空间复杂度 O(1)
ListNode * reverseList2 ( ListNode * head ) {
ListNode * current = head ;
ListNode * prev = nullptr ;
while ( current != nullptr ) {
ListNode * next = current -> next ;
current -> next = prev ;
prev = current ;
current = next ;
}
return prev ;
}
思路3 官方的递归解法 递归版本稍微复杂一些,其关键在于反向工作。假设链表的其余部分已经被反转,现在应该如何反转它前面的部分?
假设链表为: n1 →…→ nk−1 → nk → nk+1 →…→ nm →∅
若从节点 nk+1 到 nm 已经被反转,而我们正处于 nk 。
n1 →…→ nk−1 → nk →nk+1 ←…← nm
我们希望 nk+1 的下一个节点指向 nk。
所以,nk.next.next=nk 。需要注意的是 n1 的下一个节点必须指向 ∅。如果忽略了这一点,链表中可能会产生环.
class Solution {
public:
ListNode * reverseList ( ListNode * head ) {
if ( ! head || ! head -> next ) {
return head ;
}
ListNode * newHead = reverseList ( head -> next );
head -> next -> next = head ;
head -> next = nullptr ;
return newHead ;
}
};
翻转链表2 翻转链表2
给你单链表的头指针 head 和两个整数 left 和 right ,其中 left <= right 。请你反转从位置 left 到位置 right 的链表节点,返回 反转后的链表 。

示例 1:
输入:head = [1,2,3,4,5], left = 2, right = 4
输出:[1,4,3,2,5]
示例 2:
输入:head = [5], left = 1, right = 1
输出:[5]

提示:
• 链表中节点数目为 n
• 1 <= n <= 500
• -500 <= Node.val <= 500
• 1 <= left <= right <= n

进阶: 你可以使用一趟扫描完成反转吗?
思路1 掐断 翻转 拼接 将要反转的区间掐断,采用上一题的方法来翻转,关键 提前存储好区间左侧和右侧的第一个节点 ,方便再拼接回去,但是注意这里可能并没有前一个节点,所以加一个虚拟头节点,来承接翻转后的区间,免去多余判断。区间右侧的第一个节点为nullptr没有关系。
/**
* Definition for singly-linked list.
* struct ListNode {
* int val;
* ListNode *next;
* ListNode() : val(0), next(nullptr) {}
* ListNode(int x) : val(x), next(nullptr) {}
* ListNode(int x, ListNode *next) : val(x), next(next) {}
* };
*/
class Solution {
public:
ListNode * reverseList ( ListNode * head ) {
ListNode * current = head ;
ListNode * priv = nullptr ;
while ( current != nullptr ) {
ListNode * next = current -> next ;
current -> next = priv ;
priv = current ;
current = next ;
}
return priv ;
}
ListNode * reverseBetween ( ListNode * head , int left , int right ) {
if ( left == right ) {
return head ;
}
ListNode * dummyHead = new ListNode ( - 1 );
dummyHead -> next = head ;
ListNode * p = dummyHead ;
ListNode * q = dummyHead ;
ListNode * first ;
ListNode * last ;
for ( int i = 0 ; i < left - 1 ; i ++ ) {
p = p -> next ;
}
first = p -> next ;
for ( int j = 0 ; j < right ; j ++ ) {
q = q -> next ;
}
last = q ;
// 将q移到区间外第一个元素位置
q = q -> next ;
p -> next = last ;
last -> next = nullptr ;
ListNode * corridor = reverseList ( first );
while ( corridor -> next != nullptr ) {
corridor = corridor -> next ;
}
corridor -> next = q ;
return dummyHead -> next ;
}
};
思路2 穿针引线 方法一的缺点是:如果 left 和 right 的区域很大,恰好是链表的头节点和尾节点时,找到 left 和 right 需要遍历一次,反转它们之间的链表还需要遍历一次,虽然总的时间复杂度为 O(N),但 遍历了链表 2 次 ,可不可以只遍历一次呢?答案是可以的。
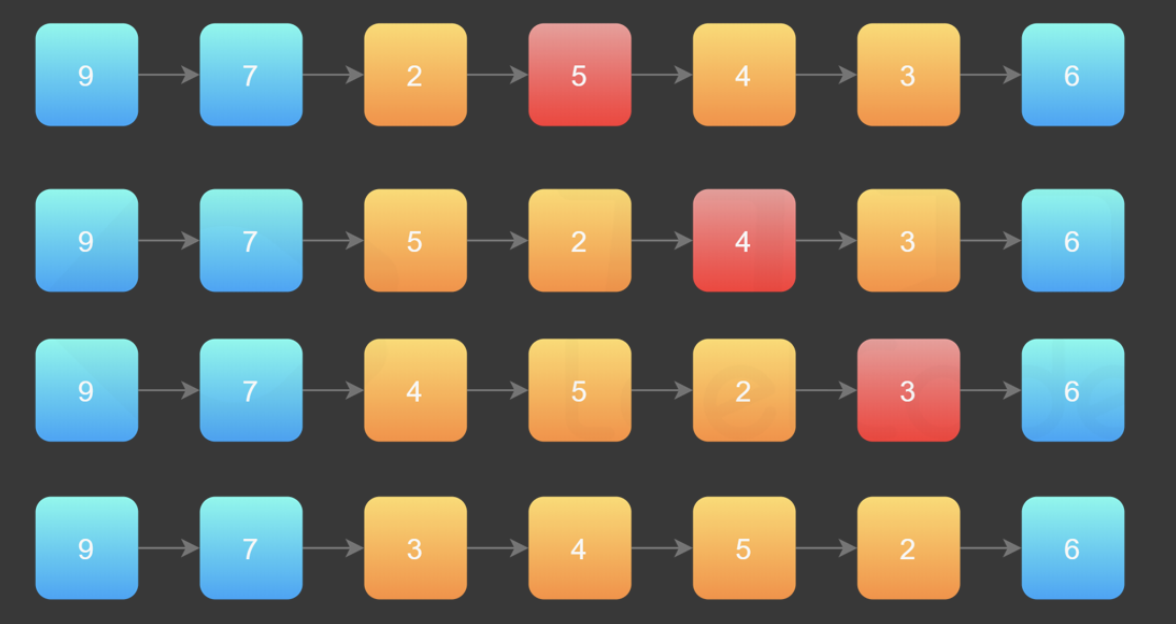
在需要反转的区间里,每遍历到一个节点,让这个新节点来到反转部分的起始位置。下面的图展示了整个流程。
初始链表:9->7->2->5->4->3->6 第一步将5插到2的前面,第二步将4插到2的前面。。。
使用三个指针变量 pre、curr、next 来记录反转的过程中需要的变量,它们的意义如下:
curr:指向待反转区域的第一个节点 left; next:永远指向 curr 的下一个节点,循环过程中,curr 变化以后 next 会变化; pre:永远指向待反转区域的第一个节点 left 的前一个节点,在循环过程中不变。 class Solution {
public:
ListNode * reverseBetween ( ListNode * head , int left , int right ) {
// 设置虚拟头节点,用于处理头节点可能被翻转的情况
// 这是处理链表问题的常用技巧,可以避免对头节点的特殊处理
ListNode * dummyNode = new ListNode ( - 1 );
dummyNode -> next = head ;
// pre指针指向要翻转区间的前一个节点
// 通过循环将pre移动到left位置的前一个节点
ListNode * pre = dummyNode ;
for ( int i = 0 ; i < left - 1 ; i ++ ) {
pre = pre -> next ;
}
// cur指针指向当前要处理的节点(翻转区间的第一个节点)
ListNode * cur = pre -> next ;
ListNode * next ; // 用于临时存储下一个要处理的节点
// 进行区间内的节点翻转
// 循环次数为区间长度减1(right - left)
for ( int i = 0 ; i < right - left ; i ++ ) {
// next指向cur的下一个节点(即要移动到前面的节点)
next = cur -> next ;
// 将cur指向next的下一个节点,跳过next节点
cur -> next = next -> next ;
// 将next节点插入到pre节点的后面
next -> next = pre -> next ;
// 更新pre的next指针,指向新插入到前面的next节点
pre -> next = next ;
}
// 返回虚拟头节点的下一个节点(即新的头节点)
return dummyNode -> next ;
}
};
翻转链表3(k个一组) K 个一组翻转链表
给你链表的头节点 head ,每 k 个节点一组进行翻转,请你返回修改后的链表。
k 是一个正整数,它的值小于或等于链表的长度。如果节点总数不是 k 的整数倍,那么请将最后剩余的节点保持原有顺序。
你不能只是单纯的改变节点内部的值,而是需要实际进行节点交换。

示例 1:
    输入:head = [1,2,3,4,5], k = 2
    输出:[2,1,4,3,5]
示例 2:
    输入:head = [1,2,3,4,5], k = 3
    输出:[3,2,1,4,5]

提示:
• 链表中的节点数目为 n
• 1 <= k <= n <= 5000
• 0 <= Node.val <= 1000

进阶:你可以设计一个只用 O(1) 额外内存空间的算法解决此问题吗?
思路 基于 1 & 2 版本,更需要控制好每一组之间的链接,尤其是循环后的翻转和善后工作。
记录了区间的头尾,区间的上一个,还有区间的下一个,用于断链后重新链接翻转后的区间。有别于官方题解,本地编译器用不了pair等C++11以后的库,所以区间翻转后,是通过移动区间头指针来找到翻转后的区间尾节点,来链接下一个点的。
class Solution {
public:
ListNode * reverseList ( ListNode * head )
{
ListNode * current = head ;
ListNode * priv = nullptr ;
while ( current != nullptr )
{
ListNode * next = current -> next ;
current -> next = priv ;
priv = current ;
current = next ;
}
return priv ;
}
ListNode * reverseKGroup ( ListNode * head , int k )
{
ListNode * dummyHead = new ListNode ( - 1 );
dummyHead -> next = head ;
ListNode * priv ;
ListNode * p = dummyHead ;
while ( p != nullptr )
{
priv = p ;
ListNode * reverseHead = priv -> next ;
for ( int i = 0 ; i < k ; i ++ )
{
p = p -> next ;
if ( p == nullptr )
{
return dummyHead -> next ;
}
}
ListNode * reverseTail = p ;
ListNode * nextNode = p -> next ;
reverseTail -> next = nullptr ;
ListNode * reversed = reverseList ( reverseHead );
priv -> next = reversed ;
while ( reversed -> next != nullptr )
{
reversed = reversed -> next ;
}
p = reversed ;
reversed -> next = nextNode ;
}
return dummyHead -> next ;
}
};
复制带随机指针的链表 复制带随机指针的链表
给你一个长度为 n 的链表,每个节点包含一个额外增加的随机指针 random ,该指针可以指向链表中的任何节点或空节点。

构造这个链表的 深拷贝。 深拷贝应该正好由 n 个 全新 节点组成,其中每个新节点的值都设为其对应的原节点的值。新节点的 next 指针和 random 指针也都应指向复制链表中的新节点,并使原链表和复制链表中的这些指针能够表示相同的链表状态。复制链表中的指针都不应指向原链表中的节点 。

例如,如果原链表中有 X 和 Y 两个节点,其中 X.random --> Y 。那么在复制链表中对应的两个节点 x 和 y ,同样有 x.random --> y 。

返回复制链表的头节点。

用一个由 n 个节点组成的链表来表示输入/输出中的链表。每个节点用一个 [val, random_index] 表示:

val:一个表示 Node.val 的整数。
random_index:随机指针指向的节点索引(范围从 0 到 n-1);如果不指向任何节点,则为  null 。
你的代码 只 接受原链表的头节点 head 作为传入参数。

示例 1:
    输入:head = [[7,null],[13,0],[11,4],[10,2],[1,0]]
    输出:[[7,null],[13,0],[11,4],[10,2],[1,0]]
示例 2:
    输入:head = [[1,1],[2,1]]
    输出:[[1,1],[2,1]]
示例 3:
    输入:head = [[3,null],[3,0],[3,null]]
    输出:[[3,null],[3,0],[3,null]]

提示:
• 0 <= n <= 1000
• -104 <= Node.val <= 104
• Node.random 为 null 或指向链表中的节点。
思路1 使用一个map,键为原始链表节点 A ,值为新建的节点 A’ ,在遍历原始链表的时候,看看原始节点的指针指向了哪里,通过map寻找对应节点key的value,就可以完全复制。
class Solution {
public:
Node * copyRandomList ( Node * head ) {
unordered_map < Node * , Node *> nodeMap ;
Node * p = head ;
while ( p != nullptr ){
nodeMap [ p ] = new Node ( p -> val );
p = p -> next ;
}
p = head ;
while ( p != nullptr ){
// 映射的next等于next的映射
nodeMap [ p ] -> next = nodeMap [ p -> next ];
nodeMap [ p ] -> random = nodeMap [ p -> random ];
p = p -> next ;
}
return nodeMap [ head ];
}
};
缺点:
使用了多一个的map空间,需要遍历两次,先添加一次,再根据映射关系来设置指向关系。
官方优化 一样使用了哈希表,但是使用了回溯算法,在第一个节点检查时就去创建指向的两个节点,如果为未创建过就新建一个填进map,如果已创建就不能再刷新value来了,而是直接复用这个值。少遍历了一遍执行时间从11ms,优化到了8ms。
class Solution {
public:
unordered_map < Node * , Node *> cachedNode ;
Node * copyRandomList ( Node * head ) {
if ( head == nullptr ) {
return nullptr ;
}
if ( ! cachedNode . count ( head )) {
Node * headNew = new Node ( head -> val );
cachedNode [ head ] = headNew ;
headNew -> next = copyRandomList ( head -> next );
headNew -> random = copyRandomList ( head -> random );
}
return cachedNode [ head ];
}
};
思路2 以上空间复杂度O(n),需要额外使用一个大map来存储节点,我们可以将新节点挨个插到每一个原始节点中间,然后遍历的时候,使用该节点指向原始节点的next指针来寻找刚刚新建的新节点,最后将新节点剥离出来,同时保证原链表正确还原(题目没有提这一点,但是检查的时候应该是需要用到原链表)
Node * copyRandomList ( Node * head )
{
// 长度为0
if ( head == nullptr )
{
return nullptr ;
}
Node * p = head ;
// 添加复制节点
while ( p )
{
Node * next = p -> next ;
Node * copyNode = new Node ( p -> val );
p -> next = copyNode ;
copyNode -> next = next ;
p = p -> next -> next ;
}
// 复制各个节点random指针
p = head ;
while ( p )
{
Node * copyNode = p -> next ;
if ( p -> random == nullptr )
{
copyNode -> random = nullptr ;
}
else
{
copyNode -> random = p -> random -> next ;
}
p = p -> next -> next ;
}
// 链表分离出来之后,next指针自动正确了
p = head ;
Node * ans = head -> next ;
Node * q = head -> next ;
// 当q已经触底,遍历到了最后一个
while ( q -> next != nullptr )
{
Node * copyNode = q -> next -> next ;
Node * originNode = p -> next -> next ;
q -> next = copyNode ;
p -> next = originNode ;
q = copyNode ;
p = originNode ;
}
// 目前两个链表是共尾节点的状态
// 掐断原始链表的指向复制链表的最后一个节点
p -> next = nullptr ;
return ans ;
}
判断环形链表 判断环形链表
给你一个链表的头节点 head ,判断链表中是否有环。
如果链表中有某个节点,可以通过连续跟踪 next 指针再次到达,则链表中存在环。 为了表示给定链表中的环,评测系统内部使用整数 pos 来表示链表尾连接到链表中的位置(索引从 0 开始)。注意:pos 不作为参数进行传递 。仅仅是为了标识链表的实际情况。
如果链表中存在环 ,则返回 true 。 否则,返回 false 。

示例 1:
    输入:head = [3,2,0,-4], pos = 1
    输出:true
    解释:链表中有一个环,其尾部连接到第二个节点。
示例 2:
    输入:head = [1,2], pos = 0
    输出:true
    解释:链表中有一个环,其尾部连接到第一个节点。
示例 3:
    输入:head = [1], pos = -1
    输出:false
    解释:链表中没有环。

提示:
• 链表中节点的数目范围是 [0, 104]
• -105 <= Node.val <= 105
• pos 为 -1 或者链表中的一个 有效索引 。

进阶:你能用 O(1)(即,常量)内存解决此问题吗?
思路1 使用不可存在相同元素的set数据结构来存储每个节点的next地址,如果有相同的节点地址已经出现过,则说明有环,否则无环;
class Solution {
public:
bool hasCycle ( ListNode * head ) {
set < ListNode *> tempset ;
ListNode * p = head ;
tempset . insert ( head );
while ( p != nullptr ) {
if ( tempset . count ( p -> next ) > 0 ) {
return true ;
}
tempset . insert ( p -> next );
p = p -> next ;
}
return false ;
}
};
这种方法空间复杂度为O(n),执行时长也排到了末尾;
思路2 使用快慢指针,快指针一次走两个,慢指针一次走一个,如果能碰到一起,说明肯定有环存在;
bool hasCycle2 ( ListNode * head )
{
ListNode * fast = head ;
ListNode * slow = head ;
while ( slow != nullptr && fast != nullptr && fast -> next != nullptr )
{
slow = slow -> next ;
fast = fast -> next -> next ;
if ( slow == fast )
{
return true ;
}
}
return false ;
}
优化 while中使用三个判断条件,发现耗时有点长,将快指针的next空判断移到循环内部,可以进一步减少耗时。
class Solution {
public:
bool hasCycle ( ListNode * head ) {
ListNode * fast = head ;
ListNode * slow = head ;
while ( slow != nullptr && fast != nullptr ) {
if ( fast -> next != nullptr ) {
slow = slow -> next ;
fast = fast -> next -> next ;
if ( slow == fast ) {
return true ;
}
} else {
return false ;
}
}
return false ;
}
};
找到环形链表的入环节点 找到环形链表的入环节点
给定一个链表,返回链表开始入环的第一个节点。 从链表的头节点开始沿着 next 指针进入环的第一个节点为环的入口节点。如果链表无环,则返回 null。
为了表示给定链表中的环,我们使用整数 pos 来表示链表尾连接到链表中的位置(索引从 0 开始)。 如果 pos 是 -1,则在该链表中没有环。注意,pos 仅仅是用于标识环的情况,并不会作为参数传递到函数中。
说明:不允许修改给定的链表。

示例 1:
输入:head = [3,2,0,-4], pos = 1
输出:返回索引为 1 的链表节点
解释:链表中有一个环,其尾部连接到第二个节点。
示例 2:
输入:head = [1,2], pos = 0
输出:返回索引为 0 的链表节点
解释:链表中有一个环,其尾部连接到第一个节点。
示例 3:
输入:head = [1], pos = -1
输出:返回 null
解释:链表中没有环。

提示:
• 链表中节点的数目范围在范围 [0, 104] 内
• -105 <= Node.val <= 105
• pos 的值为 -1 或者链表中的一个有效索引

进阶:是否可以使用 O(1) 空间解决此题?
思路 还是使用set,当判断存在相同的地址时,直接返回这个节点地址即可。
class Solution {
public:
ListNode * detectCycle ( ListNode * head ) {
set < ListNode *> tempset ;
ListNode * p = head ;
tempset . insert ( head );
while ( p != nullptr ) {
if ( tempset . count ( p -> next ) > 0 ) {
return p -> next ;
}
tempset . insert ( p -> next );
p = p -> next ;
}
return nullptr ;
}
};
同样多创建了一个空间来存储地址
思路2 这个只需完整记忆,证明过程太复杂。使用快慢指针,当他们相遇时,将快指针还原到头节点。而后,快指针也变成一次跳一步,继续循环,当快慢指针第二次相遇时,就是在入环的节点位置。
class Solution {
public:
ListNode * detectCycle2 ( ListNode * head ) {
ListNode * fast = head ;
ListNode * slow = head ;
int meet_count = 0 ;
while ( fast != nullptr && slow != nullptr ) {
if ( fast -> next != nullptr ) {
slow = slow -> next ;
if ( meet_count == 0 ) {
fast = fast -> next -> next ;
if ( slow == fast ) {
fast = head ;
meet_count ++ ;
}
} else {
fast = fast -> next ;
if ( slow == fast ) {
return fast ;
}
}
} else {
return nullptr ;
}
}
return nullptr ;
}
};
在两个节点互相循环时有问题,可以说是互为入口,index是0,算出来是1.
链表排序 链表排序
给定链表的头结点 head ,请将其按 升序 排列并返回 排序后的链表 。

示例 1:
    输入:head = [4,2,1,3]
    输出:[1,2,3,4]
示例 2:
    输入:head = [-1,5,3,4,0]
    输出:[-1,0,3,4,5]
示例 3:
    输入:head = []
    输出:[]

提示:
• 链表中节点的数目在范围 [0, 5 * 104] 内
• -105 <= Node.val <= 105

进阶:你可以在 O(nlogn) 时间复杂度和常数级空间复杂度下,对链表进行排序吗?
思路1 使用multiset,可以添加重复元素,可以自动排序。
class Solution
{
public:
ListNode * sortList ( ListNode * head )
{
if ( head == nullptr )
{
return head ;
}
multiset < int > sort_set ;
ListNode * p = head ;
while ( p != nullptr )
{
sort_set . insert ( p -> val );
p = p -> next ;
}
auto iterator = sort_set . begin ();
ListNode * newHead = new ListNode ( * iterator );
p = newHead ;
iterator ++ ;
while ( iterator != sort_set . end ())
{
ListNode * node = new ListNode ( * iterator );
p -> next = node ;
p = p -> next ;
iterator ++ ;
}
return newHead ;
}
};
性能较差
思路2 自上而下归并排序,不断二分,等颗粒度为1时,使用merge合并两个有序链表(长度为1一定有序),将所有的小链表 merge() 连接起来,最后合成一个大的。
class Solution {
public:
ListNode * sortList ( ListNode * head ) {
return sortList ( head , nullptr );
}
ListNode * sortList ( ListNode * head , ListNode * tail ) {
if ( head == nullptr ) {
return head ;
}
if ( head -> next == tail ) {
head -> next = nullptr ;
return head ;
}
ListNode * slow = head , * fast = head ;
while ( fast != tail ) {
slow = slow -> next ;
fast = fast -> next ;
if ( fast != tail ) {
fast = fast -> next ;
}
}
ListNode * mid = slow ;
return merge ( sortList ( head , mid ), sortList ( mid , tail ));
}
ListNode * merge ( ListNode * head1 , ListNode * head2 ) {
ListNode * dummyHead = new ListNode ( 0 );
ListNode * temp = dummyHead , * temp1 = head1 , * temp2 = head2 ;
while ( temp1 != nullptr && temp2 != nullptr ) {
if ( temp1 -> val <= temp2 -> val ) {
temp -> next = temp1 ;
temp1 = temp1 -> next ;
} else {
temp -> next = temp2 ;
temp2 = temp2 -> next ;
}
temp = temp -> next ;
}
if ( temp1 != nullptr ) {
temp -> next = temp1 ;
} else if ( temp2 != nullptr ) {
temp -> next = temp2 ;
}
return dummyHead -> next ;
}
};
时间复杂度:O(nlogn),其中 n 是链表的长度。 空间复杂度:O(logn),其中 n 是链表的长度。空间复杂度主要取决于递归调用的栈空间。
思路3 自下而上归并排序,步长为1,遍历排序,步长为2,再次排序。
class Solution {
public:
ListNode * sortList ( ListNode * head ) {
if ( head == nullptr ) {
return head ;
}
int length = 0 ;
ListNode * node = head ;
while ( node != nullptr ) {
length ++ ;
node = node -> next ;
}
ListNode * dummyHead = new ListNode ( 0 , head );
for ( int subLength = 1 ; subLength < length ; subLength <<= 1 ) {
ListNode * prev = dummyHead , * curr = dummyHead -> next ;
while ( curr != nullptr ) {
ListNode * head1 = curr ;
for ( int i = 1 ; i < subLength && curr -> next != nullptr ; i ++ ) {
curr = curr -> next ;
}
ListNode * head2 = curr -> next ;
curr -> next = nullptr ;
curr = head2 ;
for ( int i = 1 ; i < subLength && curr != nullptr && curr -> next != nullptr ; i ++ ) {
curr = curr -> next ;
}
ListNode * next = nullptr ;
if ( curr != nullptr ) {
next = curr -> next ;
curr -> next = nullptr ;
}
ListNode * merged = merge ( head1 , head2 );
prev -> next = merged ;
while ( prev -> next != nullptr ) {
prev = prev -> next ;
}
curr = next ;
}
}
return dummyHead -> next ;
}
ListNode * merge ( ListNode * head1 , ListNode * head2 ) {
ListNode * dummyHead = new ListNode ( 0 );
ListNode * temp = dummyHead , * temp1 = head1 , * temp2 = head2 ;
while ( temp1 != nullptr && temp2 != nullptr ) {
if ( temp1 -> val <= temp2 -> val ) {
temp -> next = temp1 ;
temp1 = temp1 -> next ;
} else {
temp -> next = temp2 ;
temp2 = temp2 -> next ;
}
temp = temp -> next ;
}
if ( temp1 != nullptr ) {
temp -> next = temp1 ;
} else if ( temp2 != nullptr ) {
temp -> next = temp2 ;
}
return dummyHead -> next ;
}
};
时间复杂度:O(nlogn),其中 n 是链表的长度。 空间复杂度:O(1)。
回文链表判断 回文链表判断
给定一个链表的 头节点 head ,请判断其是否为回文链表。
如果一个链表是回文,那么链表节点序列从前往后看和从后往前看是相同的。
示例 1:
输入: head = [1,2,3,3,2,1]
输出: true
示例 2:
输入: head = [1,2]
输出: false
提示:
• 链表 L 的长度范围为 [1, 105]
• 0 <= node.val <= 9

进阶:能否用 O(n) 时间复杂度和 O(1) 空间复杂度解决此题?
思路1 使用stack来辅助 回文即正反看起来相同,第一种解法使用栈来压入所有元素,然后弹出栈元素同时遍历链表,看看二者每一个值是否一样。耗时224ms。
class Solution {
public:
bool isPalindrome ( ListNode * head ) {
ListNode * p = head ;
stack < int > temp_stack ;
while ( p != nullptr ) {
temp_stack . push ( p -> val );
p = p -> next ;
}
p = head ;
while ( ! temp_stack . empty ()) {
if ( p -> val != temp_stack . top ()) {
return false ;
}
p = p -> next ;
temp_stack . pop ();
}
return true ;
}
};
思路2 快慢指针找中点,翻转右侧链表,比较 快慢指针找中点,将慢指针置于中点或中点以左,快指针到末尾。翻转慢指针右侧节点,左侧子链表和右侧翻转过的两个链表进行比较,两链表的长度差值必须为1或0,相同位置元素必须相等。
class Solution {
public:
ListNode * reverseList ( ListNode * head ) {
ListNode * priv = nullptr ;
ListNode * p = head ;
while ( p != nullptr ) {
ListNode * nextTemp = p -> next ;
p -> next = priv ;
priv = p ;
p = nextTemp ;
}
return priv ;
}
bool isPalindrome ( ListNode * head ) {
if ( head -> next == nullptr ) {
return true ;
}
ListNode * slow = head ;
ListNode * fast = head ;
while ( fast != nullptr ) {
if ( fast -> next != nullptr && fast -> next -> next != nullptr ) {
fast = fast -> next -> next ;
} else {
break ;
}
slow = slow -> next ;
}
// slow为中点,slow下一个为头,fast做尾,翻转链表
ListNode * reverseHead = slow -> next ;
slow -> next = nullptr ;
ListNode * newSubList = reverseList ( reverseHead );
ListNode * p = head ;
ListNode * q = newSubList ;
while ( p != nullptr && q != nullptr ) {
if ( p -> val != q -> val ) {
return false ;
}
p = p -> next ;
q = q -> next ;
if ( p == nullptr && q != nullptr && q -> next != nullptr ) {
return false ;
}
if ( q == nullptr && p != nullptr && p -> next != nullptr ) {
return false ;
}
}
return true ;
}
};
思路3 将链表值复制到数组,双指针比较 class Solution {
public:
bool isPalindrome ( ListNode * head ) {
vector < int > vals ;
while ( head != nullptr ) {
vals . emplace_back ( head -> val );
head = head -> next ;
}
for ( int i = 0 , j = ( int ) vals . size () - 1 ; i < j ; ++ i , -- j ) {
if ( vals [ i ] != vals [ j ]) {
return false ;
}
}
return true ;
}
};
删除链表的倒数第 N 个结点 删除链表的倒数第 N 个结点
给你一个链表,删除链表的倒数第 n 个结点,并且返回链表的头结点。

示例 1:
输入:head = [1,2,3,4,5], n = 2
输出:[1,2,3,5]

示例 2
输入:head = [1], n = 1
输出:[]

示例 3:
输入:head = [1,2], n = 1
输出:[1]

提示:

链表中结点的数目为 sz
1 <= sz <= 30
0 <= Node.val <= 100
1 <= n <= sz


进阶:你能尝试使用一趟扫描实现吗?
思路1 首先特判长度为1的,直接返回空。如果长度大于1,使用map记录下下标和每个节点的地址,遍历一遍后,通过 count 长度,和 n 值,算出需要删除节点index的上一个节点的地址,注意如果删除的是第一个,直接返回 head->next .
class Solution {
public:
ListNode * removeNthFromEnd ( ListNode * head , int n ) {
if ( head -> next == nullptr )
return nullptr ;
ListNode * p = head ;
unordered_map < int , ListNode *> indexMap ;
int count = 0 ;
while ( p ) {
indexMap [ count ++ ] = p ;
p = p -> next ;
}
int index = count - n - 1 ;
if ( index < 0 ) {
return head -> next ;
}
indexMap [ index ] -> next = indexMap [ index ] -> next -> next ;
return head ;
}
};
官方题解 使用栈存储,弹出第n个就是需要删除的节点,此时再多弹出一个,就可以修改 next 指针来删除这个点。注意可以使用dummyHead哑节点,就不用对头节点特判了。
class Solution {
public:
ListNode * removeNthFromEnd ( ListNode * head , int n ) {
ListNode * dummy = new ListNode ( 0 , head );
stack < ListNode *> stk ;
ListNode * cur = dummy ;
while ( cur ) {
stk . push ( cur );
cur = cur -> next ;
}
// 弹出第n个,再弹出一个,就是需要删除的节点的上一个
for ( int i = 0 ; i < n ; ++ i ) {
stk . pop ();
}
// 将prev节点指向倒数第n个节点的下一个节点,即可实现删除
ListNode * prev = stk . top ();
prev -> next = prev -> next -> next ;
ListNode * ans = dummy -> next ;
delete dummy ;
return ans ;
}
};
链表表示的两数相加 链表表示的两数相加
给你两个 非空 的链表,表示两个非负的整数。它们每位数字都是按照 逆序 的方式存储的,并且每个节点只能存储 一位 数字。
即数字 `435` ,表示为链表: `5->3->4`

请你将两个数相加,并以相同形式返回一个表示和的链表。

你可以假设除了数字 0 之外,这两个数都不会以 0 开头。

示例 1:
输入:l1 = [2,4,3], l2 = [5,6,4]
输出:[7,0,8]
解释:342 + 465 = 807.

示例 2:
输入:l1 = [0], l2 = [0]
输出:[0]

示例 3:
输入:l1 = [9,9,9,9,9,9,9], l2 = [9,9,9,9]
输出:[8,9,9,9,0,0,0,1]

提示:

每个链表中的节点数在范围 [1, 100] 内
0 <= Node.val <= 9
题目数据保证列表表示的数字不含前导零
思路1 从头到尾遍历,两个链表相同位置的数是处于同等位上的数据,使用小学数学加法计算进位即可。使用 / 取商,使用 % 取余。控制好进位,最后如果最高位相加的结果除10不为0,即仍然需要进位,则需要加一个节点。
class Solution {
public:
ListNode * addTwoNumbers ( ListNode * l1 , ListNode * l2 ) {
ListNode * newHead = new ListNode ( - 1 );
ListNode * q = newHead ;
int carry = 0 ;
while ( l1 || l2 ) {
int l1Value = l1 ? l1 -> val : 0 ;
int l2Value = l2 ? l2 -> val : 0 ;
int result = l1Value + l2Value + carry ;
int thisNodeValue = result % 10 ;
ListNode * thisNode = new ListNode ( thisNodeValue );
newHead -> next = thisNode ;
newHead = thisNode ;
carry = result / 10 ;
if ( l1 )
l1 = l1 -> next ;
if ( l2 )
l2 = l2 -> next ;
}
if ( carry > 0 ) {
newHead -> next = new ListNode ( carry );
}
return q -> next ;
}
};
这里刚刚编写的时候,在外面和循环里面都定义了一个int carry,二者命名相同没有报错,Java是会有报错的。后面需要注意这个特性。
删除排序链表中的重复元素 删除排序链表中的重复元素
给定一个已排序的链表的头 head , 删除所有重复的元素,使每个元素只出现一次 。返回 已排序的链表 。

示例 1:

输入:head = [1,1,2]
输出:[1,2]
示例 2:

输入:head = [1,1,2,3,3]
输出:[1,2,3]

提示:

链表中节点数目在范围 [0, 300] 内
-100 <= Node.val <= 100
题目数据保证链表已经按升序 排列
思路 使用快慢指针,快指针一直往前检索重复值的节点,慢指针从头节点开始做比较,二者相同时,删除快指针所指的节点,不同时,慢指针移到快指针所在位置,快指针继续往前一步。
class Solution {
public:
ListNode * deleteDuplicates ( ListNode * head ) {
if ( head == nullptr || head -> next == nullptr ) {
return head ;
}
ListNode * fast = head -> next ;
ListNode * slow = head ;
while ( fast ) {
while ( fast != nullptr && ( fast -> val == slow -> val )) {
ListNode * next = fast -> next ;
slow -> next = slow -> next -> next ;
fast = next ;
}
slow = fast ;
if ( fast )
fast = fast -> next ;
}
return head ;
}
};
官方题解优化复刻 不同于数组,刚刚编写时,总有一种感觉快慢指针咬的很紧,其实用不到快慢指针,本节点的next和本节点相同时,直接删除跳过即可。注意要防止遍历到最后一个节点时,调用current->next->val 报错的问题。
class Solution {
public:
ListNode * deleteDuplicates ( ListNode * head ) {
if ( head == nullptr || head -> next == nullptr ) {
return head ;
}
ListNode * current = head ;
while ( current -> next ) {
if ( current -> val == current -> next -> val ) {
current -> next = current -> next -> next ;
} else {
current = current -> next ;
}
}
return head ;
}
};
删除排序链表中的重复元素 II 删除排序链表中的重复元素 II
给定一个已排序的链表的头 head , 删除原始链表中所有重复数字的节点,只留下不同的数字 。返回 已排序的链表 。

示例 1:
输入:head = [1,2,3,3,4,4,5]
输出:[1,2,5]

示例 2:
输入:head = [1,1,1,2,3]
输出:[2,3]

提示:

链表中节点数目在范围 [0, 300] 内
-100 <= Node.val <= 100
题目数据保证链表已经按升序 排列
思路 这个变化的题和上一题在流程上类似,就是对比的值变成了这个节点的 next 和 next->next 。故也可以使用一个指针来判断,但是要注意元素从头开始就重复的情况,所以最好加虚拟头节点来辅助。
class Solution {
public:
ListNode * deleteDuplicates ( ListNode * head ) {
if ( ! head ) {
return head ;
}
ListNode * dummy = new ListNode ( 0 , head );
ListNode * cur = dummy ;
while ( cur -> next && cur -> next -> next ) {
if ( cur -> next -> val == cur -> next -> next -> val ) {
int x = cur -> next -> val ;
while ( cur -> next && cur -> next -> val == x ) {
cur -> next = cur -> next -> next ;
}
} else {
cur = cur -> next ;
}
}
return dummy -> next ;
}
};
旋转链表 旋转链表
给你一个链表的头节点 head ,旋转链表,将链表每个节点向右移动 k 个位置。

示例 1:
输入:head = [1,2,3,4,5], k = 2
输出:[4,5,1,2,3]

示例 2:
输入:head = [0,1,2], k = 4
输出:[2,0,1]

提示:
链表中节点的数目在范围 [0, 500] 内
-100 <= Node.val <= 100
0 <= k <= 2 * 10^ 9
思路1 成环再掐断 先连成环,再从指定的位置断开。
例如长度为4,k为2,就需要从第二个节点往后断开,第二个节点作为尾节点,第三个节点为头。
class Solution {
public:
ListNode * rotateRight ( ListNode * head , int k ) {
if ( head == nullptr || head -> next == nullptr ) {
return head ;
}
int count = 0 ;
ListNode * tail = head ;
while ( tail -> next != nullptr ) {
count ++ ;
tail = tail -> next ;
}
count ++ ;
// 需要掐断的第几个节点,从这里之后掐断
int breakPos = count > k ? count - k : count - ( k % count );
// 二者相等,直接原地返回
if ( breakPos == count ) {
return head ;
}
// 先成环再掐断
ListNode * p = head ;
tail -> next = head ;
ListNode * newHead = p -> next ;
// p在头节点,移动到要断的这个节点
for ( int i = 0 ; i < breakPos - 1 ; i ++ ) {
p = p -> next ;
newHead = p -> next ;
}
p -> next = nullptr ;
return newHead ;
}
};
官方代码 class Solution {
public:
ListNode * rotateRight ( ListNode * head , int k ) {
if ( k == 0 || head == nullptr || head -> next == nullptr ) {
return head ;
}
int n = 1 ;
ListNode * iter = head ;
while ( iter -> next != nullptr ) {
iter = iter -> next ;
n ++ ;
}
int add = n - k % n ;
if ( add == n ) {
return head ;
}
iter -> next = head ;
while ( add -- ) {
iter = iter -> next ;
}
ListNode * ret = iter -> next ;
iter -> next = nullptr ;
return ret ;
}
};
流程上一致,写法上更简洁精炼。
分隔链表 分隔链表
给你一个链表的头节点 head 和一个特定值 x ,请你对链表进行分隔,使得所有 小于 x 的节点都出现在 大于或等于 x 的节点之前。

你应当 保留 两个分区中每个节点的初始相对位置。

示例 1:
输入:head = [1,4,3,2,5,2], x = 3
输出:[1,2,2,4,3,5]

示例 2:
输入:head = [2,1], x = 2
输出:[1,2]

提示:
链表中节点的数目在范围 [0, 200] 内
-100 <= Node.val <= 100
-200 <= x <= 200
思路1 使用快慢指针,快指针一直往前,负责需要前移的节点的拆除,慢指针永远指向小于这个值的最新节点,负责小节点的承接。最好加一个虚拟头节点,来防止第一个节点即属于大节点的情况。
class Solution {
public:
ListNode * partition ( ListNode * head , int x ) {
if ( ! head || ! head -> next )
return head ;
// 使用头结点方便操作
ListNode * pre_node = new ListNode ( - 1 ), * pre = pre_node , * curr = pre ;
pre_node -> next = head ;
// curr指向小于x的结点的前一个结点,pre指向小于值结点链的最后一个结点
while ( curr && curr -> next ) {
// 将后链的小于值的结点摘下尾插前链中
if ( curr -> next -> val < x ) {
ListNode * tem = curr -> next ;
curr -> next = tem -> next ;
tem -> next = pre -> next ;
pre -> next = tem ;
// 当pre == curr时同时向后移动两个指针
if ( curr == pre )
curr = curr -> next ;
pre = tem ;
} else
curr = curr -> next ;
}
return pre_node -> next ;
}
};
官方题解 直观来说我们只需维护两个链表 small 和 large 即可,small 链表按顺序存储所有小于 x 的节点,large 链表按顺序存储所有大于等于 x 的节点。遍历完原链表后,我们只要将 small 链表尾节点指向 large 链表的头节点即能完成对链表的分隔。
为了实现上述思路,我们设 smallHead 和 largeHead 分别为两个链表的哑节点,即它们的 next 指针指向链表的头节点,这样做的目的是为了更方便地处理头节点为空的边界条件。同时设 small 和 large 节点指向当前链表的末尾节点。开始时 smallHead=small,largeHead=large。随后,从前往后遍历链表,判断当前链表的节点值是否小于 x,如果小于就将 small 的 next 指针指向该节点,否则将 large 的 next 指针指向该节点。
遍历结束后,我们将 large 的 next 指针置空,这是因为当前节点复用的是原链表的节点,而其 next 指针可能指向一个小于 x 的节点,我们需要切断这个引用。同时将 small 的 next 指针指向 largeHead 的 next 指针指向的节点,即真正意义上的 large 链表的头节点。最后返回 smallHead 的 next 指针即为我们要求的答案。
class Solution {
public:
ListNode * partition ( ListNode * head , int x ) {
ListNode * small = new ListNode ( 0 );
ListNode * smallHead = small ;
ListNode * large = new ListNode ( 0 );
ListNode * largeHead = large ;
while ( head != nullptr ) {
if ( head -> val < x ) {
small -> next = head ;
small = small -> next ;
} else {
large -> next = head ;
large = large -> next ;
}
head = head -> next ;
}
large -> next = nullptr ;
small -> next = largeHead -> next ;
return smallHead -> next ;
}
};
LRU缓存 LRU缓存
请你设计并实现一个满足  LRU (最近最少使用) 缓存 约束的数据结构。
实现 LRUCache 类:
LRUCache(int capacity) 以 正整数 作为容量 capacity 初始化 LRU 缓存
int get(int key) 如果关键字 key 存在于缓存中,则返回关键字的值,否则返回 -1 。
void put(int key, int value) 如果关键字 key 已经存在,则变更其数据值 value ;如果不存在,则向缓存中插入该组 key-value 。如果插入操作导致关键字数量超过 capacity ,则应该 逐出 最久未使用的关键字。
函数 get 和 put 必须以 O(1) 的平均时间复杂度运行。

示例:
输入
["LRUCache", "put", "put", "get", "put", "get", "put", "get", "get", "get"]
[[2], [1, 1], [2, 2], [1], [3, 3], [2], [4, 4], [1], [3], [4]]
输出
[null, null, null, 1, null, -1, null, -1, 3, 4]

解释
LRUCache lRUCache = new LRUCache(2);
lRUCache.put(1, 1); // 缓存是 {1=1}
lRUCache.put(2, 2); // 缓存是 {1=1, 2=2}
lRUCache.get(1);    // 返回 1
lRUCache.put(3, 3); // 该操作会使得关键字 2 作废,缓存是 {1=1, 3=3}
lRUCache.get(2);    // 返回 -1 (未找到)
lRUCache.put(4, 4); // 该操作会使得关键字 1 作废,缓存是 {4=4, 3=3}
lRUCache.get(1);    // 返回 -1 (未找到)
lRUCache.get(3);    // 返回 3
lRUCache.get(4);    // 返回 4


提示:

1 <= capacity <= 3000
0 <= key <= 10000
0 <= value <= 105
最多调用 2 * 105 次 get 和 put
思路1 刚拿到有点懵,对于更新、插入、容量判断感觉还可以摸索实现,就是长期未用还不知如何实现。看到这张图,感觉就比较清晰了。触发过的往上移,那第一个节点就是最久未使用的。
LRU 缓存机制可以通过哈希表辅以双向链表实现,我们用一个哈希表和一个双向链表维护所有在缓存中的键值对。

双向链表按照被使用的顺序存储了这些键值对,靠近头部的键值对是最近使用的,而靠近尾部的键值对是最久未使用的。

哈希表即为普通的哈希映射(HashMap),通过缓存数据的键映射到其在双向链表中的位置。

这样以来,我们首先使用哈希表进行定位,找出缓存项在双向链表中的位置,随后将其移动到双向链表的头部,即可在 O(1) 的时间内完成 get 或者 put 操作。具体的方法如下:

对于 get 操作,首先判断 key 是否存在:

如果 key 不存在,则返回 −1;

如果 key 存在,则 key 对应的节点是最近被使用的节点。通过哈希表定位到该节点在双向链表中的位置,并将其移动到双向链表的头部,最后返回该节点的值。

对于 put 操作,首先判断 key 是否存在:

如果 key 不存在,使用 key 和 value 创建一个新的节点,在双向链表的头部添加该节点,并将 key 和该节点添加进哈希表中。然后判断双向链表的节点数是否超出容量,如果超出容量,则删除双向链表的尾部节点,并删除哈希表中对应的项;

如果 key 存在,则与 get 操作类似,先通过哈希表定位,再将对应的节点的值更新为 value,并将该节点移到双向链表的头部。

上述各项操作中,访问哈希表的时间复杂度为 O(1),在双向链表的头部添加节点、在双向链表的尾部删除节点的复杂度也为 O(1)。而将一个节点移到双向链表的头部,可以分成「删除该节点」和「在双向链表的头部添加节点」两步操作,都可以在 O(1) 时间内完成。

小贴士
在双向链表的实现中,使用一个伪头部(dummy head)和伪尾部(dummy tail)标记界限,这样在添加节点和删除节点的时候就不需要检查相邻的节点是否存在。
根据官方思想复刻 struct DoubleLinkedNode
{
int key ;
int value ;
DoubleLinkedNode * next ;
DoubleLinkedNode * prev ;
DoubleLinkedNode ( int key , int value ) : key ( key ), value ( value ), next ( nullptr ), prev ( nullptr ) {}
DoubleLinkedNode () : key ( 0 ), value ( 0 ), next ( nullptr ), prev ( nullptr ) {}
};
class LRUCache
{
private:
// map 的key存储的是节点的key, value存放指向节点地址的指针
unordered_map < int , DoubleLinkedNode *> dataMap ;
DoubleLinkedNode * dummyHead = new DoubleLinkedNode ( 0 , 0 );
DoubleLinkedNode * dummytail = new DoubleLinkedNode ( 0 , 0 );
int tempSize = 0 ;
int capacity = 0 ;
public:
LRUCache ( int _capacity )
{
capacity = _capacity ;
dummyHead -> next = dummytail ;
dummytail -> prev = dummytail ;
}
int get ( int key )
{
if ( dataMap . count ( key ) > 0 )
{
// 将查询过的节点移动到头部
moveToHead ( dataMap [ key ]);
return dataMap [ key ] -> value ;
}
else
{
return - 1 ;
}
}
void put ( int key , int value )
{
// 判断存在性
if ( dataMap . count ( key ) > 0 )
{
// 修改节点的value值,移到最前
dataMap [ key ] -> value = value ;
moveToHead ( dataMap [ key ]);
}
else
{
// 新建节点
DoubleLinkedNode * newNode = new DoubleLinkedNode ( key , value );
// 添加进头部
addToHead ( newNode );
// 添加进数据集
dataMap [ newNode -> key ] = newNode ;
tempSize ++ ;
// 检查容量
if ( tempSize > capacity )
{
removeTailNode ();
tempSize -- ;
}
}
}
void moveToHead ( DoubleLinkedNode * node )
{
removeNode ( node );
addToHead ( node );
}
void addToHead ( DoubleLinkedNode * node )
{
node -> next = dummyHead -> next ;
node -> prev = dummyHead ;
dummyHead -> next -> prev = node ;
dummyHead -> next = node ;
}
void removeNode ( DoubleLinkedNode * node )
{
node -> next -> prev = node -> prev ;
node -> prev -> next = node -> next ;
node -> next = nullptr ;
node -> prev = nullptr ;
}
void removeTailNode ()
{
DoubleLinkedNode * tail = dummytail -> prev ;
// 删除数据集中的内容
dataMap . erase ( tail -> key );
removeNode ( tail );
delete tail ;
}
};
官方版本如下,在超出容量移除的时候,写法略有不同。
struct DLinkedNode {
int key , value ;
DLinkedNode * prev ;
DLinkedNode * next ;
DLinkedNode () : key ( 0 ), value ( 0 ), prev ( nullptr ), next ( nullptr ) {}
DLinkedNode ( int _key , int _value ) : key ( _key ), value ( _value ), prev ( nullptr ), next ( nullptr ) {}
};
class LRUCache {
private:
unordered_map < int , DLinkedNode *> cache ;
DLinkedNode * head ;
DLinkedNode * tail ;
int size ;
int capacity ;
public:
LRUCache ( int _capacity ) : capacity ( _capacity ), size ( 0 ) {
// 使用伪头部和伪尾部节点
head = new DLinkedNode ();
tail = new DLinkedNode ();
head -> next = tail ;
tail -> prev = head ;
}
int get ( int key ) {
if ( ! cache . count ( key )) {
return - 1 ;
}
// 如果 key 存在,先通过哈希表定位,再移到头部
DLinkedNode * node = cache [ key ];
moveToHead ( node );
return node -> value ;
}
void put ( int key , int value ) {
if ( ! cache . count ( key )) {
// 如果 key 不存在,创建一个新的节点
DLinkedNode * node = new DLinkedNode ( key , value );
// 添加进哈希表
cache [ key ] = node ;
// 添加至双向链表的头部
addToHead ( node );
++ size ;
if ( size > capacity ) {
// 如果超出容量,删除双向链表的尾部节点
DLinkedNode * removed = removeTail ();
// 删除哈希表中对应的项
cache . erase ( removed -> key );
// 防止内存泄漏
delete removed ;
-- size ;
}
}
else {
// 如果 key 存在,先通过哈希表定位,再修改 value,并移到头部
DLinkedNode * node = cache [ key ];
node -> value = value ;
moveToHead ( node );
}
}
void addToHead ( DLinkedNode * node ) {
node -> prev = head ;
node -> next = head -> next ;
head -> next -> prev = node ;
head -> next = node ;
}
void removeNode ( DLinkedNode * node ) {
node -> prev -> next = node -> next ;
node -> next -> prev = node -> prev ;
}
void moveToHead ( DLinkedNode * node ) {
removeNode ( node );
addToHead ( node );
}
DLinkedNode * removeTail () {
DLinkedNode * node = tail -> prev ;
removeNode ( node );
return node ;
}
};
双链表对比单链表更不容易写断,可以先拆出来,再添加进去。将两边的同时要注意两个指针需要更新,next和prev两个都需要仔细操作;
拆分时将此节点的左右两个节点二指针互相连接即可。
添加时,需要将待添加位置的左右两个节点都指向这个节点,这个节点的next和prev也要指向插入位置左右的两个节点。
思路上很简单,更加考验代码细节设计编写。
C++ 提供了多种数据结构,每种都有其特定的用途和优势。以下是常见的 C++ 数据结构及其简单示例:
数组 (Array) 最基本的线性数据结构,元素在内存中连续存储。
#include <iostream>
using namespace std ;
int main () {
int arr [ 5 ] = { 1 , 2 , 3 , 4 , 5 };
for ( int i = 0 ; i < 5 ; i ++ ) {
cout << arr [ i ] << " " ;
}
return 0 ;
}
向量 (Vector) 动态数组,可以自动调整大小。
#include <iostream>
#include <vector>
using namespace std ;
int main () {
vector < int > vec = { 1 , 2 , 3 };
vec . push_back ( 4 ); // 添加元素
vec . pop_back (); // 移除最后一个元素
for ( int num : vec ) {
cout << num << " " ;
}
return 0 ;
}
链表 (Linked List) 包括单向链表、双向链表和循环链表。
#include <iostream>
using namespace std ;
struct Node {
int data ;
Node * next ;
};
int main () {
Node * head = new Node { 1 , nullptr };
head -> next = new Node { 2 , nullptr };
head -> next -> next = new Node { 3 , nullptr };
Node * current = head ;
while ( current != nullptr ) {
cout << current -> data << " " ;
current = current -> next ;
}
return 0 ;
}
栈 (Stack) 后进先出(LIFO)的数据结构。
#include <iostream>
#include <stack>
using namespace std ;
int main () {
stack < int > s ;
s . push ( 1 );
s . push ( 2 );
s . push ( 3 );
while ( ! s . empty ()) {
cout << s . top () << " " ;
s . pop ();
}
return 0 ;
}
除了pop,push,empty,top之外,还有size()用于查看元素个数,swap用于置换两个栈道内容。
swap() • 功能:交换两个栈的内容。 • 示例代码:
#include <vector>
#include <iostream>
#include <stack>
using namespace std ;
int main () {
stack < int > stack1 ;
stack1 . push ( 10 );
stack1 . push ( 20 );
stack < int > stack2 ;
stack2 . push ( 30 );
stack2 . push ( 40 );
stack1 . swap ( stack2 );
// 输出交换后 stack1 的栈顶元素
cout << "交换后 stack1 的栈顶元素: " << stack1 . top () << endl ;
return 0 ;
}
队列 (Queue) 先进先出(FIFO)的数据结构。
#include <iostream>
#include <queue>
using namespace std ;
int main () {
queue < int > q ;
q . push ( 1 );
q . push ( 2 );
q . push ( 3 );
while ( ! q . empty ()) {
cout << q . front () << " " ;
q . pop ();
}
return 0 ;
}
优先队列 (Priority Queue) 元素按优先级出队。
#include <iostream>
#include <queue>
using namespace std ;
int main () {
priority_queue < int > pq ;
pq . push ( 3 );
pq . push ( 1 );
pq . push ( 4 );
pq . push ( 2 );
while ( ! pq . empty ()) {
cout << pq . top () << " " ;
pq . pop ();
}
return 0 ;
}
队列有front,back,empty,push,pop,size等常用函数。
集合 (Set) 存储唯一元素的有序集合,基于红黑树,可以自动排序,且元素唯一。重复添加相同元素,只有第一个可以成功添加。 常用方法有:insert,erase, clear, find寻找元素;count返回集合元素数量(0或1),
find() • 功能:查找指定元素,若找到则返回指向该元素的迭代器,未找到则返回 end() 迭代器。 • 实例代码:
#include <set>
#include <iostream>
int main () {
std :: set < int > intSet = { 3 , 7 , 10 , 15 };
auto it = intSet . find ( 7 );
if ( it != intSet . end ()) {
std :: cout << "找到元素: " << * it << std :: endl ;
} else {
std :: cout << "未找到元素" << std :: endl ;
}
return 0 ;
}
#include <iostream>
#include <set>
using namespace std ;
int main () {
set < int > s = { 3 , 1 , 4 , 1 , 5 , 9 };
for ( int num : s ) {
cout << num << " " ;
}
return 0 ;
}
映射 (Map) 键值对集合。
#include <iostream>
#include <map>
using namespace std ;
int main () {
map < string , int > ages ;
ages [ "Alice" ] = 25 ;
ages [ "Bob" ] = 30 ;
for ( const auto & pair : ages ) {
cout << pair . first << ": " << pair . second << endl ;
}
return 0 ;
}
哈希表 (Unordered Map) 基于哈希表的键值对集合。
#include <iostream>
#include <unordered_map>
using namespace std ;
int main () {
unordered_map < string , int > ages ;
ages [ "Alice" ] = 25 ;
ages [ "Bob" ] = 30 ;
for ( const auto & pair : ages ) {
cout << pair . first << ": " << pair . second << endl ;
}
return 0 ;
}
树 (Tree) 包括二叉树、二叉搜索树、AVL树等。
#include <iostream>
using namespace std ;
struct TreeNode {
int val ;
TreeNode * left ;
TreeNode * right ;
TreeNode ( int x ) : val ( x ), left ( nullptr ), right ( nullptr ) {}
};
void inorder ( TreeNode * root ) {
if ( root == nullptr ) return ;
inorder ( root -> left );
cout << root -> val << " " ;
inorder ( root -> right );
}
int main () {
TreeNode * root = new TreeNode ( 1 );
root -> left = new TreeNode ( 2 );
root -> right = new TreeNode ( 3 );
inorder ( root );
return 0 ;
}
图 (Graph) 可以使用邻接表或邻接矩阵表示。
#include <iostream>
#include <vector>
using namespace std ;
class Graph {
int V ;
vector < vector < int >> adj ;
public:
Graph ( int V ) : V ( V ), adj ( V ) {}
void addEdge ( int u , int v ) {
adj [ u ]. push_back ( v );
adj [ v ]. push_back ( u ); // 无向图
}
void print () {
for ( int i = 0 ; i < V ; i ++ ) {
cout << "顶点 " << i << " 的邻居: " ;
for ( int neighbor : adj [ i ]) {
cout << neighbor << " " ;
}
cout << endl ;
}
}
};
int main () {
Graph g ( 4 );
g . addEdge ( 0 , 1 );
g . addEdge ( 0 , 2 );
g . addEdge ( 1 , 3 );
g . print ();
return 0 ;
}
堆 (Heap) 用于实现优先队列的完全二叉树。
#include <iostream>
#include <queue>
using namespace std ;
int main () {
// 最大堆
priority_queue < int > max_heap ;
// 最小堆
priority_queue < int , vector < int > , greater < int >> min_heap ;
max_heap . push ( 3 );
max_heap . push ( 1 );
max_heap . push ( 4 );
cout << "最大堆: " ;
while ( ! max_heap . empty ()) {
cout << max_heap . top () << " " ;
max_heap . pop ();
}
min_heap . push ( 3 );
min_heap . push ( 1 );
min_heap . push ( 4 );
cout << " \n 最小堆: " ;
while ( ! min_heap . empty ()) {
cout << min_heap . top () << " " ;
min_heap . pop ();
}
return 0 ;
}
另外还有unordere*系列的容器,摈弃了自动排序,在时间复杂度上有了提升,像 unordered_map 等。
还有multi系列,让一些不可重复存储的容器,比如map和set,支持重复存储相同元素,就可以顺带使用其排序功能,快速实现一些功能。
这些数据结构是C++编程中常用的基础,STL(标准模板库)为许多数据结构提供了现成的实现,但在某些情况下,了解如何手动实现这些数据结构也是非常重要的。
八大数据结构 数组 数组是一种线性表数据结构,它使用一组连续的内存空间,来存储一组具有相同类型的数据。
C++举例:
#include <iostream>
int main () {
// 定义一个整型数组,大小为5
int arr [ 5 ] = { 1 , 2 , 3 , 4 , 5 };
// 访问数组元素
std :: cout << "第一个元素: " << arr [ 0 ] << std :: endl ;
std :: cout << "第二个元素: " << arr [ 1 ] << std :: endl ;
// 修改数组元素
arr [ 2 ] = 10 ;
std :: cout << "修改后的第三个元素: " << arr [ 2 ] << std :: endl ;
return 0 ;
}
数组的优点
随机访问:由于数组在内存中是连续存储的,因此可以通过索引快速访问任何元素,时间复杂度为O(1)。 缓存友好:连续的内存空间使得数组在缓存中更容易被加载和访问,提高了访问效率。 简单易用:数组的定义和使用非常简单,易于理解和实现。 数组的缺点
大小固定:数组的大小在定义时就确定了,无法动态扩展或缩小。如果需要存储更多的元素,就需要重新定义一个更大的数组,并将原数组的元素复制到新数组中。 插入和删除效率低:在数组中插入或删除元素时,需要移动大量的元素,时间复杂度为O(n)。 内存浪费:如果数组的大小定义得过大,可能会导致内存浪费;如果定义得过小,可能会导致数据溢出。 数组是一种简单而高效的数据结构,适用于需要快速随机访问元素的场景。然而,由于其 大小固定和插入删除效率低 的缺点,在需要动态调整大小或频繁插入删除元素的场景中,可能需要使用其他数据结构,如 链表 、 动态数组 (如C++中的std::vector)等。
动态数组原理 在C++中,动态数组的实现是基于其 内存管理机制 的,刚刚写到的静态数组由于其大小固定,使用上有诸多不便。
动态数组的实现原理是通过 内存分配 和 内存释放 来实现的。当需要添加元素时,如果当前数组已满,就需要重新分配一块更大的内存空间,并 将原数组的元素复制到新数组 中。当需要删除元素时,如果当前数组的元素较少,就需要释放内存空间,并将原数组的元素复制到新数组中。
动态数组的实现方式有很多种,其中最常见的是使用 指针 和 内存分配函数 来实现。在C++中,可以使用 new 运算符来分配内存,使用 delete 运算符来释放内存。
#include <iostream>
int main () {
// 定义一个动态数组,初始大小为5
int * arr = new int [ 5 ];
// 向数组中添加元素
arr [ 0 ] = 1 ;
arr [ 1 ] = 2 ;
arr [ 2 ] = 3 ;
arr [ 3 ] = 4 ;
arr [ 4 ] = 5 ;
// 输出数组元素
for ( int i = 0 ; i < 5 ; i ++ ) {
std :: cout << arr [ i ] << " " ;
}
std :: cout << std :: endl ;
// 重新分配内存,大小为10
int * newArr = new int [ 10 ];
// 将原数组的元素复制到新数组中
for ( int i = 0 ; i < 5 ; i ++ ) {
newArr [ i ] = arr [ i ];
}
// 释放原数组的内存
delete [] arr ;
// 将旧的数组指针指向新申请的大数组
arr = newArr ;
// 向数组中添加元素
arr [ 5 ] = 6 ;
arr [ 6 ] = 7 ;
arr [ 7 ] = 8 ;
arr [ 8 ] = 9 ;
arr [ 9 ] = 10 ;
// 输出数组元素
for ( int i = 0 ; i < 10 ; i ++ ) {
std :: cout << arr [ i ] << " " ;
}
std :: cout << std :: endl ;
// 释放新数组的内存
delete [] newArr ;
return 0 ;
}
链表 链表是一种非连续存储的线性结构,每个元素包含 数据 和指向下一个元素的指针 。链表的优点是插入和删除操作高效 ,但访问速度较慢 。
单向链表每个节点包含数据和指向下一个节点的指针。双向链表每个节点包含数据和 指向前一个节点和后一个节点 的指针。
#include <iostream>
// 定义链表节点
struct ListNode {
int val ;
ListNode * next ;
ListNode ( int x ) : val ( x ), next ( NULL ) {}
};
int main () {
// 创建链表
ListNode * head = new ListNode ( 1 );
ListNode * second = new ListNode ( 2 );
ListNode * third = new ListNode ( 3 );
head -> next = second ;
second -> next = third ;
// 访问链表元素
ListNode * current = head ;
while ( current != NULL ) {
std :: cout << current -> val << " " ;
current = current -> next ;
}
return 0 ;
}
链表的优点
动态大小:链表的大小可以动态增长或缩小,不需要预先分配固定大小的内存。 插入和删除高效:在链表中插入或删除元素时,只需要修改指针,不需要移动大量的元素,时间复杂度为O(1)。 链表的缺点
随机访问效率低:由于链表的元素不是连续存储的,因此无法通过索引快速访问元素,需要从头开始遍历链表,时间复杂度为O(n)。 额外的内存开销:链表的每个节点需要额外的指针来指向下一个节点,增加了内存开销。 链表是一种灵活的数据结构,适用于需要 频繁插入和删除元素 的场景。然而,由于其随机访问效率低的缺点,在需要快速随机访问元素的场景中,可能需要使用其他数据结构,如数组、动态数组(如C++中的std::vector)等。
栈 栈(Stack)是一种后进先出(LIFO, Last In First Out)的数据结构,它只允许在一端进行插入和删除操作。这一端通常被称为栈顶。栈的操作主要有两种:压入(push)和弹出(pop)。压入操作将元素添加到栈顶,弹出操作则从栈顶移除元素。
#include <iostream>
#include <stack>
int main () {
// 创建一个栈
std :: stack < int > myStack ;
// 压入元素
myStack . push ( 1 );
myStack . push ( 2 );
myStack . push ( 3 );
// 访问栈顶元素
std :: cout << "栈顶元素: " << myStack . top () << std :: endl ;
// 弹出栈顶元素
myStack . pop ();
// 再次访问栈顶元素
std :: cout << "弹出一个元素后,栈顶元素: " << myStack . top () << std :: endl ;
return 0 ;
}
栈的优点
简单高效:栈的操作非常简单,只需要在栈顶进行插入和删除操作,时间复杂度为O(1)。 内存管理方便:栈的内存管理由系统自动完成,不需要手动分配和释放内存。 支持递归:栈在递归算法中非常有用,因为递归调用的返回地址和局部变量都存储在栈中。 栈的缺点
大小固定:栈的大小通常是固定的,如果栈满了,再进行压入操作就会导致栈溢出。 不支持随机访问:栈不支持随机访问,只能访问栈顶元素。 栈是一种简单而高效的数据结构,适用于需要 后进先出 操作的场景,如函数调用、表达式求值等。然而,由于其 大小固定和不支持随机访问 ,在需要动态调整大小或随机访问元素的场景中,可能需要如动态数组(如C++中的std::vector)等的数据结构。
队列 队列(Queue)是一种先进先出(FIFO, First In First Out)的数据结构,它只允许在一端进行插入操作(队尾),在另一端进行删除操作(队头)。队列常用于广度优先搜索和任务调度等场景。
#include <iostream>
#include <queue>
int main () {
// 创建一个队列
std :: queue < int > myQueue ;
// 入队操作
myQueue . push ( 1 );
myQueue . push ( 2 );
myQueue . push ( 3 );
// 访问队头元素
std :: cout << "队头元素: " << myQueue . front () << std :: endl ;
// 出队操作
myQueue . pop ();
// 再次访问队头元素
std :: cout << "出队一个元素后,队头元素: " << myQueue . front () << std :: endl ;
return 0 ;
}
队列的优点
简单高效:队列的操作非常简单,只需要在队尾进行插入操作,在队头进行删除操作,时间复杂度为O(1)。 顺序性:队列能够保持元素的顺序,先进入队列的元素先被处理,这对于需要按照顺序处理数据的场景非常有用。 支持并发:在多线程环境中,队列可以用于实现线程安全的数据共享,例如生产者-消费者模型。 队列的缺点
大小固定:队列的大小通常是固定的,如果队列满了,再进行插入操作就会导致队列溢出。 不支持随机访问:队列不支持随机访问,只能访问队头和队尾的元素。 树 树(Tree)是一种非线性的数据结构,它由 节点(Node)和边(Edge) 组成。每个节点可以有 零个或多个 子节点,而每个子节点又可以有零个或多个子节点,以此类推。树的顶部节点称为根节点(Root),没有子节点的节点称为叶子节点(Leaf)。树结构常用于表示 层次关系 的数据,如文件系统。
二叉树(Binary Tree) 是一种特殊的树结构,它的每个节点 最多有两个 子节点,通常称为左子节点和右子节点。
二叉树的特点
每个节点最多有两个子节点:这是二叉树的定义,也是它与其他树结构的主要区别。 子节点的顺序:左子节点和右子节点是有顺序的,不能随意交换。即二叉树是有序树 递归定义:二叉树可以递归地定义为一个节点,该节点有一个数据元素和两个指向子二叉树的指针。 二叉树的类型
满二叉树:除了叶子节点外, 每个节点都有两个子节点 ,并且所有叶子节点都在同一层。 完全二叉树:除了最后一层外,其他层的节点数都是满的,并且最后一层的节点都靠左排列。 平衡二叉树:树上的每个节点,其左右两个子树的高度差的绝对值不超过1,并且左右两个子树都是一棵平衡二叉树。
二叉树的遍历
前序遍历:先访问根节点,然后递归遍历左子树,最后递归遍历右子树。 中序遍历:先递归遍历左子树,然后访问根节点,最后递归遍历右子树。 后序遍历:先递归遍历左子树,然后递归遍历右子树,最后访问根节点。 层序遍历:从根节点开始,按照从上到下、从左到右的顺序依次访问每个节点。 前三种称为深度优先遍历(DFS),层序遍历为广度优先遍历(BFS)。
#include <iostream>
// 定义二叉树节点
struct TreeNode {
int val ;
TreeNode * left ;
TreeNode * right ;
TreeNode ( int x ) : val ( x ), left ( NULL ), right ( NULL ) {}
};
// 前序遍历
void preorderTraversal ( TreeNode * root ) {
if ( root == NULL ) return ;
std :: cout << root -> val << " " ;
preorderTraversal ( root -> left );
preorderTraversal ( root -> right );
}
// 中序遍历
void inorderTraversal ( TreeNode * root ) {
if ( root == NULL ) return ;
inorderTraversal ( root -> left );
std :: cout << root -> val << " " ;
inorderTraversal ( root -> right );
}
// 后序遍历
void postorderTraversal ( TreeNode * root ) {
if ( root == NULL ) return ;
postorderTraversal ( root -> left );
postorderTraversal ( root -> right );
std :: cout << root -> val << " " ;
}
// 层序遍历
void levelOrderTraversal ( TreeNode * root ) {
if ( root == NULL ) return ;
std :: queue < TreeNode *> q ;
q . push ( root );
while ( ! q . empty ()) {
TreeNode * node = q . front ();
q . pop ();
std :: cout << node -> val << " " ;
if ( node -> left != NULL ) q . push ( node -> left );
if ( node -> right != NULL ) q . push ( node -> right );
}
}
int main () {
// 创建二叉树
TreeNode * root = new TreeNode ( 1 );
root -> left = new TreeNode ( 2 );
root -> right = new TreeNode ( 3 );
root -> left -> left = new TreeNode ( 4 );
root -> left -> right = new TreeNode ( 5 );
// 前序遍历二叉树
std :: cout << "前序遍历结果: " ;
preorderTraversal ( root );
std :: cout << std :: endl ;
// 中序遍历二叉树
std :: cout << "中序遍历结果: " ;
inorderTraversal ( root );
std :: cout << std :: endl ;
// 后序遍历二叉树
std :: cout << "后序遍历结果: " ;
postorderTraversal ( root );
std :: cout << std :: endl ;
// 层序遍历二叉树
std :: cout << "层序遍历结果: " ;
levelOrderTraversal ( root );
std :: cout << std :: endl ;
return 0 ;
}
树的优点
层次结构清晰:树结构能够清晰地表示数据之间的层次关系,例如文件系统、组织结构等。 高效的搜索和插入操作:对于平衡树(如二叉搜索树),搜索、插入和删除操作的平均时间复杂度为O(log n),其中n是树中节点的数量。 动态数据结构:树的大小可以动态增长或缩小,不需要预先分配固定大小的内存。 树的缺点
实现复杂:相比于线性数据结构(如数组、链表),树的实现通常更加复杂,需要更多的代码和逻辑。 空间开销较大:树的每个节点需要额外的指针来指向其子节点,这增加了内存开销。 不支持随机访问:树不支持像数组那样的随机访问,访问特定节点需要从根节点开始遍历。 树是一种非常有用的数据结构,适用于表示 层次关系和需要高效搜索、插入操作 的场景。然而,由于其 实现复杂和空间开销较大 的缺点,在简单的线性数据结构能够满足需求的情况下,可能不需要使用树。
哈希表 哈希表(Hash Table)是一种根据关键码值(Key value)而直接进行访问的数据结构。它通过哈希函数 将键映射到数组 中的位置,从而实现快速查找。。这个映射函数叫做哈希函数,存放记录的数组叫做哈希表。哈希表的优点是查找速度快,但需要处理哈希冲突。
#include <iostream>
#include <unordered_map>
#include <string>
int main () {
// 创建一个哈希表
std :: unordered_map < std :: string , int > hashTable ;
// 插入键值对
hashTable [ "apple" ] = 1 ;
hashTable [ "banana" ] = 2 ;
hashTable [ "cherry" ] = 3 ;
// 查找键值对
std :: cout << "The value of 'apple' is: " << hashTable [ "apple" ] << std :: endl ;
// 删除键值对
hashTable . erase ( "banana" );
// 遍历哈希表
for ( const auto & pair : hashTable ) {
std :: cout << pair . first << ": " << pair . second << std :: endl ;
}
return 0 ;
}
哈希表的优点
快速查找:哈希表的查找、插入和删除操作的平均时间复杂度为O(1),这使得它在处理大量数据时非常高效。 灵活性:哈希表可以存储不同类型的数据,并且可以动态调整大小以适应数据的增长或减少。 高效的内存使用:哈希表通常比其他数据结构(如树)更节省内存,因为它们不需要维护复杂的指针结构。 哈希表的缺点
哈希冲突:不同的关键码值可能映射到相同的哈希表位置,这称为哈希冲突。解决哈希冲突需要额外的处理,这可能会增加时间和空间复杂度。 不支持顺序访问:哈希表不支持像数组或链表那样的顺序访问,因此在需要按顺序遍历数据的场景中可能不太适用。 哈希函数的选择:哈希表的性能很大程度上取决于哈希函数的选择。一个好的哈希函数应该能够均匀地分布关键码值,以减少哈希冲突的可能性。 哈希表是一种非常有用的数据结构,适用于需要快速查找和插入操作的场景。然而,由于其 哈希冲突和灵活性,不保证顺序 的缺点,在需要 顺序访问 或需要 维护复杂指针结构 的场景中,可能需要使用其他数据结构,如树或数组等。
堆 堆(Heap)是一种特殊的树结构,通常是一个 完全二叉树 。堆分为最大堆和最小堆,其中最大堆的每个节点的值都大于或等于其子节点的值,最小堆的每个节点的值都小于或等于其子节点的值。堆常用于实现优先队列,其中最大堆用于实现最大优先队列,最小堆用于实现最小优先队列。
#include <iostream>
#include <queue>
int main () {
// 创建一个最大堆
std :: priority_queue < int > maxHeap ;
// 插入元素
maxHeap . push ( 3 );
maxHeap . push ( 1 );
maxHeap . push ( 4 );
maxHeap . push ( 1 );
maxHeap . push ( 5 );
// 访问最大元素
std :: cout << "最大元素: " << maxHeap . top () << std :: endl ;
// 删除最大元素
maxHeap . pop ();
// 再次访问最大元素
std :: cout << "删除最大元素后,最大元素: " << maxHeap . top () << std :: endl ;
return 0 ;
}
堆的优点
高效的插入和删除操作:在堆中插入和删除元素的时间复杂度为O(log n),其中n是堆中元素的数量。这使得堆在处理大量数据时非常高效。 快速访问最大或最小元素:在最大堆中,根节点始终是最大元素;在最小堆中,根节点始终是最小元素。因此,可以在O(1)时间内访问最大或最小元素。 动态调整大小:堆可以动态调整大小,以适应数据的增长或减少。 堆的缺点
不支持随机访问:堆不支持像数组那样的随机访问,因此在需要按顺序遍历数据的场景中可能不太适用。 不保证元素的顺序:堆只保证根节点是最大或最小元素,而不保证其他元素的顺序。 空间开销:堆的每个节点需要额外的空间来存储其子节点的指针,这增加了内存开销。 堆是一种非常有用的数据结构,适用于需要快速访问最大或最小元素的场景,如优先队列。然而,由于其不支持随机访问和不保证元素顺序的特点,在某些特定场景下可能需要考虑其他数据结构。
图 图(Graph)是一种非线性的数据结构,由顶点(Vertex)和边(Edge)组成。顶点表示对象,边表示对象之间的关系。图分为有向图和无向图。图可以用来表示各种复杂的关系,如社交网络、交通网络、计算机网络等。
#include <iostream>
#include <vector>
#include <list>
class Graph {
private:
int numVertices ;
std :: vector < std :: list < int >> adjLists ;
public:
Graph ( int vertices ) : numVertices ( vertices ) {
adjLists . resize ( numVertices );
}
void addEdge ( int src , int dest ) {
adjLists [ src ]. push_back ( dest );
// 如果是无向图,需要添加反向边
// adjLists[dest].push_back(src);
}
void printGraph () {
for ( int i = 0 ; i < numVertices ; ++ i ) {
std :: cout << "Vertex " << i << ": " ;
for ( int neighbor : adjLists [ i ]) {
std :: cout << neighbor << " " ;
}
std :: cout << std :: endl ;
}
}
};
int main () {
Graph g ( 5 );
g . addEdge ( 0 , 1 );
g . addEdge ( 0 , 4 );
g . addEdge ( 1 , 2 );
g . addEdge ( 1 , 3 );
g . addEdge ( 1 , 4 );
g . addEdge ( 2 , 3 );
g . addEdge ( 3 , 4 );
g . printGraph ();
return 0 ;
}
图的优点
强大的表示能力:图可以表示各种复杂的关系,如社交网络中的朋友关系、交通网络中的道路连接等。 灵活性:图可以是有向的(边有方向)或无向的(边无方向),可以是加权的(边有权重)或无权的(边无权重)。 广泛的应用领域:图在许多领域都有广泛的应用,如计算机科学、数学、物理学、生物学、社会学等。 图的缺点
实现复杂:图的实现通常比其他数据结构更复杂,需要更多的代码和逻辑。 空间开销大:图的存储通常需要更多的空间,尤其是在处理大规模图时。 算法复杂度高:许多图算法的时间复杂度较高,如最短路径算法、最小生成树算法等。 图是一种非常强大的数据结构,适用于表示各种复杂的关系。然而,由于其实现复杂和空间开销大的缺点,在处理小规模数据或简单关系时,可能不需要使用图。
算法 算法思想 递归 递归是一种解决问题的方法,它将问题分解为更小的子问题,直到问题足够简单可以直接解决。递归的基本思想是将一个大问题分解为一个或多个相似的子问题,然后通过解决这些子问题来解决原始问题。
递归的基本步骤如下:
定义基本情况:确定递归的终止条件,即当问题足够简单时,不需要再分解为子问题,直接解决。 分解问题:将原始问题分解为一个或多个相似的子问题。 解决子问题:递归地解决子问题,得到子问题的解。 合并子问题:将子问题的解合并为原始问题的解。 #include <iostream>
int factorial ( int n ) {
if ( n == 0 ) {
return 1 ;
} else {
return n * factorial ( n - 1 );
}
}
int main () {
int n = 5 ;
int result = factorial ( n );
std :: cout << "Factorial of " << n << " is " << result << std :: endl ;
return 0 ;
}
递归的优点
简洁性:递归可以使代码更加简洁,因为它可以将复杂的问题分解为简单的子问题。 可扩展性:递归可以使算法更易于扩展,因为它可以将问题分解为更小的子问题,从而更容易地解决更大的问题。 递归的缺点
效率较低:递归的实现通常比迭代的实现效率较低,因为递归需要保存函数调用的状态,并且可能会导致栈溢出。 可读性较差:递归的实现可能会使代码变得难以理解,特别是当递归深度较大时。 递归是一种强大的算法思想,适用于解决许多问题。然而,递归的实现可能会导致效率较低,并且代码变得难以理解。在选择使用递归时,需要权衡其优点和缺点,并根据具体情况进行选择。
回溯 回溯是一种通过尝试不同的可能来解决问题的算法思想。它通常用于解决组合优化问题,如旅行商问题、子集和问题等。回溯的基本思想是从一个初始状态开始,尝试所有可能的选择,直到找到一个解或确定问题无解。
回溯的基本步骤如下:
定义初始状态:确定问题的初始状态,即问题的初始状态。 定义选择列表:确定在当前状态下可以进行的选择列表。 尝试选择:对于每个选择,尝试将其应用于当前状态,得到一个新的状态。 检查是否满足条件:检查新状态是否满足问题的条件,如果满足条件,则找到了一个解。 回溯:如果新状态不满足条件,则需要回溯到上一个状态,并尝试其他选择。 #include <iostream>
#include <vector>
void backtrack ( std :: vector < int >& nums , std :: vector < int >& path , std :: vector < std :: vector < int >>& result ) {
if ( path . size () == nums . size ()) {
result . push_back ( path );
return ;
}
for ( int num : nums ) {
if ( std :: find ( path . begin (), path . end (), num ) == path . end ()) {
path . push_back ( num );
backtrack ( nums , path , result );
path . pop_back ();
}
}
}
int main () {
std :: vector < int > nums = { 1 , 2 , 3 };
std :: vector < int > path ;
std :: vector < std :: vector < int >> result ;
backtrack ( nums , path , result );
for ( const auto & permutation : result ) {
for ( int num : permutation ) {
std :: cout << num << " " ;
}
std :: cout << std :: endl ;
}
return 0 ;
}
回溯的优点
灵活性:回溯可以使算法更灵活,因为它可以处理各种不同的问题。 易于理解:回溯的实现通常比其他算法更易于理解,因为它可以将问题分解为更小的子问题。 回溯的缺点
效率较低:回溯的实现通常比其他算法效率较低,因为它需要尝试所有可能的选择。 可读性较差:回溯的实现可能会使代码变得难以理解,特别是当递归深度较大时。 回溯是一种强大的算法思想,适用于解决组合优化问题。然而,回溯的实现可能会导致效率较低,并且代码变得难以理解。在选择使用回溯时,需要权衡其优点和缺点,并根据具体情况进行选择。
深度广度优先 深度优先搜索(DFS)和广度优先搜索(BFS)是两种常见的图遍历算法,用于在图中搜索特定的节点或路径。 深度优先搜索(DFS)是一种沿着树的深度遍历树的节点,尽可能深的搜索树的分支。它从根节点开始,沿着一条路径尽可能深入地搜索,直到无法继续为止,然后回溯到上一个节点,继续搜索其他路径。 广度优先搜索(BFS)是一种沿着树的宽度遍历树的节点。它从根节点开始,沿着树的宽度遍历节点,直到所有节点都被访问为止。
深度优先搜索(DFS)的基本步骤如下:
从起始节点开始,将其标记为已访问。 访问起始节点的所有未访问邻居节点,并将它们标记为已访问。 对于每个已访问的邻居节点,重复步骤2和3,直到所有节点都被访问。 广度优先搜索(BFS)的基本步骤如下:
从起始节点开始,将其标记为已访问,并将其加入队列。 从队列中取出一个节点,并访问它的所有未访问邻居节点,并将它们标记为已访问,并将它们加入队列。 重复步骤2和3,直到队列为空。 #include <iostream>
#include <vector>
#include <queue>
// 定义图的邻接表表示
std :: vector < std :: vector < int >> graph = {
{ 1 , 2 }, // 节点0的邻居节点为1和2
{ 0 , 2 , 3 }, // 节点1的邻居节点为0、2和3
{ 0 , 1 , 3 }, // 节点2的邻居节点为0、1和3
{ 1 , 2 } // 节点3的邻居节点为1和2
};
// 深度优先搜索
void dfs ( int start , std :: vector < bool >& visited ) {
visited [ start ] = true ;
std :: cout << start << " " ;
for ( int neighbor : graph [ start ]) {
if ( ! visited [ neighbor ]) {
dfs ( neighbor , visited );
}
}
}
// 广度优先搜索
void bfs ( int start , std :: vector < bool >& visited ) {
std :: queue < int > q ;
q . push ( start );
visited [ start ] = true ;
while ( ! q . empty ()) {
int current = q . front ();
q . pop ();
std :: cout << current << " " ;
for ( int neighbor : graph [ current ]) {
if ( ! visited [ neighbor ]) {
q . push ( neighbor );
visited [ neighbor ] = true ;
}
}
}
}
int main () {
int startNode = 0 ;
std :: vector < bool > visited ( graph . size (), false );
std :: cout << "深度优先搜索结果: " ;
dfs ( startNode , visited );
std :: cout << std :: endl ;
visited . assign ( graph . size (), false );
std :: cout << "广度优先搜索结果: " ;
bfs ( startNode , visited );
std :: cout << std :: endl ;
return 0 ;
}
深度优先搜索(DFS)的优点
内存效率高:深度优先搜索(DFS)不需要额外的空间来存储节点,因此在内存使用上比广度优先搜索(BFS)更高效。 易于实现:深度优先搜索(DFS)的实现相对简单,因为它只需要递归地遍历图即可。 深度优先搜索(DFS)的缺点
可能陷入无限循环:深度优先搜索(DFS)可能会陷入无限循环,特别是在图中存在环的情况下。 可能无法找到最短路径:深度优先搜索(DFS)可能无法找到最短路径,特别 是在图中存在环的情况下。 广度优先搜索(BFS)的优点
找到最短路径:广度优先搜索(BFS)可以找到最短路径,因为它是一种按层次遍历的算法。 内存效率低:广度优先搜索(BFS)需要额外的空间来存储节点,因此在内存使用上比深度优先搜索(DFS)更差。 广度优先搜索(BFS)的缺点
可能无法找到最优解:广度优先搜索(BFS)可能无法找到最优解,特别是在图中存在环的情况下。 深度优先搜索(DFS)和广度优先搜索(BFS)都是图遍历算法,它们在不同的场景下有不同的应用。在选择使用深度优先搜索(DFS)还是广度优先搜索(BFS)时,需要根据具体情况进行选择。
动态规划 动态规划(Dynamic Programming)是一种解决复杂问题的算法思想,它通过将问题分解为子问题,并将子问题的解存储起来,以避免重复计算,从而提高算法的效率。动态规划通常用于优化问题,如最长公共子序列、最短路径等。
动态规划的基本步骤如下:
定义子问题:将原始问题分解为若干个子问题。 确定状态:确定子问题的状态,即子问题的输入和输出。 确定状态转移方程:确定子问题之间的状态转移关系。 确定初始状态:确定子问题的初始状态。 #include <iostream>
#include <vector>
int fibonacci ( int n ) {
if ( n <= 1 ) {
return n ;
}
std :: vector < int > dp ( n + 1 , 0 );
dp [ 0 ] = 0 ;
dp [ 1 ] = 1 ;
for ( int i = 2 ; i <= n ; ++ i ) {
dp [ i ] = dp [ i - 1 ] + dp [ i - 2 ];
}
return dp [ n ];
}
int main () {
int n = 10 ;
int result = fibonacci ( n );
std :: cout << "Fibonacci(" << n << ") = " << result << std :: endl ;
return 0 ;
}
动态规划的优点
高效性:动态规划可以避免重复计算,从而提高算法的效率。 可扩展性:动态规划可以方便地扩展到其他问题。 动态规划的缺点
空间复杂度高:动态规划需要存储子问题的解,因此在空间使用上可能较高。 可读性较差:动态规划的实现可能会使代码变得难以理解,特别是在状态转移方程比较复杂的情况下。 动态规划是一种强大的算法思想,适用于解决复杂问题。然而,动态规划的实现可能会导致效率较低,并且代码变得难以理解。在选择使用动态规划时,需要根据具体情况进行选择。
贪婪算法 贪婪算法(Greedy Algorithm)是一种近似解决问题的算法思想,它在每一步选择中都采取当前最优的选择,从而希望最终能够得到全局最优解。贪婪算法通常用于优化问题,如最短路径、背包问题等。
贪婪算法的基本步骤如下:
定义问题:确定要解决的问题。 确定贪心策略:确定每一步选择的贪心策略。 确定初始状态:确定子问题的初始状态。 #include <iostream>
#include <vector>
// 定义商品结构体
struct Item {
int weight ; // 商品重量
int value ; // 商品价值
};
// 贪婪算法求解背包问题
void knapsackGreedy ( std :: vector < Item >& items , int capacity ) {
int n = items . size ();
std :: vector < bool > selected ( n , false ); // 记录每个商品是否被选中
int totalWeight = 0 ; // 记录当前背包的总重量
for ( int i = 0 ; i < n ; ++ i ) {
if ( totalWeight + items [ i ]. weight <= capacity ) {
selected [ i ] = true ;
totalWeight += items [ i ]. weight ;
} else {
break ; // 背包已满,停止选择
}
}
// 输出结果
std :: cout << "Selected items: " ;
for ( int i = 0 ; i < n ; ++ i ) {
if ( selected [ i ]) {
std :: cout << "(" << items [ i ]. weight << ", " << items [ i ]. value << ") " ;
}
}
std :: cout << std :: endl ;
}
int main () {
std :: vector < Item > items = { { 10 , 60 }, { 20 , 100 }, { 30 , 120 } };
int capacity = 50 ;
knapsackGreedy ( items , capacity );
return 0 ;
}
贪婪算法的优点
高效性:贪婪算法可以在多项式时间内找到近似最优解。 贪婪算法的缺点
不保证最优解:贪婪算法可能无法找到全局最优解,只能找到近似最优解。 不适用范围广:贪婪算法通常只适用于特定类型的问题,不适用于所有问题。 贪婪算法是一种简单但高效的算法思想,适用于解决优化问题。然而,贪婪算法可能无法找到全局最优解,只能找到近似最优解。在选择使用贪婪算法时,需要根据具体情况进行选择。
排序算法 冒泡排序 冒泡排序(Bubble Sort)是一种简单的排序算法,它重复地遍历要排序的数列,一次比较两个元素,如果它们的顺序错误就把它们交换过来。
每一轮,从原乱序的数组头部开始,每两个元素比较大小并进行交换,直到这一轮当中最大或最小的元素被放置在数组的尾部,然后不断地重复这个过程,直到所有元素都排好位置。
冒泡排序(Bubble Sort)是一种简单的排序算法,它重复地遍历要排序的数列,一次比较两个元素,如果它们的顺序错误就把它们交换过来。
#include <iostream>
#include <vector>
void bubbleSort ( std :: vector < int >& arr ) {
int n = arr . size ();
for ( int i = 0 ; i < n - 1 ; ++ i ) {
for ( int j = 0 ; j < n - i - 1 ; ++ j ) {
if ( arr [ j ] > arr [ j + 1 ]) {
// 交换 arr[j] 和 arr[j + 1]
// 将比较大的元素往后移动
std :: swap ( arr [ j ], arr [ j + 1 ]);
}
}
}
}
int main () {
std :: vector < int > arr = { 64 , 34 , 25 , 12 , 22 , 11 , 90 };
bubbleSort ( arr );
std :: cout << "排序后的数组: " ;
for ( int num : arr ) {
std :: cout << num << " " ;
}
std :: cout << std :: endl ;
return 0 ;
}
冒泡排序的优点
简单易懂:冒泡排序的实现非常简单,易于理解和实现,适合初学者学习排序算法的基本概念。 稳定性:冒泡排序是一种稳定的排序算法,即相等元素的相对顺序在排序后不会改变。 冒泡排序的缺点
效率较低:冒泡排序的时间复杂度为O(n^2),其中n是要排序的元素数量。这意味着当处理大量数据时,冒泡排序的效率会非常低。 不适合大规模数据:由于其时间复杂度较高,冒泡排序不适合用于大规模数据的排序。 冒泡排序是一种简单但效率较低的排序算法,适用于小规模数据的排序或作为学习排序算法的入门示例。在实际应用中,对于大规模数据的排序,通常会使用更高效的排序算法,如快速排序、归并排序等。
插入排序 插入排序(Insertion Sort)是一种简单直观的排序算法,它的工作原理是通过从前往后构建有序序列,对于当前检查的未排序数据,在前面已排序序列中从后向前扫描,找到相应位置并插入。
#include <iostream>
#include <vector>
void insertionSort ( std :: vector < int >& arr ) {
int n = arr . size ();
for ( int i = 1 ; i < n ; ++ i ) {
int key = arr [ i ];
int j = i - 1 ;
// 将大于key的元素向后移动
while ( j >= 0 && arr [ j ] > key ) {
arr [ j + 1 ] = arr [ j ];
-- j ;
}
arr [ j + 1 ] = key ;
}
}
int main () {
std :: vector < int > arr = { 64 , 34 , 25 , 12 , 22 , 11 , 90 };
insertionSort ( arr );
std :: cout << "排序后的数组: " ;
for ( int num : arr ) {
std :: cout << num << " " ;
}
std :: cout << std :: endl ;
return 0 ;
}
前两次循环的过程图:
插入排序的优点
简单易懂:插入排序的实现非常简单,易于理解和实现,适合初学者学习排序算法的基本概念。 稳定性:插入排序是一种稳定的排序算法,即相等元素的相对顺序在排序后不会改变。 插入排序的缺点
效率较低:插入排序的时间复杂度为O(n^2),其中n是要排序的元素数量。这意味着当处理大量数据时,插入排序的效率会非常低。 不适合大规模数据:由于其时间复杂度较高,插入排序不适合用于大规模数据的排序。 插入排序是一种简单但效率较低的排序算法,适用于 小规模数据的排序 或作为学习排序算法的入门示例。在实际应用中,对于大规模数据的排序,通常会使用更高效的排序算法,如快速排序、归并排序等。
快速排序 快速排序(Quick Sort)是一种高效的排序算法,它基于分治的策略来对数组进行排序。快速排序的基本思想是选择一个基准元素,将数组分为两部分,一部分的所有元素都比基准元素小,另一部分的所有元素都比基准元素大,然后对这两部分分别进行排序。
#include <iostream>
#include <vector>
// 划分函数,选取一个基准元素,将数组分为两部分,走完之后,基准元素插入到其该在的位置,其右侧所有元素都比基准元素大,左侧所有元素都比基准元素小
int partition ( std :: vector < int >& arr , int low , int high ){
int base = arr [ high ];
int baseIndex = low ;
// 遍历数组,将所有小于基准元素的元素都移动到基准元素的左侧
for ( int i = low ; i <= high ; i ++ ){
if ( arr [ i ] < base ){
std :: swap ( arr [ i ], arr [ baseIndex ]);
baseIndex ++ ;
}
}
// 将基准元素插入到其该在的位置
std :: swap ( arr [ high ], arr [ baseIndex ]);
return baseIndex ;
}
// 递归快速排序,只要目标区域包含两个及以上的元素,就继续排序
void quickSort ( std :: vector < int >& arr , int low , int high ){
if ( low < high ){
int baseIndex = partition ( arr , low , high );
quickSort ( arr , low , baseIndex - 1 );
quickSort ( arr , baseIndex + 1 , high );
}
}
int main () {
std :: vector < int > arr = { 90 , 34 , 25 , 12 , 22 , 11 , 64 };
int n = arr . size ();
quickSort ( arr , 0 , n - 1 );
std :: cout << "排序后的数组: " ;
for ( int num : arr ) {
std :: cout << num << " " ;
}
std :: cout << std :: endl ;
return 0 ;
}
partition函数:选择一个基准元素(通常是数组的最后一个元素),将数组分为两部分,左边的元素都小于基准元素,右边的元素都大于基准元素。 quickSort函数:递归地对划分后的子数组进行排序。 main函数:在main函数中,我们创建了一个包含一些整数的向量,并调用quickSort函数对其进行排序。最后,我们输出排序后的数组。
首次调用的结果:
快速排序的优点
高效性:快速排序的平均时间复杂度为O(n log n),在大多数情况下比其他排序算法(如冒泡排序、插入排序等)更快。 原地排序:快速排序是一种原地排序算法,它不需要额外的存储空间来存储临时数据。 适应性:快速排序可以根据数据的分布情况进行自适应调整,对于已经部分有序的数据也能表现出较好的性能。 快速排序的缺点
不稳定性:快速排序是一种不稳定的排序算法,即相等元素的相对顺序在排序后可能会改变。 最坏情况性能:在最坏情况下 ,快速排序的时间复杂度为O(n^2),这种情况发生在数组已经有序或接近有序时。 递归深度:快速排序是一种递归算法,在处理大规模数据时,可能会导致栈溢出的问题。 快速排序是一种高效的排序算法,适用于大规模数据的排序。然而,在最坏情况下,快速排序的性能可能会受到影响,因此在实际应用中,通常会使用更稳定的排序算法,如归并排序。
归并排序 归并排序(Merge Sort)是一种分治算法,它将一个数组分成两个子数组,分别对这两个子数组进行排序,然后将它们合并成一个有序的数组。归并排序的基本思想是将数组分成两半,对每一半进行排序,然后将排序好的两半合并起来。
#include <iostream>
#include <vector>
// 归并函数,将两个有序的子数组合并成一个有序的数组
void merge ( std :: vector < int >& arr , int left , int mid , int right ){
int leftSize = mid - left + 1 ;
int rightSize = right - mid ;
std :: vector < int > leftArr ( leftSize );
std :: vector < int > rightArr ( rightSize );
// 将左右两个子数组分别复制到临时数组中
for ( int i = 0 ; i < leftSize ; i ++ ){
leftArr [ i ] = arr [ left + i ];
}
for ( int j = 0 ; j < rightSize ; j ++ ){
rightArr [ j ] = arr [ mid + 1 + j ];
}
// 合并两个有序的子数组
int i = 0 ;
int j = 0 ;
int k = left ;
while ( i < leftSize && j < rightSize ){
if ( leftArr [ i ] <= rightArr [ j ]){
arr [ k ] = leftArr [ i ];
i ++ ;
} else {
arr [ k ] = rightArr [ j ];
j ++ ;
}
k ++ ;
}
// 将剩余的元素复制到数组中
while ( i < leftSize ){
arr [ k ] = leftArr [ i ];
i ++ ;
k ++ ;
}
while ( j < rightSize ){
arr [ k ] = rightArr [ j ];
j ++ ;
k ++ ;
}
}
// 递归归并排序,只要目标区域包含两个及以上的元素,就继续排序
void mergeSort ( std :: vector < int >& arr , int left , int right ){
if ( left < right ){
int mid = left + ( right - left ) / 2 ;
mergeSort ( arr , left , mid );
mergeSort ( arr , mid + 1 , right );
merge ( arr , left , mid , right );
}
}
int main () {
std :: vector < int > arr = { 90 , 34 , 25 , 12 , 22 , 11 , 64 };
int n = arr . size ();
mergeSort ( arr , 0 , n - 1 );
std :: cout << "排序后的数组: " ;
for ( int num : arr ) {
std :: cout << num << " " ;
}
std :: cout << std :: endl ;
return 0 ;
}
归并排序的优点
稳定性:归并排序是一种稳定的排序算法,即相等元素的相对顺序在排序后不会改变。 高效性:归并排序的平均时间复杂度为O(n log n),在大多数情况下比其他排序算法(如冒泡排序、插入排序等)更快。 适应性:归并排序可以根据数据的分布情况进行自适应调整,对于已经部分有序的数据也能表现出较好的性能。 归并排序的缺点
空间开销:归并排序需要额外的空间来存储临时数据,这可能会导致空间开销较大。 递归深度:归并排序是一种递归算法,在处理大规模数据时,可能会导致栈溢出的问题。 归并排序是一种高效的排序算法,适用于小规模数据的排序。然而,在空间开销和递归深度方面,归并排序可能会受到限制。
选择排序 选择排序是一种简单直观的排序算法,它的工作原理是每次从待排序的数据元素中选出最小(或最大)的一个元素,存放在序列的起始位置(末尾),然后再从剩余未排序元素中继续寻找,换位。以此类推,直到全部待排序的数据元素排完。
#include <iostream>
#include <vector>
void selectionSort ( std :: vector < int >& arr ) {
int n = arr . size ();
for ( int i = 0 ; i < n - 1 ; ++ i ) {
int minIndex = i ;
for ( int j = i + 1 ; j < n ; ++ j ) {
if ( arr [ j ] < arr [ minIndex ]) {
minIndex = j ;
}
}
std :: swap ( arr [ i ], arr [ minIndex ]);
}
}
int main () {
std :: vector < int > arr = { 64 , 25 , 12 , 22 , 11 , 90 };
selectionSort ( arr );
std :: cout << "排序后的数组: " ;
for ( int num : arr ) {
std :: cout << num << " " ;
}
std :: cout << std :: endl ;
return 0 ;
}
选择排序的优点
简单易懂:选择排序的实现非常简单,易于理解和实现,适合初学者学习排序算法的基本概念。 选择排序的缺点
效率较低:选择排序的时间复杂度为O(n^2),其中n是要排序的元素数量。这意味着当处理大量数据时,选择排序的效率会非常低。 选择排序是一种简单但效率较低的排序算法,适用于小规模数据的排序或作为学习排序算法的入门示例。
堆排序 堆排序是一种高效的排序算法,它基于堆数据结构来实现。堆排序的基本思想是将待排序的数组构建成一个最大堆(或最小堆),然后将堆顶元素(最大或最小)与堆的最后一个元素交换,然后将堆的大小减1,再调整堆,重复上述过程,直到堆的大小为1。
#include <iostream>
#include <vector>
// 调整堆,将以index为根节点的子树调整为最大堆
void heapify ( std :: vector < int >& arr , int n , int index ) {
int largest = index ;
int left = 2 * index + 1 ;
int right = 2 * index + 2 ;
if ( left < n && arr [ left ] > arr [ largest ]) {
largest = left ;
}
if ( right < n && arr [ right ] > arr [ largest ]) {
largest = right ;
}
if ( largest != index ) {
std :: swap ( arr [ index ], arr [ largest ]);
heapify ( arr , n , largest );
}
}
void heapSort ( std :: vector < int >& arr ) {
int n = arr . size ();
// 构建最大堆
for ( int i = n / 2 - 1 ; i >= 0 ; -- i ) {
heapify ( arr , n , i );
}
// 依次取出堆顶元素,并调整堆
for ( int i = n - 1 ; i >= 0 ; -- i ) {
std :: swap ( arr [ 0 ], arr [ i ]);
heapify ( arr , i , 0 );
}
}
int main () {
std :: vector < int > arr = { 64 , 25 , 12 , 22 , 11 , 90 };
heapSort ( arr );
std :: cout << "排序后的数组: " ;
for ( int num : arr ) {
std :: cout << num << " " ;
}
std :: cout << std :: endl ;
return 0 ;
}
堆排序的优点
高效性:堆排序的平均时间复杂度为O(n log n),在大多数情况下比其他排序算法(如冒泡排序、插入排序等)更快。 堆排序的缺点
不稳定性:堆排序是一种不稳定的排序算法,即相等元素的相对顺序在排序后可能会改变。 堆排序是一种高效的排序算法,适用于大规模数据的排序。然而,在最坏情况下,堆排序的性能可能会受到影响。
希尔排序 希尔排序是一种高效的排序算法,它基于插入排序的思想来实现。希尔排序的基本思想是将待排序的数组分成若干个子序列,对每个子序列进行插入排序,然后逐渐缩小子序列的间隔,直到间隔为1时,对整个数组进行一次插入排序。
#include <iostream>
#include <vector>
void shellSort ( std :: vector < int >& arr ) {
int n = arr . size ();
// 初始间隔为数组长度的一半
for ( int gap = n / 2 ; gap > 0 ; gap /= 2 ) {
// 对每个子序列进行插入排序
for ( int i = gap ; i < n ; ++ i ) {
int temp = arr [ i ];
int j ;
for ( j = i ; j >= gap && arr [ j - gap ] > temp ; j -= gap ) {
arr [ j ] = arr [ j - gap ];
}
arr [ j ] = temp ;
}
}
}
int main () {
std :: vector < int > arr = { 64 , 25 , 12 , 22 , 11 , 90 };
shellSort ( arr );
std :: cout << "排序后的数组: " ;
for ( int num : arr ) {
std :: cout << num << " " ;
}
std :: cout << std :: endl ;
return 0 ;
}
希尔排序的优点
效率较高:希尔排序的时间复杂度优于普通的插入排序(O(n²)),尤其是在中等规模的数据集上表现较好。其时间复杂度通常在O(n log² n)到O(n²)之间,具体取决于步长序列的选择。 原地排序:希尔排序不需要额外的存储空间,是一种原地排序算法。 简单易实现:希尔排序的实现相对简单,尤其是对于已经熟悉插入排序的开发者来说。 适用于中等规模数据:对于中等规模的数据集,希尔排序的性能通常优于冒泡排序和选择排序等简单排序算法。 希尔排序的缺点
时间复杂度不稳定:希尔排序的时间复杂度依赖于步长序列的选择,最坏情况下可能退化为O(n²),无法保证在所有情况下都表现良好。 不适合大规模数据:对于大规模数据集,希尔排序的效率不如快速排序、归并排序或堆排序等更高效的算法。 步长序列选择复杂:步长序列的选择对希尔排序的性能影响很大,但如何选择最优的步长序列仍然是一个研究课题,没有统一的标准。 适用场景:
中等规模的数据集。 对内存使用有严格限制的场景(因为它是原地排序)。 作为其他更复杂排序算法的初步优化步骤。 希尔排序是一种简单且有效的排序算法,尤其适用于中等规模的数据集。虽然它在最坏情况下的时间复杂度较高,但通过选择合适的步长序列,可以在实际应用中取得较好的性能。对于大规模数据集,更高效的排序算法(如快速排序或归并排序)通常是更好的选择。
计数排序 计数排序是一种非比较排序算法,它的基本思想是利用数组的下标来确定元素的正确位置。计数排序的步骤如下:
找出待排序数组中的最大值和最小值。 创建一个计数数组,数组的大小为最大值减去最小值加1。 遍历待排序数组,将每个元素出现的次数记录在计数数组中。 对计数数组进行累加,得到每个元素在排序后的数组中的正确位置。 遍历待排序数组,根据计数数组将元素放置到正确的位置上。 #include <iostream>
#include <vector>
void countingSort ( std :: vector < int >& arr ) {
int n = arr . size ();
if ( n <= 1 ) {
return ;
}
// 找出最大值和最小值
int maxVal = arr [ 0 ];
int minVal = arr [ 0 ];
for ( int i = 1 ; i < n ; ++ i ) {
if ( arr [ i ] > maxVal ) {
maxVal = arr [ i ];
}
if ( arr [ i ] < minVal ) {
minVal = arr [ i ];
}
}
// 创建计数数组
int range = maxVal - minVal + 1 ;
std :: vector < int > count ( range , 0 );
// 统计每个元素出现的次数
for ( int i = 0 ; i < n ; ++ i ) {
count [ arr [ i ] - minVal ] ++ ;
}
// 对计数数组进行累加,得到每个元素在排序后的数组中的正确位置
for ( int i = 1 ; i < range ; ++ i ) {
count [ i ] += count [ i - 1 ];
}
// 遍历待排序数组,将元素放置到正确的位置上
std :: vector < int > sortedArr ( n );
for ( int i = n - 1 ; i >= 0 ; -- i ) {
sortedArr [ count [ arr [ i ] - minVal ] - 1 ] = arr [ i ];
count [ arr [ i ] - minVal ] -- ;
}
// 将排序后的数组复制回原数组
for ( int i = 0 ; i < n ; ++ i ) {
arr [ i ] = sortedArr [ i ];
}
}
int main () {
std :: vector < int > arr = { 64 , 25 , 12 , 22 , 11 , 90 };
countingSort ( arr );
std :: cout << "排序后的数组: " ;
for ( int num : arr ) {
std :: cout << num << " " ;
}
std :: cout << std :: endl ;
return 0 ;
}
计数排序的优点
高效性:计数排序的时间复杂度为O(n + k),其中n是待排序数组的长度,k是待排序数组中元素的范围。当k不是很大时,计数排序的性能非常好。 稳定性:计数排序是一种稳定的排序算法,即相等元素的相对顺序在排序后不会改变。 计数排序的缺点
空间开销:计数排序需要额外的空间来存储计数数组,其空间复杂度为O(k),其中k是待排序数组中元素的范围。当k很大时,计数排序的空间开销可能会很大。 计数排序是一种简单且高效的排序算法,尤其适用于待排序数组中元素的范围较小的情况。它的时间复杂度为O(n + k),其中n是待排序数组的长度,k是待排序数组中元素的范围。当k不是很大时,计数排序的性能非常好。然而,计数排序的空间开销可能会很大,特别是当k很大时。
横向比较 下面是这八种排序算法时间复杂度和空间复杂度的横向比较:
查找算法 基本查找 基本查找(Linear Search)是一种简单的查找算法,它的基本思想是遍历数组,逐个比较数组元素与目标元素是否相等。如果找到相等的元素,则返回其索引;如果遍历完整个数组都没有找到相等的元素,则返回-1。
#include <iostream>
#include <vector>
// 基本查找函数
int linearSearch ( const std :: vector < int >& arr , int target ) {
int n = arr . size ();
for ( int i = 0 ; i < n ; ++ i ) {
if ( arr [ i ] == target ) {
return i ; // 找到目标元素,返回索引
}
}
return - 1 ; // 目标元素不存在
}
int main () {
std :: vector < int > arr = { 2 , 4 , 6 , 8 , 10 , 12 , 14 , 16 , 18 , 20 };
int target = 12 ;
int result = linearSearch ( arr , target );
if ( result != - 1 ) {
std :: cout << "目标元素 " << target << " 在数组中的索引为 " << result << std :: endl ;
} else {
std :: cout << "目标元素 " << target << " 不在数组中" << std :: endl ;
}
return 0 ;
}
基本查找的优点
简单易懂:基本查找的实现非常简单,易于理解和实现,适合初学者学习查找算法的基本概念。 基本查找的缺点
效率较低:基本查找的时间复杂度为O(n),其中n是数组的长度。这意味着当数组的长度较大时,基本查找的效率会非常低。 基本查找是一种简单的查找算法,适用于小规模数据的查找或作为学习查找算法的入门示例。在实际应用中,对于大规模数据的查找,通常会使用更高效的查找算法,如二分查找、哈希查找等。
二分查找 二分查找(Binary Search)是一种在有序数组中查找特定元素的搜索算法。它的基本思想是将数组分成两部分,然后比较目标元素与中间元素的大小,如果目标元素小于中间元素,则在左半部分继续查找,否则在右半部分继续查找。重复这个过程,直到找到目标元素或者确定目标元素不存在。
#include <iostream>
#include <vector>
// 二分查找函数
int binarySearch ( const std :: vector < int >& arr , int target ) {
int left = 0 ;
int right = arr . size () - 1 ;
while ( left <= right ) {
int mid = left + ( right - left ) / 2 ;
if ( arr [ mid ] == target ) {
return mid ; // 找到目标元素,返回索引
} else if ( arr [ mid ] < target ) {
left = mid + 1 ; // 目标元素在右半部分
} else {
right = mid - 1 ; // 目标元素在左半部分
}
}
return - 1 ; // 目标元素不存在
}
int main () {
std :: vector < int > arr = { 2 , 4 , 6 , 8 , 10 , 12 , 14 , 16 , 18 , 20 };
int target = 12 ;
int result = binarySearch ( arr , target );
if ( result != - 1 ) {
std :: cout << "目标元素 " << target << " 在数组中的索引为 " << result << std :: endl ;
} else {
std :: cout << "目标元素 " << target << " 不在数组中" << std :: endl ;
}
return 0 ;
}
binarySearch函数:实现了二分查找算法。它接受一个有序数组和一个目标元素作为参数,并返回目标元素在数组中的索引,如果目标元素不存在,则返回-1。 main函数:在main函数中,我们创建了一个有序数组,并调用binarySearch函数查找目标元素。最后,根据返回结果输出相应的信息。
二分查找的优点
高效性:二分查找的时间复杂度为O(log n),其中n是数组的长度。这使得它在处理大规模数据时非常高效。 简单易懂:二分查找的实现相对简单,易于理解和实现。 二分查找的缺点
要求有序:二分查找要求数组必须是有序的,如果数组无序,则需要先进行排序,这会增加时间复杂度。 不适合动态数据:如果数组中的元素经常发生变化,那么每次查找前都需要重新排序,这会导致效率低下。 二分查找是一种高效的查找算法,适用于有序数组。它的时间复杂度为O(log n),在处理大规模数据时非常高效。然而,它要求数组必须是有序的,并且不适合动态数据。
插值查找 插值查找(Interpolation Search)是一种在有序数组中查找特定元素的搜索算法。它的基本思想是根据目标元素与数组中元素的大小关系,通过 插值公式 来确定目标元素可能存在的位置,然后在该位置附近进行查找。
#include <iostream>
#include <vector>
// 插值查找函数
int interpolationSearch ( const std :: vector < int >& arr , int target ) {
int left = 0 ;
int right = arr . size () - 1 ;
while ( left <= right && target >= arr [ left ] && target <= arr [ right ]) {
if ( left == right ) {
if ( arr [ left ] == target ) {
return left ; // 找到目标元素,返回索引
}
return - 1 ; // 目标元素不存在
}
// 计算目标元素可能存在的位置
int pos = left + (( target - arr [ left ]) * ( right - left )) / ( arr [ right ] - arr [ left ]);
if ( arr [ pos ] == target ) {
return pos ; // 找到目标元素,返回索引
} else if ( arr [ pos ] < target ) {
left = pos + 1 ; // 目标元素在右半部分
} else {
right = pos - 1 ; // 目标元素在左半部分
}
}
return - 1 ; // 目标元素不存在
}
int main () {
std :: vector < int > arr = { 2 , 4 , 6 , 8 , 10 , 12 , 14 , 16 , 18 , 20 };
int target = 12 ;
int result = interpolationSearch ( arr , target );
if ( result != - 1 ) {
std :: cout << "目标元素 " << target << " 在数组中的索引为 " << result << std :: endl ;
} else {
std :: cout << "目标元素 " << target << " 不在数组中" << std :: endl ;
}
return 0 ;
}
插值查找的优点
高效性:插值查找的时间复杂度为O(log log n),其中n是数组的长度。这使得它在处理大规模数据时非常高效。 适用于均匀分布的数据:插值查找适用于均匀分布的数据,因为它根据目标元素与数组中元素的大小关系来确定目标元素可能存在的位置,从而提高了查找效率。 插值查找的缺点
要求有序:插值查找要求数组必须是有序的,如果数组无序,则需要先进行排序,这会增加时间复杂度。 插值查找是一种高效的查找算法,适用于有序数组。它的时间复杂度为O(log log n),在处理大规模数据时非常高效。然而,它要求数组必须是有序的,并且不适合动态数据。
斐波那契查找 斐波那契查找(Fibonacci Search)是一种在有序数组中查找特定元素的搜索算法。它的基本思想是利用斐波那契数列来确定目标元素可能存在的位置,然后在该位置附近进行查找。
#include <iostream>
#include <vector>
// 斐波那契查找函数
int fibonacciSearch ( const std :: vector < int >& arr , int target ) {
int n = arr . size ();
int fib2 = 0 ; // (Fibonacci(n)-1)
int fib1 = 1 ; // Fibonacci(n)
int fib = fib2 + fib1 ;
// 找到大于等于数组长度的最小斐波那契数
while ( fib < n ) {
fib2 = fib1 ;
fib1 = fib ;
fib = fib2 + fib1 ;
}
int offset = - 1 ;
while ( fib > 1 ) {
int i = std :: min ( offset + fib2 , n - 1 );
if ( arr [ i ] < target ) {
fib = fib1 ;
fib1 = fib2 ;
fib2 = fib - fib1 ;
offset = i ;
} else if ( arr [ i ] > target ) {
fib = fib2 ;
fib1 = fib1 - fib2 ;
fib2 = fib - fib1 ;
} else {
return i ; // 找到目标元素,返回索引
}
}
if ( fib1 && arr [ offset + 1 ] == target ) {
return offset + 1 ; // 找到目标元素,返回索引
}
return - 1 ; // 目标元素不存在
}
int main () {
std :: vector < int > arr = { 2 , 4 , 6 , 8 , 10 , 12 , 14 , 16 , 18 , 20 };
int target = 12 ;
int result = fibonacciSearch ( arr , target );
if ( result != - 1 ) {
std :: cout << "目标元素 " << target << " 在数组中的索引为 " << result << std :: endl ;
} else {
std :: cout << "目标元素 " << target << " 不在数组中" << std :: endl ;
}
return 0 ;
}
斐波那契查找的优点
高效性:斐波那契查找的时间复杂度为O(log n),其中n是数组的长度。这使得它在处理大规模数据时非常高效。 斐波那契查找的缺点
要求有序:斐波那契查找要求数组必须是有序的,如果数组无序,则需要先进行排序,这会增加时间复杂度。 斐波那契查找是一种高效的查找算法,适用于有序数组。它的时间复杂度为O(log n),在处理大规模数据时非常高效。然而,它要求数组必须是有序的,并且不适合动态数据。
分块查找 分块查找(Block Search)是一种在有序数组中查找特定元素的搜索算法。它的基本思想是将数组分成若干个块,每个块内部有序,但块之间无序。然后根据目标元素与块的边界值进行比较,确定目标元素可能存在的块,然后在该块内进行查找。
#include <iostream>
#include <vector>
// 分块查找函数
int blockSearch ( const std :: vector < int >& arr , int target ) {
int n = arr . size ();
int blockSize = std :: sqrt ( n ); // 块的大小
int numBlocks = ( n + blockSize - 1 ) / blockSize ; // 块的数量
std :: vector < int > blockMax ( numBlocks ); // 存储每个块的最大值
// 找到每个块的最大值
for ( int i = 0 ; i < numBlocks ; ++ i ) {
int blockStart = i * blockSize ;
int blockEnd = std :: min (( i + 1 ) * blockSize , n );
blockMax [ i ] = arr [ blockStart ];
for ( int j = blockStart + 1 ; j < blockEnd ; ++ j ) {
if ( arr [ j ] > blockMax [ i ]) {
blockMax [ i ] = arr [ j ];
}
}
}
// 确定目标元素可能存在的块
int blockIndex = 0 ;
while ( blockIndex < numBlocks && target > blockMax [ blockIndex ]) {
++ blockIndex ;
}
// 在目标块内进行查找
int blockStart = blockIndex * blockSize ;
int blockEnd = std :: min (( blockIndex + 1 ) * blockSize , n );
for ( int i = blockStart ; i < blockEnd ; ++ i ) {
if ( arr [ i ] == target ) {
return i ; // 找到目标元素,返回索引
}
}
return - 1 ; // 目标元素不存在
}
int main () {
std :: vector < int > arr = { 2 , 4 , 6 , 8 , 10 , 12 , 14 , 16 , 18 , 20 };
int target = 12 ;
int result = blockSearch ( arr , target );
if ( result != - 1 ) {
std :: cout << "目标元素 " << target << " 在数组中的索引为 " << result << std :: endl ;
} else {
std :: cout << "目标元素 " << target << " 不在数组中" << std :: endl ;
}
return 0 ;
}
分块查找的优点
高效性:分块查找的时间复杂度为O(sqrt(n)),其中n是数组的长度。这使得它在处理大规模数据时非常高效。 分块查找的缺点
要求有序:分块查找要求数组必须是有序的,如果数组无序,则需要先进行排序,这会增加时间复杂度。 分块查找是一种高效的查找算法,适用于有序数组。它的时间复杂度为O(sqrt(n)),在处理大规模数据时非常高效。然而,它要求数组必须是有序的,并且不适合动态数据。
哈希查找 哈希查找(Hash Search)是一种在无序数组中查找特定元素的搜索算法。它的基本思想是利用哈希函数将数组中的元素映射到一个哈希表中,然后根据目标元素的哈希值在哈希表中查找。
#include <iostream>
#include <vector>
// 哈希查找函数
int hashSearch ( const std :: vector < int >& arr , int target ) {
int n = arr . size ();
std :: vector < int > hashTable ( n , - 1 ); // 哈希表,初始化为-1
// 将数组中的元素映射到哈希表中
for ( int i = 0 ; i < n ; ++ i ) {
int hashValue = arr [ i ] % n ;
while ( hashTable [ hashValue ] != - 1 ) {
++ hashValue ;
hashValue %= n ;
}
hashTable [ hashValue ] = arr [ i ];
}
// 根据目标元素的哈希值在哈希表中查找
int hashValue = target % n ;
while ( hashTable [ hashValue ] != - 1 && hashTable [ hashValue ] != target ) {
++ hashValue ;
hashValue %= n ;
}
if ( hashTable [ hashValue ] == target ) {
return hashValue ; // 找到目标元素,返回索引
}
return - 1 ; // 目标元素不存在
}
int main () {
std :: vector < int > arr = { 2 , 4 , 6 , 8 , 10 , 12 , 14 , 16 , 18 , 20 };
int target = 12 ;
int result = hashSearch ( arr , target );
if ( result != - 1 ) {
std :: cout << "目标元素 " << target << " 在数组中的索引为 " << result << std :: endl ;
} else {
std :: cout << "目标元素 " << target << " 不在数组中" << std :: endl ;
}
return 0 ;
}
哈希查找的优点
高效性:平均时间复杂度为O(1):在理想情况下,哈希查找的时间复杂度接近常数时间,适合处理大规模数据。 快速插入和删除:哈希表不仅查找快,插入和删除操作也非常高效。 灵活性:支持多种数据类型:哈希函数可以处理不同类型的数据,如字符串、整数等。 动态扩展:哈希表可以根据需求动态调整大小,保持高效性能。 广泛应用:数据库索引:常用于数据库中的索引结构,加速数据检索。缓存系统:如Redis、Memcached等缓存系统依赖哈希表实现快速数据访问。编译器符号表:用于管理变量和函数名。 哈希查找的缺点
哈希冲突:冲突不可避免:不同键可能映射到同一位置,需通过链地址法或开放地址法解决,增加了复杂度。 性能下降:冲突过多时,查找时间可能退化为O(n)。 空间消耗:空间利用率低:为避免冲突,哈希表通常需要较大的空间,导致空间浪费。负载因子影响:负载因子过高时,冲突增加;过低时,空间浪费。 哈希函数设计复杂:设计难度:好的哈希函数需均匀分布键,减少冲突,设计较为复杂。依赖哈希函数:性能高度依赖哈希函数的质量。 不支持有序操作:无法直接排序:哈希表中的数据无序,无法直接进行范围查询或排序操作。 哈希查找在平均情况下非常高效,适合需要快速查找、插入和删除的场景。然而,哈希冲突、空间消耗和哈希函数设计的复杂性是其主要缺点。在有序操作或内存有限的情况下,可能需要考虑其他数据结构。
二叉树查找 二叉树查找(Binary Tree Search)是一种在二叉搜索树中查找特定元素的搜索算法。又指二叉搜索树(BST, Binary Search Tree)。它的核心特点是每个节点的左子树包含小于该节点的值,右子树包含大于该节点的值。
#include <iostream>
using namespace std ;
// 定义二叉树节点结构
struct TreeNode {
int val ;
TreeNode * left ;
TreeNode * right ;
TreeNode ( int x ) : val ( x ), left ( nullptr ), right ( nullptr ) {}
};
// 插入节点
TreeNode * insert ( TreeNode * root , int key ) {
if ( root == nullptr ) {
return new TreeNode ( key ); // 如果树为空,创建新节点
}
if ( key < root -> val ) {
root -> left = insert ( root -> left , key ); // 递归插入左子树
} else if ( key > root -> val ) {
root -> right = insert ( root -> right , key ); // 递归插入右子树
}
return root ;
}
// 查找节点
TreeNode * search ( TreeNode * root , int key ) {
if ( root == nullptr || root -> val == key ) {
return root ; // 找到节点或树为空
}
if ( key < root -> val ) {
return search ( root -> left , key ); // 递归查找左子树
} else {
return search ( root -> right , key ); // 递归查找右子树
}
}
// 中序遍历(用于验证树的结构)
void inorderTraversal ( TreeNode * root ) {
if ( root == nullptr ) return ;
inorderTraversal ( root -> left );
cout << root -> val << " " ;
inorderTraversal ( root -> right );
}
int main () {
TreeNode * root = nullptr ;
// 插入节点
root = insert ( root , 50 );
insert ( root , 30 );
insert ( root , 20 );
insert ( root , 40 );
insert ( root , 70 );
insert ( root , 60 );
insert ( root , 80 );
// 中序遍历输出
cout << "Inorder Traversal: " ;
inorderTraversal ( root );
cout << endl ;
// 查找节点
int key = 60 ;
TreeNode * result = search ( root , key );
if ( result != nullptr ) {
cout << "Node " << key << " found in the tree." << endl ;
} else {
cout << "Node " << key << " not found in the tree." << endl ;
}
// 查找不存在的节点
key = 90 ;
result = search ( root , key );
if ( result != nullptr ) {
cout << "Node " << key << " found in the tree." << endl ;
} else {
cout << "Node " << key << " not found in the tree." << endl ;
}
return 0 ;
}
二叉树查找的优点
查找效率较高:平均时间复杂度为O(log n):在平衡的二叉搜索树中,查找、插入和删除操作的时间复杂度为O(log n),适合中等规模的数据。 支持动态操作:插入和删除操作相对高效,适合需要频繁更新的数据集。 有序性:支持范围查询:由于二叉搜索树的中序遍历是有序的,因此可以高效地支持范围查询(如查找某个区间内的所有值)。支持排序操作:通过中序遍历可以直接得到有序数据。 结构简单:易于实现:二叉搜索树的基本操作(查找、插入、删除)实现相对简单,适合教学和基础应用。 扩展性强:可扩展为高级数据结构:二叉搜索树可以扩展为更高效的数据结构,如AVL树、红黑树、B树等,以解决平衡性问题。 缺点:
平衡性问题:最坏时间复杂度为O(n):如果树不平衡(例如退化为链表),查找、插入和删除的时间复杂度会退化为O(n)。 需要额外维护平衡:为了保持高效性,需要使用平衡二叉树(如AVL树或红黑树),增加了实现复杂度。 空间开销:每个节点需要额外存储指针:二叉树需要存储左右子节点的指针,空间开销较大,尤其是在存储大量小数据时。 不适合大规模数据:性能受限:对于大规模数据,二叉树的深度会增加,导致查找效率下降。相比之下,哈希表或B树更适合大规模数据。 动态操作可能导致性能波动:频繁插入和删除可能破坏平衡:在普通二叉搜索树中,频繁的插入和删除操作可能导致树结构失衡,影响性能。 二叉树查找在数据有序性和动态操作方面表现良好,适合中等规模且需要频繁更新和范围查询的场景。然而,其性能高度依赖于树的平衡性,普通二叉搜索树在极端情况下可能退化为链表,导致性能下降。因此,在实际应用中,通常使用平衡二叉树(如AVL树或红黑树)来保证性能稳定性。对于大规模数据或需要更高性能的场景,可能需要考虑其他数据结构(如B树或哈希表)。
本文是C++基础学习完成的进阶记录,一些高阶技法和基础补齐
前面的相关文章:
C++基础记录
C++基础记录(二)
C++基础记录(三)
【算法刷题】C++常见容器使用集合
处理器 时钟频率(Clock Speed)和内核数量(Core Count)是衡量处理器性能的两个关键指标,它们对 C++ 程序的性能影响很大,但方式各不相同。理解这两者如何协同工作,能帮助你更好地优化程序。
时钟频率对C++程序性能的影响 时钟频率通常以千兆赫兹(GHz)为单位,它 决定了处理器每个内核每秒能执行多少个操作 。一个 3.0 GHz 的处理器,意味着处理器每秒有 3.0×10 9 个时钟周期(或脉冲)。
一个时钟周期并不总是对应一条指令。现代处理器为了提高效率,通常会在一个时钟周期内执行多条指令,或者一条复杂的指令会占用多个时钟周期。
IPC (Instructions Per Cycle) 也是衡量处理器效率的关键指标。IPC 表示每个时钟周期可以执行的指令数量。一个 IPC 大于 1 的处理器比 IPC 小于 1 的处理器更高效。不同的处理器架构(如 x86, ARM)、不同的指令集和不同的程序代码,IPC 值都会有很大差异。
单线程性能: 对于单线程 的 C++ 程序,时钟频率是决定性能的最主要因素。因为程序的所有计算都集中在一个内核上,更高的时钟频率意味着每个指令的执行时间更短,程序的运行速度就越快。不适合的场景: 尽管时钟频率很重要,但它并不是万能的。如果你的程序瓶颈在于 I/O 操作(比如读写文件或网络通信),或者内存访问速度,单纯提高时钟频率的效果就不那么明显了。总结: 时钟频率直接影响 C++ 程序中串行执行部分 的性能。如果你的代码大部分是顺序执行的,没有很好地利用并行化,那么提高时钟频率会带来显著的性能提升。
内核数量对C++程序性能的影响 内核数量指的是一个处理器中独立处理单元的数量。每个内核都可以独立执行任务。
多线程性能: 内核数量主要影响多线程 C++ 程序的性能。如果你使用如 std::thread、OpenMP 或 TBB 这样的技术,将任务分解成多个可以并行执行的部分,那么更多的内核就能同时处理更多的任务,从而大幅缩短总运行时间。并行化是关键: 要利用多核的优势,你的程序必须是可并行化 的。如果你的算法本身就是串行的(比如一个简单的循环没有依赖性),那么增加再多的内核也无济于事,因为它只能在一个内核上运行。并非越多越好: 尽管多核能提升性能,但多线程编程也引入了新的挑战,比如同步(Synchronization) 、锁竞争(Lock Contention) 和数据共享 等问题。如果处理不好,这些开销反而可能导致性能下降。例如,两个线程频繁地争抢同一个锁,它们可能会大部分时间都处于等待状态,而不是真正地执行计算。总结: 内核数量决定了你的 C++ 程序能够并行处理任务的能力 。要充分利用多核优势,你需要设计并实现能有效并行化的算法。
多线程 应用程序代码总是运行在线程中。线程是一个同步执行实体,其中的语句依次执行。可将 main( )的代码视为在应用程序的主线程中执行。在这个主线程中,可以创建并行运行的线程。如果应用程序除主线程外,还包含一个或多个并行运行的线程,则被称为多线程应用程序。
线程的创建方式由操作系统决定,您可直接调用操作系统提供的 API 来创建线程。
从 C++11 起,C++规定由线程函数负责为您调用操作系统 API,这提高了多线程应用程序的可移植性。如果您编写的应用程序将在特定操作系统上运行,请了解该操作系统提供的用于编写多线程应用程序的 API。
创建线程的方式随操作系统而异,C++在头文件<thread>中提供了 std::thread,它隐藏了与平台相关的细节。如果您针对特定平台编写应用程序,最好只使用针对该操作系统的线程函数。编写 C++应用程序时,如果您希望其中的线程是可移植的,请务必了解Boost 线程库
多线程注意事项
多线程应用程序常常要求线程彼此通信,这样应用程序才能成为一个整体,而不是一系列互不关心、各自为政的线程。 另外,顺序也很重要,您不希望用户界面线程在负责整理碎片的工作线程之前结束。在有些情况下,一个线程需要等待另一个线程。例如,读取数据库的线程应等待写入数据库的线程结束。 让一个线程等待另一个线程被称为线程同步。 线程的创建 C++ 11 之后添加了新的标准线程库 std::thread, std::thread 在 <thread> 头文件中声明,因此使用 std::thread 时需要包含 在 <thread> 头文件。
#include <thread>
std :: thread thread_object ( callable , args ...);
callable:可调用对象,可以是函数指针、函数对象、Lambda 表达式等。 args…:传递给 callable 的参数列表。 使用函数指针创建线程 通过函数指针创建线程,这是最基本的方式:
实例
#include <iostream>
#include <thread>
void printMessage ( int count ) {
for ( int i = 0 ; i < count ; ++ i ) {
std :: cout << "Hello from thread (function pointer)! \n " ;
}
}
int main () {
std :: thread t1 ( printMessage , 5 ); // 创建线程,传递函数指针和参数
t1 . join (); // 等待线程完成
return 0 ;
}
输出结果:
Hello from thread (function pointer)!
Hello from thread (function pointer)!
Hello from thread (function pointer)!
Hello from thread (function pointer)!
Hello from thread (function pointer)!
使用函数对象创建线程 通过类中的 operator() 方法定义函数对象来创建线程:
#include <iostream>
#include <thread>
class PrintTask {
public:
void operator ()( int count ) const {
for ( int i = 0 ; i < count ; ++ i ) {
std :: cout << "Hello from thread (function object)! \n " ;
}
}
};
int main () {
std :: thread t2 ( PrintTask (), 5 ); // 创建线程,传递函数对象和参数
t2 . join (); // 等待线程完成
return 0 ;
}
输出结果:
Hello from thread (function object)!
Hello from thread (function object)!
Hello from thread (function object)!
Hello from thread (function object)!
Hello from thread (function object)!
使用 Lambda 表达式创建线程 Lambda 表达式可以直接内联定义线程执行的代码:
#include <iostream>
#include <thread>
int main () {
std :: thread t3 ([]( int count ) {
for ( int i = 0 ; i < count ; ++ i ) {
std :: cout << "Hello from thread (lambda)! \n " ;
}
}, 5 ); // 创建线程,传递 Lambda 表达式和参数
t3 . join (); // 等待线程完成
return 0 ;
}
线程管理 join() join() 用于等待线程完成执行。如果不调用 join() 或 detach() 而直接销毁线程对象,会导致程序崩溃。
detach() detach() 将线程与主线程分离,线程在后台独立运行,主线程不再等待它。
线程的传参 值传递 参数可以通过值传递给线程:
std :: thread t ( func , arg1 , arg2 );
引用传递 如果需要传递引用参数,需要使用 std::ref :
#include <iostream>
#include <thread>
void increment ( int & x ) {
++ x ;
}
int main () {
int num = 0 ;
std :: thread t ( increment , std :: ref ( num )); // 使用 std::ref 传递引用
t . join ();
std :: cout << "Value after increment: " << num << std :: endl ;
return 0 ;
}
综合实例,以下是一个完整的示例,展示了如何使用上述三种方式创建线程,并进行线程管理。
#include <iostream>
#include <thread>
using namespace std ;
// 一个简单的函数,作为线程的入口函数
void foo ( int Z ) {
for ( int i = 0 ; i < Z ; i ++ ) {
cout << "线程使用函数指针作为可调用参数 \n " ;
}
}
// 可调用对象的类定义
class ThreadObj {
public:
void operator ()( int x ) const {
for ( int i = 0 ; i < x ; i ++ ) {
cout << "线程使用函数对象作为可调用参数 \n " ;
}
}
};
int main () {
cout << "线程 1 、2 、3 独立运行" << endl ;
// 使用函数指针创建线程
thread th1 ( foo , 3 );
// 使用函数对象创建线程
thread th2 ( ThreadObj (), 3 );
// 使用 Lambda 表达式创建线程
thread th3 ([]( int x ) {
for ( int i = 0 ; i < x ; i ++ ) {
cout << "线程使用 lambda 表达式作为可调用参数 \n " ;
}
}, 3 );
// 等待所有线程完成
th1 . join (); // 等待线程 th1 完成
th2 . join (); // 等待线程 th2 完成
th3 . join (); // 等待线程 th3 完成
return 0 ;
}
以上代码的输出结果在不同平台或每次运行时可能不同,因为线程的执行顺序由操作系统的调度算法决定,多个线程会并发运行,输出可能交错,例如:
线程 1 、 2 、 3 独立运行
线程使用函数指针作为可调用参数
线程使用函数对象作为可调用参数
线程使用 lambda 表达式作为可调用参数
线程使用函数指针作为可调用参数
按照自己对于Java线程的理解,写出了下面这段代码,期望看到两个线程交替打印。
#include <iostream>
#include <thread>
void PrintStrings () {
for ( int i = 0 ; i < 5 ; i ++ ) {
std :: cout << "Hello, World! from thread " << std :: endl ;
}
}
int main () {
std :: thread t ( PrintStrings );
t . join ();
for ( int i = 0 ; i < 5 ; i ++ ) {
std :: cout << "Hello, World! from main()" << std :: endl ;
}
return 0 ;
}
问题 :子线程内部打印完了才往下执行main内的打印。
原因 : t.join() 的作用是阻塞(block)主线程 main(),让它停下来,等待子线程 t 执行完毕。只有当子线程 t 中的 PrintStrings() 函数完全执行完成、线程终止后,main() 函数才会继续执行 t.join() 后面的代码,也就是你看到的第二个 for 循环。
解决思路就是弄清楚线程是什么时候开始执行的。
尝试将 join() 移到最后,但是这次是main中的打印全部完成,再开启子线程的打印。
原因 :在多线程程序中,操作系统负责在不同的线程之间切换,分配 CPU 时间片。虽然理论上主线程和子线程是并行运行的,但实际的执行顺序取决于操作系统的调度器。在更改 join() 位置后的代码中,main 线程创建子线程 t 之后,它会立即执行它自己的 for 循环。而子线程 t 什么时候真正开始运行,取决于操作系统什么时候给它分配 CPU 时间。对于一个相对简单的程序,main 线程通常会因为其优先级或调度策略的缘故,在创建子线程后立即获得 CPU 时间片,并执行自己的任务。在这个极短的时间内,main 线程的 for 循环可能已经全部执行完毕,甚至在子线程有机会开始运行之前。
解决 :两个线程的循环中插入延时, std::this_thread::sleep_for() 函数会让当前线程进入休眠,并主动放弃对 CPU 的占用。当 main 线程执行到 sleep_for 时,它会暂停一段时间,给操作系统一个机会去调度其他就绪的线程(比如你的子线程)。当主线程休眠结束后,它和子线程就会进入竞争状态,从而更有可能产生交替执行的效果。
#include <iostream>
#include <thread>
using namespace std ;
void PrintStrings () {
for ( int i = 0 ; i < 5 ; i ++ ) {
cout << "Hello, World! from thread " << endl ;
// 让出CPU
this_thread :: sleep_for ( chrono :: milliseconds ( 10 ));
}
}
int main () {
thread t ( PrintStrings );
for ( int i = 0 ; i < 5 ; i ++ ) {
cout << "Hello, World! from main()" << endl ;
// 让出CPU
this_thread :: sleep_for ( chrono :: milliseconds ( 10 ));
}
t . join ();
return 0 ;
}
线程数据通信 线程可共享变量,可访问全局数据。创建线程时,可给它提供一个指向共享对象(结构或类)的指针。
线程将数据写入其他线程能够存取的内存单元,这让线程能够共享数据,从而彼此进行通信。在磁盘碎片整理工具中,工作线程知道进度,而用户界面线程需要获悉这种信息;工作线程定期地存储进度(用整数表示的百分比),而用户界面线程可使用它来显示进度。
这种情形非常简单:一个线程创建信息,另一个线程使用它。如果多个线程读写相同的内存单元,结果将如何呢?有些线程开始读取数据时,其他线程可能还未结束写入操作,这将给数据的完整性带来威胁。这就是需要同步线程的原因所在。
使用互斥量和信号量同步线程 线程是操作系统级实体,而用来同步线程的对象也是操作系统提供的。大多数操作系统都提供了信号量(semaphore)和互斥量(mutex),供您用来同步线程。 互斥量(互斥同步对象)通常用于避免多个线程同时访问同一段代码。换句话说,互斥量指定了一段代码,其他线程要执行它,必须等待当前执行它的线程结束并释放该互斥量。接下来,下一个线程获取该互斥量,完成其工作,并释放该互斥量。从 C++11 起,C++通过类 std::mutex 提供了一种互斥量实现,这个类位于头文件 <mutex> 中。
通过使用信号量,可指定多少个线程可同时执行某个代码段。只允许一个线程访问的信号量被称为二值信号量(binary semaphore)。
互斥量(Mutex) 互斥量是一种同步原语,用于防止多个线程同时访问共享资源。当一个线程需要访问共享资源时,它首先需要锁定(lock)互斥量。如果互斥量已经被其他线程锁定,那么请求锁定的线程将被阻塞,直到互斥量被解锁(unlock)。
std::mutex:用于保护共享资源,防止数据竞争。
std :: mutex mtx ;
mtx . lock (); // 锁定互斥锁
// 访问共享资源
mtx . unlock (); // 释放互斥锁
std::lock_guard 和 std::unique_lock:自动管理锁的获取和释放。
std :: lock_guard < std :: mutex > lock ( mtx ); // 自动锁定和解锁
// 访问共享资源
互斥量的使用示例:
#include <mutex>
std :: mutex mtx ; // 全局互斥量
void safeFunction () {
mtx . lock (); // 请求锁定互斥量
// 访问或修改共享资源
mtx . unlock (); // 释放互斥量
}
int main () {
std :: thread t1 ( safeFunction );
std :: thread t2 ( safeFunction );
t1 . join ();
t2 . join ();
return 0 ;
}
锁(Locks) C++提供了多种锁类型,用于简化互斥量的使用和管理。
常见的锁类型包括:
std::lock_guard:作用域锁,当构造时自动锁定互斥量,当析构时自动解锁。 std::unique_lock:与std::lock_guard类似,但提供了更多的灵活性,例如可以转移所有权和手动解锁。 锁的使用示例:
#include <mutex>
std :: mutex mtx ;
void safeFunctionWithLockGuard () {
std :: lock_guard < std :: mutex > lk ( mtx );
// 访问或修改共享资源
}
void safeFunctionWithUniqueLock () {
std :: unique_lock < std :: mutex > ul ( mtx );
// 访问或修改共享资源
// ul.unlock(); // 可选:手动解锁
// ...
}
条件变量(Condition Variable) 条件变量用于线程间的协调,允许一个或多个线程等待某个条件的发生。它通常与互斥量一起使用,以实现线程间的同步。
std::condition_variable 用于实现线程间的等待和通知机制。
std :: condition_variable cv ;
std :: mutex mtx ;
bool ready = false ;
std :: unique_lock < std :: mutex > lock ( mtx );
cv . wait ( lock , []{ return ready ; }); // 等待条件满足
// 条件满足后执行
条件变量的使用示例:
#include <mutex>
#include <condition_variable>
std :: mutex mtx ;
std :: condition_variable cv ;
bool ready = false ;
void workerThread () {
std :: unique_lock < std :: mutex > lk ( mtx );
cv . wait ( lk , []{ return ready ; }); // 等待条件
// 当条件满足时执行工作
}
void mainThread () {
{
std :: lock_guard < std :: mutex > lk ( mtx );
// 准备数据
ready = true ;
} // 离开作用域时解锁
cv . notify_one (); // 通知一个等待的线程
}
原子操作(Atomic Operations) 原子操作确保对共享数据的访问是不可分割的,即在多线程环境下,原子操作要么完全执行,要么完全不执行,不会出现中间状态。
原子操作的使用示例:
#include <atomic>
#include <thread>
std :: atomic < int > count ( 0 );
void increment () {
count . fetch_add ( 1 , std :: memory_order_relaxed );
}
int main () {
std :: thread t1 ( increment );
std :: thread t2 ( increment );
t1 . join ();
t2 . join ();
return count ; // 应返回2
}
线程局部存储(Thread Local Storage, TLS) 线程局部存储允许每个线程拥有自己的数据副本。这可以通过thread_local关键字实现,避免了对共享资源的争用。
线程局部存储的使用示例:
#include <iostream>
#include <thread>
thread_local int threadData = 0 ;
void threadFunction () {
threadData = 42 ; // 每个线程都有自己的threadData副本
std :: cout << "Thread data: " << threadData << std :: endl ;
}
int main () {
std :: thread t1 ( threadFunction );
std :: thread t2 ( threadFunction );
t1 . join ();
t2 . join ();
return 0 ;
}
死锁(Deadlock)和避免策略 死锁发生在多个线程互相等待对方释放资源,但没有一个线程能够继续执行。避免死锁的策略包括:
总是以相同的顺序请求资源。 使用超时来尝试获取资源。 使用死锁检测算法。 线程间通信方式 std::future 和 std::promise :实现线程间的值传递。
std :: promise < int > p ;
std :: future < int > f = p . get_future ();
std :: thread t ([ & p ] {
p . set_value ( 10 ); // 设置值,触发 future
});
int result = f . get (); // 获取值
消息队列(基于 std::queue 和 std::mutex)实现简单的线程间通信。
C++17 引入了并行算法库 <algorithm>,其中部分算法支持并行执行,可以利用多核 CPU 提高性能。
#include <algorithm>
#include <vector>
#include <execution>
std :: vector < int > vec = { 1 , 2 , 3 , 4 , 5 };
std :: for_each ( std :: execution :: par , vec . begin (), vec . end (), []( int & n ) {
n *= 2 ;
});
多线程技术带来的问题 要使用多线程技术,必须妥善地同步线程,否则,您将有大量的无眠之夜。多线程应用程序面临的问题很多,下面是最常见的两个。
竞争状态 :多个线程试图写入同一项数据。哪个线程获胜?该对象处于什么状态? 死锁 :两个线程彼此等待对方结束,导致它们都处于“等待”状态,而应用程序被挂起。
妥善地同步可避免竞争状态。一般而言,线程被允许写入共享对象时,您必须格外小心,确保:
每次只能有一个线程写入; 在当前执行写入的线程结束前,不允许其他线程读取该对象。 通过确保任何情况下都不会有两个线程彼此等待,可避免死锁。为此,可使用主线程同步工作线程,也可在线程之间分配任务时,确保工作负荷分配明确。可以让一个线程等待另一个线程,但绝不要同时让后者也等待前者。
要学习多线程编程,可参阅大量有关该主题的在线文档,也可亲自动手实践。一旦掌握了这个主题,就能让 C++应用程序充分利用未来将发布的多核处理器。
本文是C++扫盲的第三篇记录,从STL位标志往后的一些进阶内容。
前面的相关文章:
C++基础记录
C++基础记录(二)
【算法刷题】C++常见容器使用集合
STL位标志 bitset std::bitset 是 C++ 标准库中一个非常实用的类,它提供了一种管理和操作固定大小的位的集合(bit set)的方式。你可以把它想象成一个数组,但这个数组的每个元素都只能是 0 或 1。
从低位到高位是从右往左数,第 0 位是最右边的位。
主要特点:
固定大小: std::bitset 的大小在编译时就确定了。你需要用一个模板参数来指定它能存储多少位,例如 std::bitset<32> 表示一个能存储 32 位的 bit set。 高效: 因为大小是固定的,它在内存中通常会以一个或多个无符号整数的形式存储,这使得位操作(如位移、按位与、或、异或等)非常高效。 方便的接口: 它提供了很多方便的方法来操作和查询位,比如设置、清零、翻转、测试特定位等。 实例化 std::bitset 实例化这个模板类时,必须通过一个模板参数指定实例需要管理的位数:
bitset < 4 > fourBits ; // 4 bits initialized to 0000
还可将 bitset 初始化为一个用字符串字面量(char*)表示的位序列:
bitset < 5 > fiveBits ( "10101" ); // 5 bits 10101
使用一个 bitset 来实例化另一个 bitset 非常简单:
bitset < 8 > fiveBitsCopy ( fiveBits );
使用实例:
#include <iostream>
#include <bitset>
using namespace std ;
int main () {
// 创建一个 4 位的 bitset
bitset < 4 > fourBits ; // 4 bits initialized to 0000
// 创建一个 5 位的 bitset
bitset < 5 > fiveBits ( "10101" ); // 5 bits 10101
// 创建一个 8 位的 bitset
bitset < 8 > eightBits ( 255 ); // 8 bits 11111111
// 创建一个 8 位的 bitset 副本
bitset < 8 > eightBitsCopy ( eightBits );
return 0 ;
}
bitset运算符 std::bitset 提供了多种运算符来进行位操作,这些运算符使得对位集合的操作变得非常直观和高效。以下是一些常用的运算符:
运算符 描述 « 将位序列的文本表示插入到输出流中 » 将一个字符串插入到bitset对象中 ~ 按位取反 & 按位与 | 按位或 ^ 按位异或 «= 左移,例如左移两位 fourBits «= 2; »= 右移 [] 访问特定位
使用举例:
#include <iostream>
#include <bitset>
using namespace std ;
int main () {
bitset < 8 > b1 ( 1 );
// 00000001
b1 <<= 2 ;
// 左移两位,变为 00000100
cout << "b1 after left shift by 2: " << b1 << endl ;
return 0 ;
}
取反:
#include <iostream>
#include <bitset>
using namespace std ;
int main () {
bitset < 8 > b1 ( 5 ); // 00000101
cout << "b1: " << b1 << endl ;
cout << "b1 after NOT: " << ~ b1 << endl ; // 11111010
return 0 ;
}
bitset成员方法 | 函数 | 描述 | | — | — | | set() | 将序列中的所有位都设置为 1 | | set (N, val=1) | 将第 N+1 位设置为 val 指定的值(默认为 1) | | reset() | 将序列中的所有位都重置为 0 | | reset (N) | 将偏移位置为(N+1)的位清除 | | flip() | 将位序列中的所有位取反 | | size() | 返回序列中的位数 | | count() | 返回序列中值为 1 的位数 |
使用举例:
#include <iostream>
#include <bitset>
using namespace std ;
int main () {
bitset < 8 > b1 ( 5 ); // 00000101
cout << "b1: " << b1 << endl ;
b1 . set ( 2 ); // 将第 3 位设置为 1
cout << "b1 after set(2): " << b1 << endl ;
b1 . reset ( 2 ); // 将第 3 位设置为 0
cout << "b1 after reset(2): " << b1 << endl ;
b1 . flip (); // 取反
cout << "b1 after flip(): " << b1 << endl ;
return 0 ;
}
vector<bool>STL bitset 的缺点之一是不能动态地调整长度。仅当在编辑阶段知道序列将存储多少位时才能使用 bitset。 为了克服这种缺点,STL 向程序员提供了 vector<bool> 类(在有些 STL 实现中为bit_vector)。
实例化 vector<bool> 的方式与实例化 vector 类似,有一些方便的重载构造函数可供使用:
vector < bool > boolFlags1 ;
例如,可创建一个这样的 vector,即它最初包含 10 个布尔元素,且每个元素都被初始化为 1(即true):
vector < bool > boolFlags2 ( 10 , true );
还可使用一个 vector<bool> 创建另一个 vector<bool>:
vector < bool > boolFlags2Copy ( boolFlags2 );
vector<bool> 成员方法和运算符vector<bool>提供了函数 flip(),用于将序列中的布尔值取反,这与函数 bitset<>::flip() 很像。
除这个方法外,vector<bool> 与 std::vector 极其相似,例如,可使用 push_back 将标志位插入到序列中。
使用举例:
#include <iostream>
#include <vector>
using namespace std ;
int main () {
vector < bool > vb ( 3 );
vb [ 0 ] = true ;
vb [ 1 ] = false ;
vb [ 2 ] = true ;
vb . push_back ( true );
for ( int i = 0 ; i < vb . size (); i ++ )
{
cout << vb [ i ] << endl ;
}
vb . flip ();
cout << "After flip:" << endl ;
for ( int i = 0 ; i < vb . size (); i ++ )
{
cout << vb [ i ] << endl ;
}
return 0 ;
}
一开始写作了:
vector < bool > vb ;
vb [ 0 ] = true ;
没有指定大小,就直接使用 0 位,严重错误,直接越界。 需要养成声明即初始化的好习惯 ,使用前确定大小。
可以先初始化大小,或者先push_back添加元素,再修改对应位置。也可以使用初始化列表: vector <bool> boolFlags{ true, true, false } .
智能指针 C++在内存分配、释放和管理方面具有其他语言不具备的灵活性。同时这种松散的机制也会引发一些不确定性。
例如:
SomeClass * ptrData = anObject . GetData ();
/*
Questions: Is object pointed by ptrData dynamically allocated using new?
If so, who calls delete? Caller or the called?
Answer: No idea!
*/
ptrData -> DoSomething ();
在上述代码中,没有显而易见的方法获悉 ptrData 指向的内存:
是否是从堆中分配的,因此最终需要释放; 是否由调用者负责释放; 对象的析构函数是否会自动销毁该对象。 优势 智能指针可以自动管理动态分配的内存,避免内存泄漏和悬空指针等问题。
smart_pointer < SomeClass > spData = anObject . GetData ();
// Use a smart pointer like a conventional pointer!
spData -> Display ();
( * spData ). Display ();
// Don't have to worry about de-allocation
// (the smart pointer's destructor does it for you)
智能指针的行为类似常规指针(这里将其称为原始指针),但通过重载的运算符和析构函数确保动态分配的数据能够及时地销毁,从而提供了更多有用的功能。
智能指针类重载了 解除引用运算符(*) 和 成员选择运算符(->) ,让程序员可以像使用常规指针那样使用智能指针。
一个简单的智能指针类 代码如下:
template < typename T >
class smart_pointer
{
private:
T * ptr ;
public:
smart_pointer ( T * p = nullptr ) : ptr ( p ) {}
~ smart_pointer () { delete ptr ; }
T & operator * () { return * ptr ; }
T * operator -> () { return ptr ; }
// copy constructor
smart_pointer ( const smart_pointer & sp ) : ptr ( sp . ptr ) {}
// assignment operator
smart_pointer & operator = ( const smart_pointer & sp )
{
if ( this != & sp )
{
delete ptr ;
ptr = sp . ptr ;
}
return * this ;
}
};
实现了 * 和 -> 运算符,从而可以像常规意义上的指针那样使用它。
插入:内存管理策略 使智能指针真正“智能”的是复制构造函数、赋值运算符和析构函数的实现,它们决定了智能指针对象被传递给函数、赋值或离开作用域(即像其他类对象一样被销毁)时的行为。
策略:深复制 回顾一下切除问题:
void MakeFishSwim ( Fish aFish )
{
aFish . swim ();
}
...
Carp carp1 ;
MakeFishSwim ( carp1 );
// Slicing: only the Fish part of Carp is sent to MakeFishSwim()
Tuna tuna1 ;
MakeFishSwim ( tuna1 );
下面实例,使用基于深复制的智能指针将多态对象作为基类对象进行传递:
template < typename T >
class deepcopy_smart_ptr
{
private:
T * ptr ;
// copy constructor
deepcopy_smart_ptr ( const deepcopy_smart_ptr & source )
{
ptr = source -> Clone ();
}
// assignment operator
deepcopy_smart_ptr & operator = ( const deepcopy_smart_ptr & source )
{
if ( ptr )
{
delete ptr ;
}
ptr = source -> Clone ();
return * this ;
}
};
实现了一个复制构造函数,使得能够通过函数 Clone() 函数对多态对象进行深复制—类必须实现函数 Clone() 。另外,它还实现了复制赋值运算符,为了简单起见,这里假设基类 Fish 实现的虚函数为 Clone() 。通常,实现深复制模型的智能指针通过模板参数或函数对象提供该函数。下面是 deepcopy_smart_ptr 的一种用法:
deepcopy_smart_ptr < Carp > freshWaterFish ( new Carp );
MakeFishSwim ( freshWaterFish ); // Carp will not be 'sliced'
策略:写时复制(Copy on Write) COW是一种优化策略,它推迟了资源的复制操作。当你有两个对象共享同一份数据时,COW会让你在第一次修改 数据时才真正地去复制它。
COW的核心思想 想象一下,你有一个std::string对象,叫s1,里面存着一段很长的文本。现在你想要用s1去初始化另一个std::string对象s2:
std :: string s1 = "这是一段很长的文本..." ;
std :: string s2 = s1 ; // 理论上s2是s1的一个拷贝
如果std::string使用了COW,那么在这一步,s2并不会立刻复制s1的数据。相反,s1和s2会共享同一份底层数据。为了实现这一点,通常会有一个引用计数(reference count)来记录有多少个对象正在共享这份数据。在这个例子中,这份数据的引用计数会从1增加到2。
什么时候会触发复制? 复制操作只会在你试图修改其中一个对象时发生。比如,你想修改s2:
s2 += ",后面又加了一些新内容。" ; // 触发写时复制
在你执行这行代码时,系统会检查s2所指向的数据的引用计数。因为它大于1,所以系统会:
为s2分配一块新的内存。 将原始数据(“这是一段很长的文本…”)从旧地址复制到新地址。 让s2指向这份新数据。 将原始数据的引用计数减1。 最后,将新内容添加到s2的新数据中。 智能指针的COW应用 写时复制机制(Copy on Write,COW)试图对深复制智能指针的性能进行优化,它共享指针,直到首次写入对象。首次调用非 const 函数时,COW 指针通常为该非 const 函数操作的对象创建一个副本,而其他指针实例仍共享源对象。
COW 深受很多程序员的喜欢。实现 const 和非 const 版本的运算符*和->,是实现 COW 指针功能的关键。非 const 版本用于创建副本。
重要的是,选择 COW 指针时,在使用这样的实现前务必理解其实现细节。否则,复制时将出现复制得太少或太多的情况。
策略:引用计数智能指针 引用计数智能指针,通常指的是 C++ 标准库中的 std::shared_ptr ,它是一种用于管理动态分配对象生命周期的智能指针。它的核心思想是共享所有权(shared ownership),即多个智能指针可以同时指向同一个对象,并且该对象只有 在所有指向它的智能指针都被销毁或重置后,才会自动释放内存 。因此,引用计数提供了一种优良的机制,使得可共享对象而无法对其进行复制。
这种智能指针被复制时,需要将对象的引用计数加 1。至少有两种常用的方法来跟踪计数:
在对象中维护引用计数; 引用计数由共享对象中的指针类维护。 前者称为入侵式引用计数,因为需要修改对象以维护和递增引用计数,并将其提供给管理对象的智能指针。COM 采取的就是这种方法。
后者是智能指针类将计数保存在自由存储区(如动态分配的整型),复制时复制构造函数将这个值加 1。
因此,使用引用计数机制,程序员只应通过智能指针来处理对象。在使用智能指针管理对象的同时让原始指针指向它是一种糟糕的做法,因为智能指针将在它维护的引用计数减为零时释放对象,而原始指针将继续指向已不属于当前应用程序的内存。
引用计数还有一个独特的问题:如果两个对象分别存储指向对方的指针,这两个对象将永远不会被释放,因为它们的生命周期依赖性导致其引用计数最少为 1。即循环引用。
循环引用的解决办法
为了解决循环引用的问题,C++ 提供了std::weak_ptr 。std::weak_ptr 是一种不增加引用计数的智能指针,它通常用于打破循环引用,或者观察一个对象而不会阻止其被销毁。当你需要访问 std::weak_ptr 所指向的对象时,你需要先将其转换为 std::shared_ptr 。
区分于 std::shared_ptr ,std::weak_ptr 不会增加对象的强引用计数。对应的,被 weak_ptr 指向的引用,成为弱引用。只要有一个 std::weak_ptr 或 std::shared_ptr 指向控制块,弱引用计数就大于 0。当弱引用计数降为 0 时,控制块才会被销毁。
std::weak_ptr 只会影响弱引用计数,而不会影响强引用计数。这意味着,即使有多个 std::weak_ptr 指向同一个对象,只要没有 std::shared_ptr 指向它,对象随时都可能被销毁。
核心功能:lock() 方法
std::weak_ptr 最大的特点是它不能直接访问所指向的对象。为了安全地使用它,你需要先调用 lock() 方法。
lock() 方法会检查对象是否仍然存在(即强引用计数是否大于 0)。
如果对象存在,lock() 会返回一个临时的 std::shared_ptr。这时,强引用计数会增加 1,确保在你使用这个临时智能指针期间,对象不会被销毁。使用完毕后,这个临时智能指针会自动销毁,引用计数会减 1。 如果对象不存在(已经被销毁),lock() 会返回一个空的 std::shared_ptr。 这个机制非常重要,因为它保证了你在访问对象时,该对象是有效的。
策略:破坏性复制 破坏性复制是这样一种机制,即在智能指针被复制时,将对象的所有权转交给目标指针并重置原来的指针。
destructive_copy_smartptr < SampleClass > smartPtr ( new SampleClass ());
SomeFunc ( smartPtr ); // Ownership transferred to SomeFunc
// Don't use smartPtr in the caller any more!
虽然破坏性复制机制使用起来并不直观,但它有一个优点,即可确保任何时刻只有一个活动指针指向对象。因此,它非常适合从函数返回指针以及需要利用其“破坏性”的情形。
一个破坏性复制智能指针的例子:
template < typename T >
class destructive_copy_smartptr
{
public:
destructive_copy_smartptr ( T * p = nullptr ) : _ptr ( p ) {}
~ destructive_copy_smartptr () { delete _ptr ; }
// 接收的参数并非const类型,是为了实现破坏性复制
destructive_copy_smartptr & operator = ( destructive_copy_smartptr & other )
{
_ptr = other . _ptr ;
// 赋值后,将外部的原指针设为nullptr
other . _ptr = nullptr ;
return * this ;
}
destructive_copy_smartptr ( destructive_copy_smartptr & other )
{
_ptr = other . _ptr ;
other . _ptr = nullptr ;
}
private:
T * _ptr ;
};
不同于大多数 C++类,该智能指针类的复制构造函数和赋值运算符不能接受 const 引用,因为它在复制源引用后使其无效。这不仅不符合传统复制构造函数和赋值运算符的语义,还让智能指针类的用法不直观。复制或赋值后销毁源引用不符合预期。鉴于这种智能指针销毁源引用,这也使得它不适合用于 STL 容器,如 std::vector 或其他任何动态集合类。这些容器需要在内部复制内容,这将导致指针失效。由于种种原因,不在程序中使用破坏性复制智能指针是明智的选择。
使用 std::unique_ptr C++标准一直支持 auto_ptr,它是一种基于破坏性复制的智能指针。C++11 终于摒弃了该智能指针,现在您应使用 std::unique_ptr。
unique_ptr 是一种简单的智能指针,但其复制构造函数和赋值运算符被声明为私有的,因此不能复制它,即不能将其按值传递给函数,也不能将其赋给其他指针。
要使用 std:unique_ptr ,必须包含头文件<memory>:
使用举例:
#include <iostream>
#include <memory>
using namespace std ;
class Fish
{
public:
Fish () { cout << "Fish constructor" << endl ; }
~ Fish () { cout << "Fish destructor" << endl ; }
void Swim () { cout << "Fish swim" << endl ; }
};
void MakeFishSwim ( const unique_ptr < Fish >& inFish )
{
inFish -> Swim ();
}
int main ()
{
unique_ptr < Fish > pFish ( new Fish );
pFish -> Swim ();
MakeFishSwim ( pFish );
unique_ptr < Fish > pFish2 ;
// error: operator= is private
// pFish2 = pFish;
return 0 ;
}
可以看到,pFish指向的对象是在main函数中创建的,当main函数结束时,pFish指向的对象会自动销毁,无需手动调用delete。总之,unique_ptr 比 C++11 已摒弃的 auto_ptr 更安全,因为复制和赋值不会导致源智能指针对象无 效。它在销毁时释放对象。
unique_ptr 支持移动语义,即可以将一个 unique_ptr 移动到另一个 unique_ptr 中。移动语义可以避免复制对象,提高效率。
移动语义的使用举例:
#include <iostream>
using namespace std ;
int main ()
{
unique_ptr < int > ptr1 ( new int ( 1 ));
cout << * ptr1 << endl ;
cout << ptr1 . get () << endl ;
unique_ptr < int > ptr2 = move ( ptr1 );
cout << * ptr2 << endl ;
cout << ptr2 . get () << endl ;
// 移动后,ptr1 不再指向原对象,而是由ptr2指向这个对象
// ptr1 指向 nullptr
if ( ptr1 )
{
cout << * ptr1 << endl ;
}
else
{
cout << "ptr1 is null" << endl ;
}
return 0 ;
}
深受欢迎的三方智能指针库 显然,C++标准库提供的智能指针并不能满足所有程序员的需求,这就是还有很多其他智能指针库的原因。
Boost 提供了一些经过测试且文档完善的智能指针类,还有很多其他的实用类。
有关 Boost 智能指针的更详细信息,请访问 boost smart_ptr ,在这里还可下载相关的库。
使用流进行输入和输出 C++ 的流(Streams)是处理输入/输出(I/O)的核心机制。它抽象了数据源和数据目的地,将数据的读取和写入操作统一起来,使得开发者可以用同样的方式处理来自不同地方的数据,比如文件、键盘、屏幕、网络等。
你可以把“流”想象成一条水管:
输入流 (Input Stream):数据从源头流向你的程序,就像水从水源流进水管一样。输出流 (Output Stream):数据从你的程序流向目的地,就像水从水管流出去一样。流类库的核心概念 C++ 标准库中的流类库(通常称为 iostream)主要由几个基类组成,它们共同构成了流处理的基础:
std::istream (输入流)
处理从外部设备读取数据的操作。 例如,从键盘读取数据用到的 std::cin 就是 std::istream 的一个实例。 常用的操作符是提取操作符 >>,例如 std::cin >> myVar;。 std::ostream (输出流)
处理向外部设备写入数据的操作。 例如,向屏幕输出数据用到的 std::cout 就是 std::ostream 的一个实例。 常用的操作符是插入操作符 <<,例如 std::cout << "Hello, world!";。 std::iostream (输入/输出流)
同时支持输入和输出,通常用于处理可以双向通信的设备。 例如,文件流 std::fstream 就继承自这个类。 重要的流类和流对象 | 类/对象 | 用途 | | — | — | | cout | 标准输出流,通常被重定向到控制台 | | cin | 标准输入流,通常用于将数据读入变量 | | cerr | 用于显示错误信息的标准输出流 | | fstream | 用于操作文件的输入和输出流,继承了 ofstream 和 ifstream | | ofstream | 用于操作文件的输出流类,即用于创建文件 | | ifstream | 用于操作文件的输入流类,即用于读取文件 | | stringstream | 用于操作字符串的输入和输出流类,继承了 istringstream 和 ostringstream,通常用于在字符串和其他类型之间进行转换 |
cout、cin 和 cerr 分别是流类 ostream、istream 和 ostream 的全局对象。由于是全局对象,它们在 main( )开始之前就已初始化。
使用流类时,可指定为您执行特定操作的控制符(manipulator)。std::endl 就是一个这样的控制符,您一直在使用它来插入换行符:
std :: cout << "This lines ends here" << std :: endl ;
std命名空间常用于流的控制符 | 控制符 | 用途 | | — | — | | 输出控制符 | | endl | 插入一个换行符 | | ends | 插入一个空字符 | | 基数控制符 | | dec | 让流以十进制方式解释输入或显示输出 | | hex | 让流以十六进制方式解释输入或显示输出 | | oct | 让流以八进制方式解释输入或显示输出 | | 浮点数表示控制符 | | fixed | 让流以定点表示法显示数据 | | scientific | 让流以科学表示法显示数据 | | <iomanip> 控制符 | | setprecision | 设置小数精度 | | setw | 设置字段宽度 | | setfill | 设置填充字符 | | setbase | 设置基数,与使用 dec、hex 或 oct 等效 | | setiosflag | 通过类型为 std::ios_base::fmtflags 的掩码输入参数设置标志 | | resetiosflag | 将 std::ios_base::fmtflags 参数指定的标志重置为默认值 |
std::cout 指定格式写入控制台 修改数字显示格式 可以让 cout 以十六进制或八进制方式显示整数。
#include <iostream>
using namespace std ;
int main ()
{
int num = 255 ;
cout << "Decimal: " << dec << num << endl ;
cout << "Hexadecimal: " << hex << num << endl ;
cout << "Octal: " << oct << num << endl ;
return 0 ;
}
setiosflags 是 C++ <iomanip> 头文件中的一个函数,主要用于设置输出流的格式标志。这些格式标志决定了数据在输出时的显示方式,比如对齐方式、数字基数、是否显示正负号等。
对上面的代码进一步使用 setiosflags 函数,打印大写十六进制字母。
#include <iostream>
#include <iomanip>
using namespace std ;
int main ()
{
int num = 255 ;
cout << "Integer in hex using base notation: " ;
cout << setiosflags ( ios_base :: hex | ios_base :: showbase | ios_base :: uppercase );
cout << "Hexadecimal: " << num << endl ;
return 0 ;
}
在 cout « 链式输出中,setiosflags 的作用范围没有生效。根本原因在于 setiosflags 操纵符是在它所在的流(cout)上设置格式标志,但这个设置并不会立即影响到它后面的第一个字符串字面量 “Hexadecimal: “。cout « setiosflags(…) 这条语句会先执行,把 cout 的输出格式设置为十六进制、显示基数前缀并使用大写字母。但是,紧接着的 cout « “Hexadecimal: “ 是一个字符串,它不受这些数字格式的影响。当 cout 遇到下一个可以被格式化的数据,也就是你的整数变量 num 时,cout 的输出格式已经被重置了。
写作:
cout << "Integer in hex using base notation: " << setiosflags ( ios_base :: hex | ios_base :: showbase | ios_base :: uppercase ) << num << endl ;
仍然失效,暂不清楚原因,但是有一个更现代的写法是可以生效的:
cout << "Hexadecimal: " << hex << showbase << uppercase << num << endl ;
另一个例子,使用 cout 以定点表示法和科学表示法显示 Pi 和圆面积:
#include <iostream>
#include <iomanip>
using namespace std ;
int main ()
{
const double pi = ( double ) 22.0 / 7.0 ;
double radius = 5.0 ;
double area = pi * radius * radius ;
cout << fixed << setprecision ( 7 );
cout << "Pi: " << pi << endl ;
cout << scientific << "Scientific: " << pi << endl ;
cout << "Area: " << area << endl ;
return 0 ;
}
result:
Pi: 3.1428571
Scientific: 3.1428571e+00
Area: 7.8571429e+01
使用 std::cout 对齐文本和设置字段宽度 可使用 setw() 控制符来设置字段宽度,插入到流中的内容将在指定宽度内右对齐。在这种情况下,还可使用 setfill() 指定使用什么字符来填充空白区域。
#include <iostream>
#include <iomanip>
using namespace std ;
int main ()
{
cout << endl ;
cout << setw ( 30 ) << "Hello" << endl ;
cout << setw ( 10 ) << setfill ( '*' ) << "World" << endl ;
return 0 ;
}
使用 std::cin 进行输入 使用 std::cin 将输入读取到基本类型变量中 std::cin 用途广泛,让您能够将输入读取到基本类型(如 int、double 和 char*)变量中。您还可使用 getline() 从键盘读取一行输入。
使用实例:
#include <iostream>
using namespace std ;
int main ()
{
int num ;
cout << "Enter an integer: " ;
cin >> num ;
cout << "You entered: " << num << endl ;
double pi ;
cout << "Enter the value of Pi: " ;
cin >> pi ;
cout << "You entered: " << pi << endl ;
char ch1 , ch2 , ch3 ;
cout << "Enter three characters separated by spaces: " ;
cin >> ch1 >> ch2 >> ch3 ;
cout << "You entered: " << ch1 << ch2 << ch3 << endl ;
return 0 ;
}
使用cin::get安全地读取字符 cin 让您能够将输入直接写入 int 变量,也可将输入直接写入 char 数组(C 风格字符串):
cout << "Enter a line: " << endl ;
char charBuf [ 10 ] = { 0 }; // can contain max 10 chars
cin >> charBuf ; // Danger: user may enter more than 10 chars
写入 C 风格字符串缓冲区时,务必不要超越缓冲区的边界,以免导致程序崩溃或带来安全隐患,这至关重要。因此,将输入读取到 char 数组(C 风格字符串)时,下面是一种更好的方法:
cout << "Enter a line: " << endl ;
char charBuf [ 10 ] = { 0 };
cin . get ( charBuf , 9 ); // stop inserting at the 9th character
使用实例:
#include <iostream>
using namespace std ;
int main ()
{
char charBuf [ 10 ] = { 0 };
cout << "Enter something:" ;
cin . get ( charBuf , 9 );
cout << "You entered: " << charBuf << endl ;
return 0 ;
}
只要可以,就使用 std::string , 而不是C风格字符串。
使用 std::string 进行承接 按照其他类型一样的写法来接收字符串时,会有一个限制,就是遇到用户输入空格,就停止了插入。例如:
#include <iostream>
#include <string>
using namespace std ;
int main ()
{
string str ;
cout << "Enter string:" ;
cin >> str ;
cout << "You entered: " << str << endl ;
return 0 ;
}
输入“Hello world”,只接收了“Hello”,空格后面的“world”被忽略了。
要读取整行输入(包括空白),需要使用 getline( ):
#include <iostream>
#include <string>
using namespace std ;
int main ()
{
string str ;
cout << "Enter your name:" ;
getline ( cin , str );
cout << "You entered: " << str << endl ;
return 0 ;
}
使用 std::fstream 进行文件操作 要使用 std::fstream 类或其基类,需要包含头文件 <fstream> :
要使用 fstream、ofstream 或 ifstream 类,需要使用方法 open( )打开文件:
fstream myFile ;
myFile . open ( "HelloFile.txt" , ios_base :: in | ios_base :: out | ios_base :: trunc );
if ( myFile . is_open ()) // check if open() succeeded
{
// do reading or writing here
myFile . close ();
}
open() 接受两个参数:第一个是要打开的文件的路径和名称(如果没有提供路径,将假定为应用程序的当前目录设置);第二个是文件的打开模式。在上述代码中,指定了模式 ios_base::trunc(即便指定的文件存在,也重新创建它)、ios_base::in(可读取文件)和 ios_base::out(可写入文件)。
注意到在上述代码中使用了 is_open( ),它检测 open( )是否成功。
保存到文件时,必须使用 close() 关闭文件流。无论是使用构造函数还是成员方法 open() 来打开文件流,都建议您在使用文件流对象前,使用 is_open()检查文件打开操作是否成功。
还有另一种打开文件流的方式,那就是使用构造函数:
fstream myFile ( "HelloFile.txt" , ios_base :: in | ios_base :: out | ios_base :: trunc );
如果只想打开文件进行写入,可使用如下代码:
ofstream myFile ( "HelloFile.txt" , ios_base :: out );
如果只想打开文件进行读取,可使用如下代码:
ifstream myFile ( "HelloFile.txt" , ios_base :: in );
可在下述各种模式下打开文件流。
ios_base::app:附加到现有文件末尾,而不是覆盖它。 ios_base::ate:切换到文件末尾,但可在文件的任何地方写入数据。 ios_base::trunc:导致现有文件被覆盖,这是默认设置。 ios_base::binary:创建二进制文件(默认为文本文件)。 ios_base::in:以只读方式打开文件。 ios_base::out:以只写方式打开文件。 打开文件并使用«写入内容 代码示例:
#include <iostream>
#include <string>
#include <fstream>
using namespace std ;
int main ()
{
// 使用open打开一个文件,输入内容
ofstream myFile ;
myFile . open ( "test.txt" , ios_base :: out );
myFile << "Open File Success" << endl ;
myFile << "hello world" << endl ;
myFile . close ();
return 0 ;
}
打开文件并使用»读取内容 代码示例:
#include <iostream>
#include <string>
#include <fstream>
using namespace std ;
int main ()
{
// 使用open打开一个文件,输入内容
ifstream myFile ;
myFile . open ( "test.txt" , ios_base :: in );
if ( myFile . is_open ())
{
cout << "Open File Success" << endl ;
string content ;
while ( myFile . good ())
{
getline ( myFile , content );
cout << content << endl ;
}
myFile . close ();
}
else
{
cout << "Open File Failed" << endl ;
}
return 0 ;
}
ifstream的good函数什么作用
ifstream 的 good() 函数用于检查输入流的当前状态,以确定它是否可以继续进行有效的输入/输出操作。
good() 函数的作用,good() 函数会返回一个布尔值:
true:如果流没有设置任何错误标志。这意味着文件流处于“正常”状态,没有遇到文件结束、读取失败或格式错误等问题。你可以安全地继续读取数据。 false:如果流的以下任何一个或多个错误标志被设置了:failbit: 发生了非致命的 I/O 错误。例如,你试图将一个非数字字符读入一个整数变量。 eofbit: 达到了文件末尾 (End-Of-File)。这意味着已经没有更多数据可供读取。 badbit: 发生了致命的 I/O 错误。例如,磁盘读取错误。 读写二进制文件 写入二进制文件的流程与前面介绍的流程差别不大,重要的是在打开文件时使用 ios_base::binary 标志。通常使用 ofstream::write 和 ifstream::read 来读写二进制文件。
将一个结构写入二进制文件,并且使用该文件恢复出一个结构:
#include <fstream>
#include <iostream>
using namespace std ;
struct Student {
int id ;
char name [ 20 ];
int age ;
};
int main () {
Student s1 = { 1 , "zhangsan" , 18 };
ofstream myFile ( "test.bin" , ios_base :: out | ios_base :: binary );
if ( myFile . is_open ()) {
myFile . write ( reinterpret_cast < const char *> ( & s1 ), sizeof ( Student ));
myFile . close ();
}
Student s2 ;
ifstream myFile2 ( "test.bin" , ios_base :: in | ios_base :: binary );
if ( myFile2 . is_open ()) {
myFile2 . read (( char * ) & s2 , sizeof ( Student ));
myFile2 . close ();
cout << s2 . id << endl ;
cout << s2 . name << endl ;
cout << s2 . age << endl ;
}
return 0 ;
}
使用了 ifstream::read 和 ofstream::write 来读写文件; 使用了 reinterpret_cast 来将结构转换为字符指针。和下面的强转效果是一样的; 结构化的数据存储到 XML 文件中是更好的选择。XML 是一种基于文本和标记的存储格式,在持久化信息方面提供了灵活性和可扩展性。发布这个程序后,如果您对其进行升级,给结构 Human添加了新属性(如 numChildren),则需要考虑新版本使用的 ifstream::read,确保它能够正确地读取旧版本创建的二进制 数据。
使用 std::stringstream 对字符串进行转换 假设您有一个字符串,它包含字符串值 45,如何将其转换为整型值 45 呢?如何将整型值 45 转换为字符串 45 呢?C++提供的 stringstream 类是最有用的工具之一,让您能够执行众多的转换操作。
要使用 std::stringstream 类,需要包含头文件 <sstream>:
使用实例:
#include <fstream>
#include <iostream>
#include <sstream>
#include <string>
using namespace std ;
int main () {
cout << "Enter an integer: " << endl ;
int input = 0 ;
cin >> input ;
stringstream converterStream ;
converterStream << input ;
string inputStr ;
converterStream >> inputStr ;
cout << "You entered: " << inputStr << endl ;
stringstream anotherStream ;
anotherStream << inputStr ;
int anotherInput = 0 ;
anotherStream >> anotherInput ;
cout << "The integer value is: " << anotherInput << endl ;
return 0 ;
}
该程序让用户输入一个整型值,并使用运算符 << 将其插入到一个 stringstream 对象中。然后,您使用提取运算符将这个整数转换为 string。接下来,您将存储在 inputAsStr 中的字符串转换为整数,并将其存储到 Copy 中。
流小结 只想读取文件时,务必使用 ifstream。 只想写入文件时,务必使用 ofstream。 插入文件流或从文件流中提取之前,务必使用 is_open() 核实是否成功地打开了它。 使用完文件流后,别忘了使用方法 close() 将其关闭。 别忘了,使用代码 cin»strData;从 cin 提取内容到 string 中时,通常导致 strData 只包含空白前的文本,而不是整行。 别忘了,函数 getline(cin, strData); 从输入流中获取整行,其中包括空白。 异常处理 现实世界千差万别,没有两台计算机是相同的,即便硬件配置一样。这是因为在特定时间,可用的资源量取决于计算机运行的软件及其状态,因此即便在开发环境中内存分配完美无缺,在其他环境中也可能出问题。
这些问题导致了异常 。异常会打断应用程序的正常流程。毕竟,如果没有内存可用,应用程序就无法完成分配给它的任务。然而,应用程序可处理这种异常:向用户显示一条友好的错误消息、采取必要的挽救措施并妥善地退出。
异常可能是外部因素导致的,如系统没有足够的内存;也可能是应用程序内部因素导致的,如使用的指针包含无效值或除数为零。为了向调用者指出错误,有些模块引发异常。
通过对异常进行处理,有助于避免出现“访问违规”和“未处理的异常”等屏幕,还可避免收到相关的抱怨邮件。下面来看看 C++都向您提供了哪些应对意外的工具。
使用try catch 处理异常 在捕获异常方面, try 和 catch 是最重要的 C++关键字。要捕获语句可能引发的异常,可将它们放在 try 块中,并使用 catch 块对 try 块可能引发的异常进行处理:
void SomeFunc () {
try {
int * numPtr = new int ;
* numPtr = 999 ;
delete numPtr ;
} catch (...) // ... catches all exceptions
{
cout << "Exception in SomeFunc(), quitting" << endl ;
}
}
使用举例,用户输入为 -1 个整数预留空间:
#include <iostream>
using namespace std ;
int main () {
try {
cout << "Enter the size of the array: " << endl ;
int size = 0 ;
cin >> size ;
int * numPtr = new int [ size ];
cout << "the array size is: " << size << endl ;
} catch (...) {
cout << "Exception in main(), quitting" << endl ;
}
return 0 ;
}
使用 catch(...) 可以捕获所有异常。在这个场景下,也可以指定 const std::bad_alloc& e 来专门捕获因为 new 失败引发的异常。
也可以先指定 const std::bad_alloc& e 来捕获异常,然后再使用 catch(...) 来捕获其他异常。确保万无一失。
#include <iostream>
using namespace std ;
int main () {
try {
cout << "Enter the size of the array: " << endl ;
int size = 0 ;
cin >> size ;
int * numPtr = new int [ size ];
cout << "the array size is: " << size << endl ;
} catch ( std :: bad_alloc & exp ) {
cout << "Exception encountered: " << exp . what () << endl ;
cout << "Got to end, sorry!" << endl ;
} catch (...) {
cout << "Exception in main(), quitting" << endl ;
}
return 0 ;
}
输出:
Enter the size of the array:
-1
Exception encountered: std::bad_array_new_length
Got to end, sorry!
一般而言,可根据可能出现的异常添加多个 catch( )块,这将很有帮助。
使用 throw 引发特定类型的异常 void DoSomething ()
{
if ( something_unwanted )
throw object ;
}
使用举例:
#include <iostream>
using namespace std ;
int Divide ( int a , int b ) {
if ( b == 0 ) {
throw "Division by zero" ;
}
int result = a / b ;
cout << "Result: " << result << endl ;
return result ;
}
int main () {
int a = 10 ;
int b = 0 ;
int result = 0 ;
try {
result = Divide ( a , b );
} catch ( const char * exp ) {
cout << "Exception encountered: " << exp << endl ;
}
return 0 ;
}
上述代码表明,通过捕获类型为 char* 的异常,可捕获调用函数 Divide() 可能引发的异常。另外,这里没有将整个 main() 都放在 try{ } ;中,而 只在其中包含可能引发异常的代码 。这通常是一种不错的做法,因为 异常处理也可能降低代码的执行性能 。
异常处理的工作流程 在程序清单 28.3 中,您在函数 Divide( ) 中引发了一个类型为 char* 的异常,并在函数 main() 中使用处理程序 catch(char*) 捕获它。
每当您使用 throw 引发异常时,编译器都将查找能够处理该异常的 catch(Type) 。异常处理逻辑首先检查引发异常的代码是否包含在 try 块中,如果是,则查找可处理这种异常的 catch(Type) 。如果 throw 语句不在 try 块内,或者没有与引发的异常兼容的 catch() ,异常处理逻辑将继续在调用函数中寻找。因此,异常处理逻辑沿调用栈向上逐个地在调用函数中寻找,直到找到可处理异常的 catch(Type) 。在退栈过程的每一步中,都将销毁当前函数的局部变量,因此这些局部变量的销毁顺序与创建顺序相反。
演示:
#include <iostream>
using namespace std ;
struct StructA {
StructA () { cout << "StructA constructor" << endl ; }
~ StructA () { cout << "StructA destructor" << endl ; }
};
struct StructB {
StructB () { cout << "StructB constructor" << endl ; }
~ StructB () { cout << "StructB destructor" << endl ; }
};
void FunctionTwo () {
StructA a ;
StructB b ;
cout << "About to Throw an Exception" << endl ;
throw "Exception in FunctionTwo()" ;
}
void FunctionOne () {
try {
StructA a ;
StructB b ;
FunctionTwo ();
} catch ( const char * exp ) {
cout << "Exception encountered: " << exp << endl ;
cout << "Exception Handled in FunctionOne(), not gonna pass to Caller"
<< endl ;
}
}
int main () {
cout << "About to call FunctionOne()" << endl ;
try {
FunctionOne ();
} catch ( const char * exp ) {
cout << "Exception encountered: " << exp << endl ;
}
cout << "Everything alright! About to exit main()" << endl ;
return 0 ;
}
按照栈上的顺序,创建和销毁对象,在 FunctionOne() 中捕获了异常,就不会传递到 main() 中。
如果因出现异常而被调用的析构函数也引发异常,将导致应用程序异常终止。
std::exception类 例如捕获 std::bad_alloc 时,实际上是捕获 new 引发的 std::bad_alloc 对象。std::bad_alloc 继承了 C++标准类 std::exception,而 std::exception 是在头文件 <exception> 中声明的。
下述重要异常类都是从 std::exception 派生而来的。
bad_alloc:使用 new 请求内存失败时引发。 bad_cast:试图使用 dynamic_cast 转换错误类型(没有继承关系的类型)时引发。 ios_base::failure:由 iostream 库中的函数和方法引发。 std::exception 类是异常基类,它定义了虚方法 what() ;这个方法很有用且非常重要,详细地描述了导致异常的原因,让用 户知道什么地方出了问题。
由于 std::exception 是众多异常类型的基类,因此可使用 catch(const exception&) 捕获所有将 std::exception 作为基类的异常:
void SomeFunc () {
try {
// code made exception safe
} catch ( const std :: exception & exp ) // catch bad_alloc, bad_cast, etc
{
cout << "Exception encountered: " << exp . what () << endl ;
}
}
从 std::exception 派生出自定义异常类 可以引发所需的任何异常。然而,让自定义异常继承 std::exception 的好处在于,现有的异常处理程序 catch(const std::exception&)不但能捕获 bad_alloc、bad_cast 等异常,还能捕获自定义异常,因为它们的基类都是 exception。
举例:
#include <iostream>
#include <string>
using namespace std ;
class CustomException : public exception {
string reason ;
public:
CustomException ( const string & reason ) : reason ( reason ) {}
virtual const char * what () const throw () { return reason . c_str (); }
};
int Divide ( int a , int b ) {
if ( b == 0 ) {
throw CustomException ( "Divisor cannot be zero" );
}
return a / b ;
}
int main () {
try {
int result = Divide ( 10 , 0 );
cout << "Result: " << result << endl ;
} catch ( const CustomException & e ) {
cout << "Exception: " << e . what () << endl ;
}
return 0 ;
}
请注意 CustomException::what() 的声明:
virtual const char * what () const throw ()
它以 throw() 结尾,这意味着这个函数本身不会引发异常。这是对异常类的一个重要约束,如果您在该函数中包含一条 throw 语句,编译器将发出警告。如果函数以 throw(int) 结尾,意味着该函数可能引发类型为 int 的异常。
异常小结 务必捕获类型为 std::exception 的异常。 务必从 std::exception 派生出自定义异常类。 务必谨慎地引发异常。异常不能替代返回值(如true 或 false)。 不要在析构函数中引发异常。 不要认为内存分配总能成功,务必将使用 new 的代码放在 try 块中,并使用 catch(std::exception&)捕获可能发生的异常。 不要在catch( )块中包含实现逻辑或分配资源的代码,以免在处理异常的同时导致异常。 - 问:为何引发异常,而不是返回错误?
- 答:不是什么时候都可以返回错误。如果调用 new 失败,需要处理 new 引发的异常,以免应用程序崩溃。另外,如果错误非常严重,导致应用程序无法正常运行,应考虑引发异常。
- 问:为何自定义异常类应继承 std::exception?
- 答:当然,并非必须这样做,但这让您能够重用捕获 std::exception 异常的所有 `catch( )` 块。编写自己的异常类时,可以不继承任何类,但必须在所有相关的地方插入新的 `catch(MyNewExceptionType&)` 语句。
- 问:我编写的函数引发异常,必须在该函数中捕获它吗?
- 答:完全不必,只需确保调用栈中有一个函数捕获这类异常即可。
- 问:构造函数可引发异常吗?
- 答:构造函数实际上没有选择余地!它们没有返回值,指出问题的唯一途径是引发异常。
- 问:析构函数可引发异常吗?
- 答:从技术上说可以,但这是一种糟糕的做法,因为异常导致退栈时也将调用析构函数。如果因异常而调用的析构函数引发异常,将给原本就稳定并试图妥善退出的应用程序雪上加霜。
本文是C++扫盲的第二篇记录,从STL标准模板往后的一些进阶内容。
前面的相关文章:
C++基础记录
【算法刷题】C++常见容器使用集合
STL容器 STL 顺序容器 如下所示。
std::vector:操作与动态数组一样,在最后插入数据;可将 vector 视为书架,您可在一端添加和拿走图书。 std::deque:与 std::vector 类似,但允许在开头插入或删除元素。 std::list:操作与双向链表一样。可将它视为链条,对象被连接在一起,您可在任何位置添加或删除对象。 std::forward_list:类似于 std::list,但是单向链表,只能沿一个方向遍历。 STL 提供的 关联容器 如下所示。
std::set:存储各不相同的值,在插入时进行排序;容器的复杂度为对数。 std::unordered_set:存储各不相同的值,在插入时进行排序;容器的复杂度为常数。这种容器是 C++11 新增的。 std::map:存储键-值对,并根据唯一的键排序;容器的复杂度为对数。 std::unordered_map:存储键-值对,并根据唯一的键排序;容器的复杂度为对数。这种容器是C++11 新增的。 std::multiset:与 set 类似,但允许存储多个值相同的项,即值不需要是唯一的。 std::unordered_multiset:与 unordered_set 类似,但允许存储多个值相同的项,即值不需要是唯一的。这种容器是 C++11 新增的。 std::multimap:与 map 类似,但不要求键是唯一的。 std::unordered_multimap:与 unordered_map 类似,但不要求键是唯一的。这种容器是 C++11新增的。 容器适配器(Container Adapter) 是顺序容器和关联容器的变种,其功能有限,用于满足特定的需 求。主要的适配器类如下所示。
std::stack:以 LIFO(后进先出)的方式存储元素,让您能够在栈顶插入(压入)和删除(弹出)元素。 std::queue:以 FIFO(先进先出)的方式存储元素,让您能够删除最先插入的元素。 std::priority_queue:以特定顺序存储元素,因为优先级最高的元素总是位于队列开头。 迭代器 在C++中,迭代器(Iterator) 是一种通用概念,它提供了一种访问容器(如数组、列表、树等)中元素的方式,而无需暴露容器的底层实现细节。你可以把它想象成一个“智能指针”,它指向容器中的某个元素,并且可以向前或向后移动 来遍历容器中的所有元素。
迭代器的主要作用就是将算法和容器分离。这样,你可以编写通用的算法(如排序、查找),这些算法可以应用于任何支持迭代器的容器,而不需要为每一种容器类型(如 std::vector 或 std::list)重复编写相同的代码。
迭代器的核心功能 一个典型的迭代器通常会提供以下操作:
解引用操作符 (*) :获取迭代器当前指向的元素。自增操作符 (++) :将迭代器移动到下一个元素。相等/不相等比较操作符 (==, !=) :判断两个迭代器是否指向同一个位置。自减操作符 (--) :将迭代器移动到上一个元素(仅限部分类型)。STL 迭代器 STL (Standard Template Library) 迭代器 是 C++ 标准库中定义的一组特定的迭代器,它们是STL容器和算法之间的桥梁。
STL迭代器不是一个单一的类,而是一组概念和接口的集合。它们被分为五种主要类型,每种类型都有不同的功能,可以用于不同的场景:
输入迭代器 (Input Iterator) 用途: 只能向前遍历容器一次,用于读取数据。例子: 输入流迭代器 (std::istream_iterator)。输出迭代器 (Output Iterator) 用途: 只能向前遍历容器一次,用于写入数据。例子: 输出流迭代器 (std::ostream_iterator)。前向迭代器 (Forward Iterator) 用途: 只能向前遍历容器,可以遍历多次。例子: std::forward_list 的迭代器。双向迭代器 (Bidirectional Iterator) 用途: 可以向前和向后遍历容器。例子: std::list 和 std::set 的迭代器。随机访问迭代器 (Random Access Iterator) 用途: 功能最强大,可以像指针一样进行任意位置的跳转 。支持+, -, []等操作。例子: std::vector, std::string, std::deque 和 C 风格数组的迭代器。为什么 STL 迭代器如此重要? STL 迭代器的存在使得 STL 算法库非常强大和灵活。例如,std::sort 算法要求其参数是随机访问迭代器 ,因为它需要随机访问元素以进行高效的排序。而 std::find 算法只需要输入迭代器 ,因为它只需要从头到尾遍历一次即可。
总结来说,C++ 迭代器 是一个通用的抽象概念,而 STL 迭代器 是这个概念在 C++ 标准库中的具体实现,它们是连接 STL 容器和算法的通用接口,是 C++ 泛型编程的基石。
STL算法 查找、排序和反转等都是标准的编程需求,不应让程序员重复实现这样的功能。因此 STL 以 STL 算法的方式提供这些函数,通过结合使用这些函数和迭代器,程序员可对容器执行一些最常见的操作。 最常用的 STL 算法如下所示。
std::find:在集合中查找值。 std::find_if:根据用户指定的谓词在集合中查找值。 std::reverse:反转集合中元素的排列顺序。 std::remove_if:根据用户定义的谓词将元素从集合中删除。 std::transform:使用用户定义的变换函数对容器中的元素进行变换。 这些算法都是 std 命名空间中的模板函数,要使用它们,必须包含标准头文件<algorithm>。 举例从vector中查找元素及其下标 #include <iostream>
#include <vector>
#include <algorithm>
int main () {
std :: vector < int > vec = { 10 , 20 , 30 , 40 , 50 };
// 查找元素
int value_to_find = 30 ;
auto it = std :: find ( vec . begin (), vec . end (), value_to_find );
if ( it != vec . end ()) {
std :: cout << "Found value: " << * it << std :: endl ;
// 获取下标
int index = std :: distance ( vec . begin (), it );
std :: cout << "Index of value: " << index << std :: endl ;
} else {
std :: cout << "Value not found." << std :: endl ;
}
return 0 ;
}
在 C++ 标准库中,std::distance是一个定义在 <iterator> 头文件中的函数模板,用于计算两个迭代器之间的距离。它主要用于确定从一个迭代器到另一个迭代器之间有多少个元素。
对比
字符串使用演进 C++中字符串的使用经历了从C风格字符串到C++标准库字符串类的演进,主要包括以下几个阶段:
C风格字符串(C-Style Strings) :这是最早的字符串表示方式,使用字符数组和空字符('\0')来表示字符串的结束。 例如:char str[] = "Hello, World!"; 缺点:容易出现缓冲区溢出、内存管理复杂、操作不便等问题。 优点:兼容性好,与C语言库函数兼容。 C++支持动态分配内存,使用new和delete运算符可以在运行时分配和释放内存。
比如使用 char * dynamicName = new char[arrayLen] 来定义一个动态分配的字符数组,其中 arrayLen 是一个整数,用于指定动态分配的字符数组的长度。
然而,如果要在运行阶段改变数组的长度,必须首先释放以前分 配给它的内存,再重新分配内存来存储数据。
如果将 char*用作类的成员属性,情况将更复杂。将对象赋给另一个对象时,如果编写正确的复制构造函数和赋值运算符,两个对象将包含同一个指针的拷贝,该指针指向相同的缓冲区。其结果是,两个对象的字符串指针存储的地址相同,指向同一个内存单元。其中一个对象被销毁时,另一个对象中的指针将非法,让应用程序面临崩溃的危险。
C++标准库字符串类(std::string) :这是C++标准库提供的字符串类,使用起来更加方便和安全。 例如:std::string str = "Hello, World!"; 优点:自动管理内存、提供丰富的操作方法、支持字符串拼接、比较等。 缺点:与C风格字符串相比,性能较低。 string实例化和复制 string 类提供了很多重载的构造函数,因此可以多种方式进行实例化和初始化。例如,可使用常量字符串初始化 STL string 对象或将常量字符串赋给 STL std::string 对象:
const char * constCStyleString = "Hello String!" ;
std :: string strFromConst ( constCStyleString );
或:
std :: string strFromConst = constCStyleString ;
// 上述代码与下面的代码类似:
std :: string str2 ( "Hello String!" );
同样,可使用一个 string 对象来初始化另一个:
std :: string str2Copy ( str2 );
可让 string 的构造函数只接受输入字符串的前 n 个字符:
// Initialize a string to the first 5 characters of another
std :: string strPartialCopy ( constCStyleString , 5 );
还可这样初始化 string 对象,即使其包含指定数量的特定字符:
// Initialize a string object to contain 10 'a's
std :: string strRepeatChars ( 10 , 'a' );
string元素访问 第一种:使用[]运算符
std :: string str = "Hello, World!" ;
char ch = str [ 7 ]; // ch now holds 'W'
// 遍历
for ( size_t i = 0 ; i < str . size (); ++ i ) {
std :: cout << str [ i ] << ' ' ;
}
这种方式来访问string内容时,需要注意的是,访问的下标必须在字符串的有效范围内,否则会导致未定义行为。
第二种:使用迭代器
std :: string str = "Hello, World!" ;
// 遍历
for ( std :: string :: iterator it = str . begin (); it != str . end (); ++ it ) {
std :: cout << * it << ' ' ;
}
这种方式更加灵活,可以方便地进行各种操作,如插入、删除等。迭代器很重要,因为很多 string 成员函数都以迭代器的方式返回其结果。
拼接string 可以使用+运算符或append方法来拼接字符串。
std :: string str1 = "Hello, " ;
std :: string str2 = "World!" ;
std :: string str3 = str1 + str2 ; // str3 now holds "Hello, World!"
std :: string str1 = "Hello, " ;
std :: string str2 = "World!" ;
str1 . append ( str2 ); // str1 now holds "Hello, World!"
string中字符和子字符串的查找 可以使用find方法来查找字符或子字符串。
std :: string str = "Hello, World!" ;
size_t pos = str . find ( "World" ); // pos now holds 7
if ( pos != std :: string :: npos ) {
std :: cout << "Found at position: " << pos << std :: endl ;
} else {
std :: cout << "Not found" << std :: endl ;
}
find方法返回子字符串首次出现的位置,如果未找到则返回std::string::npos。
在C++的 std::string 类中, string::npos 是一个静态成员常量,它的值是 string::size_type 类型所能表示的最大值。它的主要作用是作为一个 “未找到” (”not found”)的标志。当你在使用 std::string 的查找方法(如 find() 或 rfind())时,如果子字符串或字符没有被找到,这些方法就会返回 string::npos。
如果string中有不止一个的子字符串,find方法只会返回第一个子字符串的位置。如果要查找所有子字符串的位置,需要使用循环来实现。
std :: string str = "Hello, World! World!" ;
size_t pos = str . find ( "World" );
while ( pos != std :: string :: npos ) {
std :: cout << "Found at position: " << pos << std :: endl ;
pos = str . find ( "World" , pos + 1 );
}
string的截断 如果是获取子字符串,可以使用substr方法来截取字符串的一部分。
std :: string str = "Hello, World!" ;
std :: string subStr = str . substr ( 7 , 5 ); // subStr now holds "World"
如果是直接对原字符串操作,可以使用 erase() 方法来删除指定位置的字符或子字符串。
STL string 类提供了 erase()函数,具有以下用途。
string sampleStr ( "Hello String! Wake up to a beautiful day!" );
sampleStr . erase ( 13 , 28 ); // Hello String!
sampleStr . erase ( iCharS ); // iterator points to a specific character
在给定由两个迭代器指定的范围时删除该范围内的字符。 sampleStr . erase ( sampleStr . begin (), sampleStr . end ()); // erase from begin
例如:
std :: string str = "Hello, World!" ;
// 删除从位置 7 开始的 5 个字符
str . erase ( 7 , 5 ); // str now holds "Hello!"
删除某一个字符:
std :: string str = "Hello, World!" ;
auto iChar = str . find ( 'W' );
if ( iChar != std :: string :: npos ) {
str . erase ( iChar , 1 ); // 删除第一个 'W'
}
std :: cout << str << std :: endl ; // 输出 "Hello, orld!"
删除指定迭代器范围内的所有字符:
std :: string str = "Hello, World!" ;
auto iStart = str . begin () + 7 ;
auto iEnd = str . begin () + 12 ;
str . erase ( iStart , iEnd ); // str now holds "Hello!"
字符串反转 有时需要反转字符串的内容。假设要判断用户输入的字符串是否为回文,方法之一是将其反转,再与原来的字符串进行比较。反转 STL string 很容易,只需使用泛型算法 std::reverse() 即可:
string sampleStr ( "Hello String! We will reverse you!" );
reverse ( sampleStr . begin (), sampleStr . end ());
std::reverse()算法根据两个输入参数指定的边界反转边界内的内容。在这里,两个边界分别是 string 对象的开头和末尾,因此整个字符串都被反转。只要提供合适的输入参数,也可将字符串的一部分反转。注意,边界不能超过 end()。
大小写转换 要对字符串进行大小写转换,可使用算法 std::transform() 来实现。
下面这个例子,将用户输入的字符串分别进行大写和小写转换:
#include <iostream>
#include <string>
#include <algorithm>
#include <cctype>
int main () {
std :: string input ;
std :: cout << "Enter a string: " ;
std :: getline ( std :: cin , input );
// 转换为大写
std :: string upperCaseStr = input ;
std :: transform ( upperCaseStr . begin (), upperCaseStr . end (), upperCaseStr . begin (), :: toupper );
// 转换为小写
std :: string lowerCaseStr = input ;
std :: transform ( lowerCaseStr . begin (), lowerCaseStr . end (), lowerCaseStr . begin (), :: tolower );
std :: cout << "Uppercase: " << upperCaseStr << std :: endl ;
std :: cout << "Lowercase: " << lowerCaseStr << std :: endl ;
return 0 ;
}
C++14引入的操作符””s C++14引入了一个新的操作符""s,它可以直接将字符串字面量转换为std::string类型。这使得字符串的创建更加简洁和直观。
如果字面量字符串中包含了空字符,需要使用""s操作符来创建字符串。
#include <iostream>
#include <string>
using namespace std ;
int main () {
string str1 ( "Hello \0 World!" );
cout << str1 << endl ;
// 输出:Hello
string str2 ( "Hello \0 World!" s );
cout << str2 << endl ;
// 输出:Hello \0 World!
return 0 ;
}
vector vector 是一个模板类,提供了动态数组的通用功能,具有如下特点:
在数组末尾添加元素所需的时间是固定的,即在末尾插入元素的所需时间不随数组大小而异,在末尾删除元素也如此; 在数组中间添加或删除元素所需的时间与该元素后面的元素个数成正比; 存储的元素数是动态的,而 vector 类负责管理内存。 vector实例化 vector是一个模板类,需要指定元素类型。
vector < int > dynamicIntArray ;
vector < string > stringArray ;
vector < double > doubleArray ;
声明const迭代器可以这样写:
vector < int >:: const_iterator iter = dynamicIntArray . cbegin ();
如果需要可修改值的迭代器,需要使用iterator而不是const_iterator。
vector < int >:: iterator iter = dynamicIntArray . begin ();
其他实例化方式:
// 初始化列表
vector < int > dynamicIntArray = { 1 , 2 , 3 , 4 , 5 };
// 指定大小,默认初始化元素为0
vector < int > dynamicIntArray ( 5 );
// 指定大小,指定初始化元素,内部元素均为50
vector < int > dynamicIntArray ( 5 , 50 );
// 通过另一个vector初始化
vector < int > dynamicIntArray2 ( dynamicIntArray );
// 通过迭代器,使用另一个数组的一部分来初始化
vector < int > dynamicIntArray3 ( dynamicIntArray . begin (), dynamicIntArray . begin () + 3 );
vector使用 push_back() 添加元素 和 pop_back() 删除元素 添加元素:
vector < int > dynamicIntArray ;
dynamicIntArray . push_back ( 10 );
dynamicIntArray . push_back ( 20 );
dynamicIntArray . push_back ( 30 );
// size() 函数返回vector中元素的个数
for ( int i = 0 ; i < dynamicIntArray . size (); i ++ )
{
cout << dynamicIntArray [ i ] << endl ;
}
使用 pop_back() 将元素从 vector 中删除所需的时间是固定的,即不随 vector 存储的元素个数而异。例如:
dynamicIntArray . pop_back (); // 删除最后一个元素
// 现在 dynamicIntArray 只包含 10 和 20
vector使用 insert() 指定位置插入元素 有好几个重载版本:
插入指定位置,例如在开头插入一个元素: vector < int > dynamicIntArray = { 10 , 20 , 30 };
dynamicIntArray . insert ( dynamicIntArray . begin (), 5 ); // 在开头插入5
// 结果: 5 10 20 30
指定插入位置,元素数量,元素数值(数值相同): vector < int > dynamicIntArray = { 10 , 20 , 30 };
dynamicIntArray . insert ( dynamicIntArray . begin () + 1 , 2 , 15 ); // 在第二个位置插入两个15
// 结果: 10 15 15 20 30
将另一个vector插入指定位置: vector < int > dynamicIntArray1 = { 10 , 20 , 30 };
vector < int > dynamicIntArray2 = { 40 , 50 };
dynamicIntArray1 . insert ( dynamicIntArray1 . begin () + 1 , dynamicIntArray2 . begin (), dynamicIntArray2 . end ());
// 结果: 10 40 50 20 30
vector使用数组语法访问元素 可以使用数组语法来访问 vector 中的元素:
vector < int > dynamicIntArray = { 10 , 20 , 30 };
cout << dynamicIntArray [ 0 ] << endl ; // 输出 10
cout << dynamicIntArray [ 1 ] << endl ; // 输出 20
cout << dynamicIntArray [ 2 ] << endl ; // 输出 30
// 循环
for ( int i = 0 ; i < dynamicIntArray . size (); i ++ )
{
cout << dynamicIntArray [ i ] << endl ;
}
vector使用at()访问元素 at() 方法提供了边界检查,如果访问越界会抛出异常。
vector < int > dynamicIntArray = { 10 , 20 , 30 };
cout << dynamicIntArray . at ( 0 ) << endl ; // 输出 10
cout << dynamicIntArray . at ( 1 ) << endl ; // 输出 20
cout << dynamicIntArray . at ( 2 ) << endl ; // 输出 30
使用指针语法访问vector元素 可以使用迭代器以类似指针的方式访问vector元素:
vector < int > dynamicIntArray = { 10 , 20 , 30 };
vector < int >:: const_iterator it = dynamicIntArray . begin ();
cout << * it << endl ; // 输出 10
// 遍历
for ( it = dynamicIntArray . begin (); it != dynamicIntArray . end (); it ++ )
{
cout << * it << endl ;
}
这里使用了 ++ 运算符移动位置,使用了 * 运算符解引用迭代器。
vector的大小和容量 size() 方法返回 vector 中元素的个数,而 capacity() 方法返回 vector 分配的内存大小(即可以容纳的元素个数)。
vector < int > dynamicIntArray = { 10 , 20 , 30 };
cout << "Size: " << dynamicIntArray . size () << endl ; // 输出 3
cout << "Capacity: " << dynamicIntArray . capacity () << endl ; // 输出 3 或更大
如果 vector 需要频繁地给其内部动态数组重新分配内存,将对性能造成一定的影响。在很大程度上说,这种问题可以通过使用成员函数 reserve (number) 来解决。reserve 函数的功能基本上是增加分配给内部数组的内存,以免频繁地重新分配内存。通过减少重新分配内存的次数,还可减少复制对象的时间,从而提高性能,这取决于存储在 vector 中的对象类型。
vector < int > dynamicIntArray ;
dynamicIntArray . reserve ( 100 ); // 预留空间以容纳100个元素
dynamicIntArray . push_back ( 10 );
dynamicIntArray . push_back ( 20 );
dynamicIntArray . push_back ( 30 );
cout << "Size: " << dynamicIntArray . size () << endl ; // 输出 3
cout << "Capacity: " << dynamicIntArray . capacity () << endl ; // 输出 100
deque deque(double-ended queue)是一个模板类,提供了双端队列的通用功能,除了兼顾 vector 的随机访问能力,还支持在队列的前端进行快速的插入和删除操作。
对比两种结构的底层实现:
vector和deque实现对比 C++ 的 std::vector 和 std::deque 都是标准模板库(STL)中的容器,它们在底层使用了不同的数据结构来存储元素,这导致了它们在性能特性上的差异。
std::vectorstd::vector 的底层实现是一个动态数组(Dynamic Array) 。它的所有元素都存储在一段连续的内存块中。
优点: 快速随机访问: 由于内存连续,通过索引访问任何元素的时间复杂度为 $O(1)$,因为它只需要简单的指针算术运算。缓存友好: 连续的内存布局使得它在遍历元素时具有很好的 CPU 缓存局部性(cache locality),这通常能带来更好的性能。缺点: 插入和删除开销大: 在数组的中间或开头插入或删除元素需要移动其后的所有元素,时间复杂度为 $O(n)$。扩容开销: 当动态数组的容量不足时,vector 需要分配一块更大的新内存,将所有旧元素复制到新内存中,然后释放旧内存。这个操作的时间复杂度也是 $O(n)$。std::deque和 vector 容器采用连续的线性空间不同,deque 容器存储数据的空间是由一段一段等长的连续空间构成,各段空间之间并不一定是连续的,可以位于在内存的不同区域。
为了管理这些连续空间,deque 容器用数组(数组名假设为 map)存储着各个连续空间的首地址。
也就是说,map 数组中存储的都是指针,指向那些真正用来存储数据的各个连续空间。
通过建立 map 数组,deque 容器申请的这些分段的连续空间就能实现“整体连续”的效果。
换句话说,当 deque 容器需要在头部或尾部增加存储空间时,它会申请一段新的连续空间,同时在 map 数组的开头或结尾添加指向该空间的指针,由此该空间就串接到了 deque 容器的头部或尾部。
有读者可能会问,如果 map 数组满了怎么办?很简单,再申请一块更大的连续空间供 map 数组使用,将原有数据(很多指针)拷贝到新的 map 数组中,然后释放旧的空间。
deque 容器的分段存储结构,提高了在序列两端添加或删除元素的效率,但也使该容器迭代器的底层实现变得更复杂。
deque使用 push_front() 和 push_back() #include <iostream>
#include <deque>
using namespace std ;
int main () {
deque < int > myDeque ;
// 在队列末尾添加元素
myDeque . push_back ( 10 );
myDeque . push_back ( 20 );
myDeque . push_back ( 30 );
// 在队列前端添加元素
myDeque . push_front ( 5 );
myDeque . push_front ( 1 );
// 当前deque内容: 1 5 10 20 30
// 删除队列末尾的元素
myDeque . pop_back ();
// 删除队列前端的元素
myDeque . pop_front ();
// 修改后的deque内容: 5 10 20
return 0 ;
}
deque的两种遍历方式 #include <iostream>
#include <deque>
using namespace std ;
int main () {
deque < int > myDeque = { 10 , 20 , 30 , 40 , 50 };
// 使用索引遍历
cout << "Using index:" << endl ;
for ( size_t i = 0 ; i < myDeque . size (); ++ i ) {
cout << myDeque [ i ] << " " ;
}
cout << endl ;
// 使用迭代器遍历
cout << "Using iterator:" << endl ;
for ( deque < int >:: iterator it = myDeque . begin (); it != myDeque . end (); ++ it ) {
// 使用distance计算偏移位置
size_t offset = distance ( myDeque . begin (), it );
cout << "Offset: " << offset << ", Value: " << * it << " " ;
}
cout << endl ;
return 0 ;
}
size_t 是无符号整数类型,用于表示对象的大小或索引。
清空vector和deque 可以使用 clear() 方法清空 vector 和 deque,可以使用 empty() 来判断容器是否为空的。
#include <iostream>
#include <vector>
#include <deque>
using namespace std ;
int main () {
vector < int > myVector = { 1 , 2 , 3 , 4 , 5 };
deque < int > myDeque = { 10 , 20 , 30 , 40 , 50 };
// 清空vector
myVector . clear ();
if ( myVector . empty ()) {
cout << "Vector is empty." << endl ;
} else {
cout << "Vector is not empty." << endl ;
}
// 清空deque
myDeque . clear ();
if ( myDeque . empty ()) {
cout << "Deque is empty." << endl ;
} else {
cout << "Deque is not empty." << endl ;
}
return 0 ;
}
应该 不应该 在不知道需要存储多少个元素时,务必使用动态数组 vector 或 deque。 使用固定大小的数组,可能会浪费内存或导致溢出。 请牢记,vector 只能在一端扩容,为此可使用函数 push_back( )。 试图在 vector 的前端插入元素,可能导致性能问题。 请牢记,deque 可在两端扩容,为此可使用函数 push_back( )和 push_front( )。 忘记 deque 的双端特性,导致不必要的复杂操作。 访问动态数组时,不要跨越其边界。 使用索引访问时不检查边界,可能导致未定义行为。 使用迭代器遍历容器,确保代码的通用性和安全性。 直接使用指针操作容器,可能导致错误和不安全的代码。
别忘了,函数 pop_back() 删除集合中的最后一个元素。函数 pop_front() 删除 deque 的第一个元素。
std::list std::list 在C++中是一个双向链表(doubly linked list),它的核心实现依赖于节点(node)和指针(pointer)。
std::list 通常使用一个 虚拟的头节点(sentinel node) 来简化操作。这个节点不存储任何实际数据,它的作用是:
next指针永远指向链表的第一个真实节点。 prev指针永远指向链表的最后一个真实节点。 当链表为空时,这个虚拟头节点的next和prev都指向它自己。 使用虚拟头节点的好处是,无论是插入、删除还是遍历,你都不需要对链表为空或在头尾进行特殊判断,所有操作都可以用统一的方式处理,这大大简化了代码逻辑。
要实例化模板 list,需要指定要在其中存储的对象类型,因此实例化 list 的语法类似于下面这样:
std :: list < int > linkInts ; // list containing integers
std :: list < float > listFloats ; // list containing floats
std :: list < Tuna > listTunas ; // list containing objects of type Tuna
要声明一个指向 list 中元素的迭代器,可以像下面这样做:
std :: list < int >:: const_iterator elementInList ;
如果需要一个这样的迭代器,即可以使用它来修改值或调用非 const 函数,可将 const_iterator 替换为 iterator。
list实例化方式 #include <iostream>
#include <list>
using namespace std ;
int main () {
// 使用初始化列表
list < int > myList = { 1 , 2 , 3 , 4 , 5 };
// 使用默认构造函数
list < string > stringList ;
// 使用指定大小和初始值
list < double > doubleList ( 5 , 3.14 ); // 包含5个3.14
// 使用另一个list初始化
list < int > anotherList ( myList );
// 使用vector的元素来实例化一个list
vector < int > vec = { 10 , 20 , 30 , 40 , 50 };
list < int > listFromVec ( vec . cbegin (), vec . cend ());
return 0 ;
}
begin() 返回一个普通的可读写迭代器 (iterator)。这意味着你可以通过这个迭代器来读取或修改容器中的元素。 cbegin() 返回一个常量迭代器 (const_iterator)。这个迭代器只能用来读取容器中的元素,但不能修改它们。end同理。
您首先实例化了一个 vector,接下来,实例化了一个 list,它包含从 vector 复制而来的元素,这是使用 C++11 新增的 vector::cbegin() 和 vector::cend() 返回的 const 迭代器复制的。该程序清单表明,迭代器让容器的实现彼此独立,其通用功能让您能够使用 vector 中的值实例化 list。
list的开头和末尾插入元素 可以使用 push_front() 方法在 list 的开头插入元素,使用 push_back() 方法在 list 的末尾插入元素。
#include <iostream>
#include <list>
using namespace std ;
int main () {
list < int > myList ;
// 在开头插入元素
myList . push_front ( 10 );
myList . push_front ( 20 );
// 在末尾插入元素
myList . push_back ( 30 );
myList . push_back ( 40 );
// 输出列表内容
for ( const auto & elem : myList ) {
cout << elem << " " ;
}
cout << endl ;
return 0 ;
}
list中间插入元素 可以使用 insert() 方法在 list 的中间插入元素。
成员函数 list::insert()有 3 种版本。
第 1 种版本:
iterator insert ( iterator pos , const T & x )
在这里,insert 函数接受的第 1 个参数是插入位置,第 2 个参数是要插入的值。该函数返回一个迭代器,它指向刚插入到 list 中的元素。
第 2 种版本:
void insert ( iterator pos , size_type n , const T & x )
该函数的第 1 个参数是插入位置,最后一个参数是要插入的值,而第 2 个参数是要插入的元素个数。
第 3 种版本:
template < class InputIterator >
void insert ( iterator pos , InputIterator f , InputIterator l )
该重载版本是一个模板函数,除一个位置参数外,它还接受两个输入迭代器,指定要将集合中相应范围内的元素插入到 list 中。注意,输入类型 InputIterator 是一种模板参数化类型,因此可指定任何集合(数组、vector 或另一个 list)的边界。
使用举例:
#include <iostream>
#include <list>
using namespace std ;
int main () {
list < int > myList = { 10 , 20 , 30 , 40 };
// 在第二个位置插入元素
auto it = myList . begin ();
advance ( it , 1 ); // 移动到第二个位置
myList . insert ( it , 15 ); // 在第二个位置插入15
// 此时的列表内容 10 15 20 30 40
// 在第二个位置插入多个元素
it = myList . begin ();
advance ( it , 1 ); // 移动到第二个位置
myList . insert ( it , 2 , 25 ); // 在第二个位置插入2个25
// 此时的列表内容 10 15 25 25 20 30 40
// 在第二个位置插入数组元素
int arr [] = { 35 , 45 };
it = myList . begin ();
advance ( it , 1 ); // 移动到第二个位置
myList . insert ( it , arr , arr + 2 ); // 在第二个位置插入数组元素
// 此时的列表内容 10 15 25 25 35 45 20 30 40
return 0 ;
}
list删除元素 erase() 方法用于删除 list 中的元素。有两个重载版本:
接受一个迭代器参数,删除指定位置的元素; 接受两个迭代器参数,删除指定范围内的元素。 #include <iostream>
#include <list>
using namespace std ;
int main () {
list < int > myList = { 10 , 20 , 30 , 40 , 50 };
// 删除第二个元素
auto it = myList . begin ();
advance ( it , 1 ); // 移动到第二个位置
myList . erase ( it ); // 删除第二个元素
// 此时的列表内容 10 30 40 50
// 删除第二个元素到第四个元素
it = myList . begin ();
advance ( it , 1 ); // 移动到第二个位置
auto endIt = myList . begin ();
advance ( endIt , 3 ); // 移动到第四个位置
myList . erase ( it , endIt ); // 删除第二个元素到第四个元素
// 此时的列表内容: 10 50
for ( const auto & elem : myList ) {
cout << elem << " " ;
}
cout << endl ;
return 0 ;
}
需要注意的是, list::erase(first, last) 删除的是 [first, last) 范围内的元素,即包含 first 指向的元素,但不包含 last 指向的元素。这也是为什么第二次删除会移除 30 和 40,而保留 50(在执行第二次删除前的列表中)。因为尾迭代器 endIt 指向的为50这个元素。
区分于it.end() ,it.end() 指向的其实是最后一个元素的下一个位置,所以使用it.end()来删除元素时,会删除到最后一个元素。
list元素反转 可以使用 reverse() 方法来反转 list 中的元素。
#include <iostream>
#include <list>
using namespace std ;
int main () {
list < int > myList = { 10 , 20 , 30 , 40 , 50 };
// 反转列表元素
myList . reverse ();
// 输出列表内容
for ( const auto & elem : myList ) {
cout << elem << " " ;
}
cout << endl ;
return 0 ;
}
list进行排序 可以使用 sort() 方法对 list 中的元素进行排序。 有两个重载方法:
单独一个sort()方法,默认以升序排序 接受一个比较函数作为参数,以指定的标准排序 #include <iostream>
#include <list>
using namespace std ;
bool SortPredicate_Descending ( const int & a , const int & b ) {
return a > b ; // 降序排序
}
int main () {
list < int > myList = { 40 , 10 , 30 , 20 , 50 };
// 默认升序排序
myList . sort ();
cout << "Sorted in ascending order: " ;
for ( const auto & elem : myList ) {
cout << elem << " " ;
}
cout << endl ;
// 降序排序
myList . sort ( SortPredicate_Descending );
cout << "Sorted in descending order: " ;
for ( const auto & elem : myList ) {
cout << elem << " " ;
}
cout << endl ;
return 0 ;
}
定义了函数 SortPredicate_Descending ,它是一个二元谓词,帮助 list 的 sort() 函数判断一个元素是否比另一个元素小。如果不是,则交换这两个元素的位置。换句话说,您告诉了 list 如何解释小于,就这里而言,小于的含义是第一个参数大于第二个参数。这个谓词仅在第一个值比第二个值大时返回 true。也就是说,使用该谓词时,仅当第一个元素(lsh)的数字值比第二个元素(rsh)大时,sort()才认为第一个元素比第二个元素小。基于这种解释,sort()交换元素的位置,以满足谓词指定的标准。
包含对象的list进行排序 实际使用中,很少使用list来存储int等简单内置类型,而是存储自定义的类型,这是如何排序呢?
答案是采取下面两种方式之一:
在 list 包含的对象所属的类中,实现运算符<; 提供一个排序二元谓词—一个这样的函数,即接受两个输入值,并返回一个布尔值,指出第一个值是否比第二个值小。 #include <iostream>
#include <list>
#include <string>
using namespace std ;
class Tuna {
int age ;
string name ;
public:
Tuna ( int age , string name ) {
this -> age = age ;
this -> name = name ;
}
int getAge () const {
return age ;
}
string getName () const {
return name ;
}
// 实现<操作符函数,实现按照名称name的长度升序排序
bool operator < ( const Tuna & other ) const {
return name . size () < other . name . size ();
}
};
bool SortPredicate_Age ( const Tuna & a , const Tuna & b ) {
return a . getAge () < b . getAge (); // 按年龄升序排序
}
int main () {
list < Tuna > tunaList ;
tunaList . push_back ( Tuna ( 1 , "Tunadfbdbn1" ));
tunaList . push_back ( Tuna ( 2 , "Tunafbdfbdbfsddvw2" ));
tunaList . push_back ( Tuna ( 3 , "Tuna3" ));
// 按年龄排序
tunaList . sort ( SortPredicate_Age );
cout << "Sorted Tuna List by Age:" << endl ;
for ( const auto & tuna : tunaList ) {
cout << "Name: " << tuna . getName () << ", Age: " << tuna . getAge () << endl ;
}
tunaList . sort ();
cout << "Sorted Tuna List by < oprator:" << endl ;
for ( const auto & tuna : tunaList ) {
cout << "Name: " << tuna . getName () << ", Age: " << tuna . getAge () << endl ;
}
return 0 ;
}
包含对象的list进行删除 这时候需要使用list的 remove() 方法,但是需要注意的是,需要给 remove() 方法指定标准。在类中实现 == 比较运算符。
#include <iostream>
#include <list>
#include <string>
using namespace std ;
class Human {
string name ;
int age ;
public:
Human ( string name , int age ) {
this -> name = name ;
this -> age = age ;
}
string getName () const {
return name ;
}
int getAge () const {
return age ;
}
bool operator == ( const Human & other ) {
return name == other . name ;
}
};
int main () {
list < Human > humanList ;
humanList . push_back ( Human ( "张三" , 18 ));
humanList . push_back ( Human ( "李四" , 20 ));
humanList . push_back ( Human ( "王五" , 22 ));
for ( const auto & human : humanList ) {
cout << "Name: " << human . getName () << ", Age: " << human . getAge () << endl ;
}
humanList . remove ( Human ( "李四" , 20 ));
cout << "=======> After remove: 李四 <==========" << endl ;
for ( const auto & human : humanList ) {
cout << "Name: " << human . getName () << ", Age: " << human . getAge () << endl ;
}
return 0 ;
}
实现的 Human::operator==将该对象与 list 中的元素进行比较。该运算符在姓名相同时返回 true,向 list::remove( )指出了匹配标准。
std::forward_list std::forward_list 是 C++11 引入的一个单向链表容器,提供了类似于 std::list 的功能,但只支持单向遍历。它的底层实现依赖于节点(node)和指针(pointer)。
forward_list 的用法与 list 很像,但只能沿一个方向移动迭代器,且插入元素时只能使用函数 push_front(),而不能使用 push_back()。当然,总是可以使用 insert() 及其重载版本在指定位置插入元素。
下列代码演示了 forward_list 的实例化,添加元素和单向遍历:
#include <iostream>
#include <forward_list>
using namespace std ;
int main () {
forward_list < int > myList ;
myList . push_front ( 1 );
myList . push_front ( 2 );
myList . push_front ( 3 );
// 现在 myList 包含 3, 2, 1
for ( const auto & elem : myList ) {
cout << elem << " " ;
}
cout << endl ;
auto it = myList . begin ();
myList . insert_after ( it , 4 );
// 现在 myList 包含 3, 4, 2, 1
for ( auto singleIt = myList . begin (); singleIt != myList . end (); singleIt ++ ) {
cout << * singleIt << " " ;
}
cout << endl ;
return 0 ;
}
鉴于 forward_list 不支持双向迭代,因此只能对迭代器使用运算符++,而不能使用–。
列表总结:
如果需要频繁地插入或删除元素(尤其是在中间插入或删除时),应使用 std::list,而不是 std::vetor。因为在这种情况下,vector 需要调整其内部缓冲区的大小,以支持数组语法,还需执行开销高昂的复制操作,而 list 只需建立或断开链接。
请记住,可使用成员方法 push_front() 和 push_back() 分别在 list 开头和末尾插入元素。
对于要使用 list 等 STL 容器存储其对象的类,别忘了在其中实现运算符<和==,以提供默认的排序和删除谓词。
请记住,像其他 STL 容器类一样,总是可以使用 list::size() 来确定 list 包含多少个元素。
请记住,像其他 STL 容器类一样,可使用方法 list::clear() 清空 list。
无需频繁在两端插入或删除元素,且不用在中间插入或删除元素时,请不要使用 list;在这些情况下,vector 和 deque 的速度要快得多。
如果不想根据默认标准进行删除或排序,别忘了给 sort() 和 remove() 提供一个谓词函数。
std::set和std::multiset set 是 C++ 标准库中的一个关联容器,用于存储唯一的元素,自动排序。它基于红黑树实现,提供了快速的插入、删除和查找操作。
multiset 是 set 的一个变体,允许存储重复的元素。
set 的常用方法包括:
insert():插入元素。erase():删除元素。find():查找元素。size():返回元素数量。empty():检查是否为空。clear():清空容器。multiset 的常用方法与 set 类似,只是允许存储重复元素。
为了实现快速搜索,STL set 和 multiset 的内部结构像二叉树,这意味着将元素插入到 set 或 multiset时将对其进行排序,以提高查找速度。这还意味着不像 vector 那样可以使用其他元素替换给定位置的元素,位于 set 中特定位置的元素不能替换为值不同的新元素,这是因为 set 将把新元素同内部树中的其他元素进行比较,进而将其放在其他位置。
set和multiset的实例化 可以使用以下方式实例化:
set < int > mySet ;
multiset < int > myMultiset ;
set < Tuna > myTunaSet ;
multiset < Tuna > myTunaMultiset ;
鉴于 set 和 multiset 都是在插入时对元素进行排序的容器,如果您没有指定排序标准,它们将使用默认谓词 std::less,确保包含的元素按升序排列。
要创建二元排序谓词,可在类中定义一个 operator(),让它接受两个参数(其类型与集合存储的数据类型相同),并根据排序标准返回 true。下面是一个这样的排序谓词,它按降序排列元素:
// used as a template parameter in set / multiset instantiation
template < typename T >
struct SortDescending
{
bool operator ()( const T & lhs , const T & rhs ) const
{
return ( lhs > rhs );
}
};
然后,在实例化 set 或 multiset 时指定该谓词,如下所示:
// a set and multiset of integers (using sort predicate)
set < int , SortDescending < int >> setInts ;
multiset < int , SortDescending < int >> msetInts ;
也可以使用迭代器来通过另一个容器的元素来初始化 set 或 multiset,如下所示:
#include <iostream>
#include <set>
#include <vector>
using namespace std ;
int main (){
vector < int > vec = { 1 , 2 , 3 , 4 , 5 };
set < int > setInts ( vec . cbegin (), vec . cend ());
for ( auto it = setInts . begin (); it != setInts . end (); it ++ ) {
cout << * it << " " ;
}
cout << endl ;
return 0 ;
}
set和multiset的插入元素 #include <iostream>
#include <set>
#include <vector>
using namespace std ;
template < typename T >
void DisplayContents ( const T & container )
{
for ( auto element = container . cbegin (); element != container . cend (); element ++ )
{
cout << * element << " " ;
}
cout << endl ;
}
int main ()
{
// 使用 insert() 方法插入单个元素
set < int > setInts ;
setInts . insert ( 1 );
setInts . insert ( 2 );
setInts . insert ( 3 );
DisplayContents ( setInts );
cout << endl ;
// 使用 insert() 方法插入多个元素
cout << "======>use another insert to add item<======" << endl ;
vector < int > vec = { 4 , 5 , 6 };
set < int > setInts2 ;
setInts2 . insert ( vec . cbegin (), vec . cend ());
DisplayContents ( setInts2 );
cout << endl ;
return 0 ;
}
DisplayContents这个模板方法,用来打印一个容器里的内容。它接受一个容器作为参数,使用迭代器遍历容器中的元素,并打印每个元素。
multiset 中计算一个元素的数量有多少 使用 count() 函数可以计算 multiset 中特定元素的数量。
#include <iostream>
#include <set>
using namespace std ;
int main () {
multiset < int > myMultiset = { 1 , 2 , 2 , 2 , 3 , 4 , 5 };
// 计算元素3的数量
int count = myMultiset . count ( 2 );
cout << "Count of 2 in set: " << count << endl ; // 输出 3
// 尝试计算一个不存在的元素
count = myMultiset . count ( 6 );
cout << "Count of 6 in set: " << count << endl ; // 输出 0
return 0 ;
}
set、multiset、map、multimap中查找元素 诸如 set、multiset、map 和 multimap 等关联容器都提供了成员函数 find() ,它让您能够根据给定的键来查找值:
auto elementFound = setInts . find ( - 1 );
// Check if found...
if ( elementFound != setInts . end ())
cout << "Element " << * elementFound << " found!" << endl ;
else
cout << "Element not found in set!" << endl ;
multiset 可包含多个值相同的元素,因此对于 multiset,这个函数查找第一个与给定键匹配的元素。
#include <iostream>
#include <set>
using namespace std ;
int main () {
multiset < int > myMultiset = { 1 , 2 , 2 , 3 , 4 , 2 , 5 };
// 查找元素2
auto it = myMultiset . find ( 2 );
if ( it != myMultiset . end ()) {
cout << "Found element: " << * it << endl ; // 输出 2
} else {
cout << "Element not found." << endl ;
}
// 继续查找下一个元素2
int count = myMultiset . count ( 2 );
for ( int i = 0 ; i < count - 1 ; i ++ ) {
it ++ ;
cout << "Found another qualified element: " << * it << endl ; // 输出 2
}
return 0 ;
}
鉴于 multiset 可能在 相邻的位置 存储多个值相同的元素,为了访问所有这些元素,可使用 find() 返回的迭代器,并将迭代器前移 count()-1 次。
set、multiset、map、multimap中删除元素 诸如 set、multiset、map 和 multimap 等关联容器都提供了成员函数 erase() ,它有三种重载方法。
使用实例:
#include <iostream>
#include <set>
using namespace std ;
template < typename T >
void DisplayContents ( const T & container )
{
for ( auto element = container . cbegin (); element != container . cend (); element ++ )
{
cout << * element << " " ;
}
cout << endl ;
}
int main () {
multiset < int > myMultiset = { 1 , 2 , 2 , 3 , 4 , 2 , 5 };
// 删除元素2
myMultiset . erase ( 2 );
// 输出删除后的内容
cout << "After erasing 2: " ;
DisplayContents ( myMultiset );
// 删除一个不存在的元素(不会报错)
myMultiset . erase ( 6 ); // 不存在的元素
auto it = myMultiset . find ( 3 );
myMultiset . erase ( it );
// 输出删除后的内容
cout << "After erasing 3: " ;
DisplayContents ( myMultiset );
return 0 ;
}
使用set实现的简要电话薄 #include <iostream>
#include <set>
#include <string>
using namespace std ;
template < typename T >
void DisplayContents ( const T & container )
{
for ( auto element = container . cbegin (); element != container . cend (); element ++ )
{
cout << * element << " " ;
}
cout << endl ;
}
struct ContactItem {
string name ;
string phone ;
string displayAs ;
ContactItem ( string n , string p ) : name ( n ), phone ( p ) {
displayAs = name + "(" + phone + ")" ;
}
bool operator < ( const ContactItem & other ) const {
return name < other . name ;
}
bool operator == ( const ContactItem & other ) const {
return name == other . name ;
}
// Used in DisplayContents via cout
operator const char * () const {
return displayAs . c_str ();
}
};
int main () {
set < ContactItem > setContacts ;
setContacts . insert ( ContactItem ( "张三" , "123456" ));
setContacts . insert ( ContactItem ( "李四" , "654321" ));
setContacts . insert ( ContactItem ( "王五" , "112233" ));
DisplayContents ( setContacts );
cout << "Enter a name you wish to delete: " ;
string nameToDelete ;
getline ( cin , nameToDelete );
auto contactFound = setContacts . find ( ContactItem ( nameToDelete , "" ));
if ( contactFound != setContacts . end ()) {
setContacts . erase ( contactFound );
cout << "Contact deleted." << endl ;
} else {
cout << "Contact not found." << endl ;
}
DisplayContents ( setContacts );
return 0 ;
}
unordered_set和unordered_multiset 底层实现
元素存储顺序
性能
set:平均时间复杂度: 插入、删除、查找操作的时间复杂度都是 O(logN)。 最坏时间复杂度: 也是 O(logN),因为红黑树是自平衡的。 unordered_set:平均时间复杂度: 插入、删除、查找操作的时间复杂度都是 O(1)。 最坏时间复杂度: 在哈希冲突严重的情况下,所有元素都映射到同一个桶,哈希表会退化成链表,此时操作的时间复杂度会降为 O(N)。不过这种情况非常罕见,通常可以通过选择好的哈希函数和管理哈希表大小来避免。 使用 std::unordered_set 及其方法 insert( )、find( )、size( )、max_bucket_count( )、load_factor( )和 max_load_factor( )
#include <iostream>
#include <unordered_set>
using namespace std ;
int main () {
unordered_set < int > mySet ;
// 插入元素
mySet . insert ( 10 );
mySet . insert ( 20 );
mySet . insert ( 30 );
// 查找元素
auto it = mySet . find ( 20 );
if ( it != mySet . end ()) {
cout << "Element found: " << * it << endl ;
} else {
cout << "Element not found." << endl ;
}
// 元素数量
cout << "Size: " << mySet . size () << endl ;
// 最大桶数量
cout << "Max bucket count: " << mySet . max_bucket_count () << endl ;
// 负载因子
cout << "Load factor: " << mySet . load_factor () << endl ;
// 最大负载因子
cout << "Max load factor: " << mySet . max_load_factor () << endl ;
return 0 ;
}
程序方法解释:
unordered_set 和 unordered_map 的哈希表性能在很大程度上取决于其内部管理机制,max_bucket_count、load_factor 和 max_load_factor 就是其中几个关键参数。
1. max_bucket_count 作用 :表示容器所能容纳的最大桶(bucket)数量 。解释 :这是一个只读成员函数,用于获取哈希表当前能支持的最大桶数。这个值通常由 C++ 标准库实现决定,并不会轻易改变。它代表了容器容量的一个上限,保证哈希表不会无限膨胀。当容器需要重新哈希(rehash)时,它会选择一个新的桶数,但这个新桶数不会超过 max_bucket_count。2. load_factor 作用 :衡量哈希表的拥挤程度 。计算方式 :load_factor = 元素数量(size) / 桶数量(bucket_count)解释 :load_factor 是一个动态变化的指标。它告诉你平均每个桶里有多少个元素。低 load_factor :哈希表很稀疏,冲突少,查询速度快,但会占用更多内存。高 load_factor :哈希表很拥挤,冲突多,查询速度变慢,但内存利用率高。3. max_load_factor 作用 :控制哈希表自动重新哈希的阈值 。解释 :这是一个可读写的参数,可以由你手动设置。当哈希表的 load_factor 超过 max_load_factor 时,容器会自动进行重新哈希(rehash) 操作。重新哈希 :这是一种代价较高的操作。容器会创建一个新的、更大的哈希表(通常桶数量是之前的两倍),然后把旧哈希表中的所有元素重新插入到新哈希表中。这个过程会消耗较多时间和计算资源。三者关系及实际应用 这三个参数共同协作来平衡 unordered_set 的性能和内存使用:
你通过 max_load_factor 容器在插入新元素时,会实时计算 load_factor 一旦 load_factor 超过你设定的 max_load_factor,容器就会触发重新哈希。 重新哈希时,容器会增加桶的数量 (bucket_count),从而降低 load_factor,使其重新回到 max_load_factor 以下。新的桶数不会超过 max_bucket_count 对于 Android 开发者来说,如果你在 C++ 项目中使用了 unordered_set 或 unordered_map,并遇到了性能瓶颈,通常可以通过手动调整 max_load_factor 来优化。如果你的数据量是已知的,或者对性能要求极高,你可以在容器初始化时使用 reserve() 函数预留足够的空间,避免频繁的重新哈希,这比动态调整 max_load_factor 更高效。
疑问:load_factor太大表示每个桶内元素过于拥挤时,重新hash为什么可以解决这个问题?
当哈希表的 max_load_factor(最大负载因子)被超过时,确实需要进行重新哈希(Rehashing),而不仅仅是简单地移动元素。这是因为哈希函数通常依赖于哈希表的容量。一个简单的哈希函数可能是 hash(key) % capacity 。当 capacity 改变时,同一个 key 得到的哈希值也就不一样了,即当容量增大后,即使是哈希值相同的两个键,在新的哈希表中也可能被分配到不同的位置,从而显著降低冲突的概率。
请牢记,STL set 和 multiset 容器针对频繁查找 的情形进行了优化。 请牢记,std::multiset 可存储多个值相同的元素 (键),而 std::set 只能存储不同的值。 务必使用 multiset::count(value)确定有多少个元 素包含特定的值。 请牢记,set::size( )和 multiset::size( )指出容器包 含多少个元素。 对于其对象将存储在 set 或 multiset 等容器中的类,别忘了在其中实现运算符<和==。前者将成为排序谓词,而后者将用于 set::find( )等函数。 在需要频繁插入而很少查找的情形下,不要使用 std::set 或 std::multiset;在这种情形下,std::vector和 std::list 通常更适合。 STL map和multimap map 和 multimap 之间的区别在于,后者能够存储重复的键,而前者只能存储唯一的键。
为了实现快速查找,STL map 和 multimap 的内部结构看起来像棵二叉树。这意味着在 map 或 multimap 中插入元素时将进行排序。
map的实例化 典型的 map 实例化语法如下:
#include <map>
using namespace std ;
...
map < keyType , valueType , Predicate = std :: less < keyType >> mapObj ;
multimap < keyType , valueType , Predicate = std :: less < keyType >> mmapObj ;
第三个模板参数是可选的。如果您值指定了键和值的类型,而省略了第三个模板参数,std::map 和 std::multimap 将把 std::less<> 用作排序标准。
#include <map>
#include <iostream>
using namespace std ;
int main () {
map < int , string > myMap ;
myMap [ 1 ] = "one" ;
myMap [ 2 ] = "two" ;
myMap [ 3 ] = "three" ;
for ( auto it = myMap . begin (); it != myMap . end (); ++ it ) {
cout << it -> first << " => " << it -> second << endl ;
}
return 0 ;
}
map中插入元素 可以使用 insert() 方法插入元素,例如:
#include <map>
#include <iostream>
using namespace std ;
int main () {
map < int , string > myMap ;
myMap . insert ( pair < int , string > ( 1 , "one" ));
myMap . insert ( pair < int , string > ( 2 , "two" ));
myMap . insert ( pair < int , string > ( 3 , "three" ));
for ( auto it = myMap . begin (); it != myMap . end (); ++ it ) {
cout << it -> first << " => " << it -> second << endl ;
}
return 0 ;
}
也可以采用数组方式添加元素,例如:
#include <map>
#include <iostream>
using namespace std ;
int main () {
map < int , string > myMap ;
myMap [ 1 ] = "one" ;
myMap [ 2 ] = "two" ;
myMap [ 3 ] = "three" ;
for ( auto it = myMap . begin (); it != myMap . end (); ++ it ) {
cout << it -> first << " => " << it -> second << endl ;
}
return 0 ;
}
类似于multiset,multimap中也可以使用 multimap::count() 指出有多少个元素包含指定的键。
map使用find()查找元素 find()函数总是返回一个迭代器。首先检查该迭代器,确保 find( )已成功,再使用它来访问找到的值。
#include <map>
#include <iostream>
using namespace std ;
int main () {
map < int , string > myMap ;
myMap [ 1 ] = "one" ;
myMap [ 2 ] = "two" ;
myMap [ 3 ] = "three" ;
map < int , string >:: iterator it = myMap . find ( 2 );
if ( it != myMap . end ()) {
cout << "Found: " << it -> first << " => " << it -> second << endl ;
} else {
cout << "Not found" << endl ;
}
return 0 ;
}
如果使用的是 multimap,容器可能包含多个键相同的键-值对,因此需要找到与指定键对应的所有值。为此,可使用 multimap::count( ) 确定有多少个值与指定的键对应,再对迭代器递增,以访问这些相邻的值:
#include <map>
#include <iostream>
using namespace std ;
int main () {
multimap < int , string > myMap ;
myMap . insert ( pair < int , string > ( 1 , "one" ));
myMap . insert ( pair < int , string > ( 2 , "two" ));
myMap . insert ( pair < int , string > ( 2 , "two2" ));
myMap . insert ( pair < int , string > ( 3 , "three" ));
// 查找键为2的元素
multimap < int , string >:: iterator it = myMap . find ( 2 );
if ( it != myMap . end ()) {
cout << "Found: " << it -> first << " => " << it -> second << endl ;
} else {
cout << "Not found" << endl ;
}
// 查找键为2的元素的数量
int count = myMap . count ( 2 );
cout << "Count: " << count << endl ;
for ( int i = 0 ; i < count ; i ++ ) {
cout << "Found Again: " << it -> first << " => " << it -> second << endl ;
it ++ ;
}
return 0 ;
}
使用erase()删除元素 类似于set,multimap也可以使用erase()删除元素。并且都是有三种类似的重载函数。
直接接收元素,接收迭代器,接收两个迭代器中间的范围:
#include <map>
#include <iostream>
using namespace std ;
int main () {
multimap < int , string > myMap ;
myMap . insert ( pair < int , string > ( 1 , "one" ));
myMap . insert ( pair < int , string > ( 2 , "two" ));
myMap . insert ( pair < int , string > ( 2 , "two2" ));
myMap . insert ( pair < int , string > ( 3 , "three" ));
// 删除键为2的元素
myMap . erase ( 2 );
for ( auto it = myMap . begin (); it != myMap . end (); ++ it ) {
cout << it -> first << " => " << it -> second << endl ;
}
auto it3 = myMap . find ( 3 );
// 删除迭代器指向的元素
myMap . erase ( it3 );
cout << "======>erase 3<========" << endl ;
for ( auto it = myMap . begin (); it != myMap . end (); ++ it ) {
cout << it -> first << " => " << it -> second << endl ;
}
// 删除迭代器范围指向的元素
myMap . erase ( myMap . begin (), myMap . end ());
cout << "======>erase all<========" << endl ;
for ( auto it = myMap . begin (); it != myMap . end (); ++ it ) {
cout << it -> first << " => " << it -> second << endl ;
}
return 0 ;
}
map编写排序谓词 要提供不同的排序标准,可编写一个二元谓词—实现了 operator() 的类或结构:
template < typename keyType >
struct Predicate
{
bool operator ()( const keyType & key1 , const keyType & key2 )
{
// your sort priority logic here
}
};
例如一个电话薄场景,要求姓名 string 来对比的时候,不区分大小写,那么就可以编写一个谓词来实现:
#include <iostream>
#include <map>
#include <string>
#include <algorithm>
using namespace std ;
struct PredIgnoreCase
{
bool operator ()( const string & s1 , const string & s2 ) const
{
string s1Lower = s1 ;
string s2Lower = s2 ;
transform ( s1Lower . begin (), s1Lower . end (), s1Lower . begin (), :: tolower );
transform ( s2Lower . begin (), s2Lower . end (), s2Lower . begin (), :: tolower );
return s1Lower < s2Lower ;
}
};
int main () {
map < string , string > contactMap ;
contactMap [ "John" ] = "123456" ;
contactMap [ "jane" ] = "789012" ;
contactMap [ "alice" ] = "345678" ;
contactMap [ "Amy" ] = "124525" ;
for ( auto it = contactMap . begin (); it != contactMap . end (); ++ it ) {
cout << it -> first << " => " << it -> second << endl ;
}
// 按照姓名排序
cout << "======>sort by name<========" << endl ;
map < string , string , PredIgnoreCase > sortedMap ( contactMap . begin (), contactMap . end ());
for ( auto it = sortedMap . begin (); it != sortedMap . end (); ++ it ) {
cout << it -> first << " => " << it -> second << endl ;
}
return 0 ;
}
unordered_map 类似于unordered_set,unordered_map也可以使用哈希函数来存储元素,并且也可以使用自定义的哈希函数。
鉴于 unordered_map 将键-值对存储在桶中,在元素数达到或接近桶数时,它将自动执行负载均衡:
cout << "Load factor: " << umapIntToStr . load_factor () << endl ;
cout << "Max load factor = " << umapIntToStr . max_load_factor () << endl ;
cout << "Max bucket count = " << umapIntToStr . max_bucket_count () << endl ;
load_factor() 指出了 unordered_map 桶的填满程度。因插入元素导致 load_factor() 超过 max_load_factor() 时,unordered_map 将重新组织以增加桶数,并重建散列表。
#include <iostream>
#include <unordered_map>
using namespace std ;
int main () {
unordered_map < int , string > umapIntToStr ;
umapIntToStr . insert ( pair < int , string > ( 1 , "one" ));
umapIntToStr . insert ( pair < int , string > ( 2 , "two" ));
umapIntToStr . insert ( pair < int , string > ( 3 , "three" ));
umapIntToStr . insert ( pair < int , string > ( 4 , "four" ));
umapIntToStr . insert ( pair < int , string > ( 5 , "five" ));
umapIntToStr . insert ( pair < int , string > ( 6 , "six" ));
umapIntToStr . insert ( pair < int , string > ( 7 , "seven" ));
umapIntToStr . insert ( pair < int , string > ( 8 , "eight" ));
umapIntToStr . insert ( pair < int , string > ( 9 , "nine" ));
umapIntToStr . insert ( pair < int , string > ( 10 , "ten" ));
umapIntToStr . insert ( pair < int , string > ( 11 , "eleven" ));
umapIntToStr . insert ( pair < int , string > ( 12 , "twelve" ));
umapIntToStr . insert ( pair < int , string > ( 13 , "thirteen" ));
cout << "Load factor: " << umapIntToStr . load_factor () << endl ;
cout << "Bucket Count:" << umapIntToStr . bucket_count () << endl ;
cout << "Max load factor = " << umapIntToStr . max_load_factor () << endl ;
cout << "Max bucket count = " << umapIntToStr . max_bucket_count () << endl ;
cout << "add 14th item" << endl ;
umapIntToStr . insert ( pair < int , string > ( 14 , "fourteen" ));
umapIntToStr . insert ( pair < int , string > ( 15 , "fifteen" ));
cout << "Load factor: " << umapIntToStr . load_factor () << endl ;
cout << "Bucket Count:" << umapIntToStr . bucket_count () << endl ;
cout << "Max load factor = " << umapIntToStr . max_load_factor () << endl ;
cout << "Max bucket count = " << umapIntToStr . max_bucket_count () << endl ;
return 0 ;
}
根据打印调整元素数量,一开始分配了13个bucket,当插入14个元素时,触发了rehash,分配了29个bucket。
注意:
无论使用的键是什么,都不要编写依赖于 unordered_map 中元素排列顺序的代码。在unordered_map 中,元素相对顺序取决于众多因素,其中包括键、插入顺序、桶数等。这些容器为提高查找性能进行了优化,遍历其中的元素时,不要依赖于元素的排列顺序。 在不发生冲突的情况下,std::unordered_map 的插入和查找时间几乎是固定的,不受包含的元素数的影响。然而,这并不意味着它优于在各种情形下复杂度都为对数的std::map。在包含的元素不太多的情况下,固定时间可能长得多,导致std::unordered_map 的速度比std::map 慢。选择容器类型时,务必执行模拟实际情况的基准测试。 map小结 需要存储键-值对且键是唯一的时,务必使用map。 需要存储键-值对且键可能重复时(如电话簿),务必使用 multimap。 请牢记,与其他 STL 容器一样,map 和 multimap 都有成员方法 size() ,它指出容器包含多少个键-值对。 必须确保插入和查找时间固定时(通常是包含的元素非常多时),务必使用 unordered_map 或unordered_multimap。 别忘了, multimap::count(key) 指出容器中有多少个元素的键为 key。 别忘了检查 find() 的返回值—将其与容器的 end() 进行比较。 函数对象 函数对象(Function Object)是 C++ 中的一种特殊类型的对象,它重载了 operator(),使得该对象可以像函数一样被调用。函数对象通常用于 STL 算法和容器中,以提供自定义的行为。
从概念上来说,函数对象是用作函数的对象;但从实现上说,函数对象是实现了 operator()的类的对象。虽然函数和函数指针也可归为函数对象,但实现了 operator()的类的对象才能保存状态(即类的成员属性的值),才能用于标准模板库(STL)算法。
C++程序员常用于 STL 算法的函数对象可分为下列两种类型。
一元函数:接受一个参数的函数,如 f(x) 。如果一元函数返回一个布尔值,则该函数称为谓词。 二元函数:接受两个参数的函数,如 f(x, y) 。如果二元函数返回一个布尔值,则该函数称为二元谓词。 返回布尔类型的函数对象通常用于需要进行判断的算法,如前面介绍的 find()和 sort()。组合两个函数对象的函数对象称为自适应函数对象。
一元函数 只对一个参数进行操作的函数称为一元函数。一元函数的功能可能很简单,如在屏幕上显示元素,如下所示:
// A unary function
template < typename elementType >
void FuncDisplayElement ( const elementType & element )
{
cout << element << ' ' ;
};
该函数也可采用另一种表现形式,即其实现 包含在类或结构的operator() 中:
// Struct that can behave as a unary function
template < typename elementType >
struct DisplayElement
{
void operator () ( const elementType & element ) const
{
cout << element << ' ' ;
}
};
这种形式的函数对象可以存储状态(即类的成员变量),并且可以在 STL 算法中使用。使用举例:
#include <iostream>
#include <vector>
#include <list>
#include <algorithm>
using namespace std ;
template < typename T >
struct DisplayElement {
void operator () ( const T & element ) const {
cout << element << "" << endl ;
}
};
int main () {
vector < int > vec = { 1 , 2 , 3 , 4 , 5 };
for_each ( vec . begin (), vec . end (), DisplayElement < int > ());
list < char > list = { 'a' , 'b' , 'c' , 'd' , 'e' };
for_each ( list . begin (), list . end (), DisplayElement < char > ());
cout << "using lambda" << endl ;
for_each ( vec . begin (), vec . end (), []( int element ) {
cout << element << "" << endl ;
});
cout << "using lambda" << endl ;
for_each ( list . begin (), list . end (), []( char element ) {
cout << element << "" << endl ;
});
return 0 ;
}
我们使用定义的这个结构体函数对象来打印int和char类型,最后的两个打印操作,使用到了lambda表达式,可以不用提前定义函数对象。
插入:操作符函数 操作符函数是重载了特定操作符的函数对象。通过重载操作符,可以使得对象能够像内置类型一样使用操作符进行操作。
例如之前用到的,对自定义的 MyString 类进行拼接时,重写 + 操作符,就可以直接使用 + 来操作对象。
class MyString {
public:
...
MyString ( const char * str ) : data ( str ) {}
// 重载 + 操作符
MyString operator + ( const MyString & other ) const {
return MyString (( data + other . data ). c_str ());
}
...
}
还有 == 操作符,用于对两个对象进行比较时来判断。例如在list中进行remove操作时。
这里的就是 () 操作符,在函数声明时用来定义 函数调用运算符 operator() 的。
结构中定义的优势 如果能够使用结构的对象来存储信息,则使用在结构中实现的函数对象的优点将显现出来。
我们设计一个结构,可以计算自己的 operator() 函数被调用的次数。
#include <iostream>
#include <vector>
#include <algorithm>
using namespace std ;
template < typename T >
struct DisplayAndCount
{
int count ;
DisplayAndCount () : count ( 0 ) {}
void operator () ( const T & element ) {
cout << element << "" << endl ;
count ++ ;
}
};
int main () {
vector < int > vec = { 1 , 2 , 3 , 4 , 5 };
DisplayAndCount < int > displayAndCount ;
displayAndCount = for_each ( vec . begin (), vec . end (), DisplayAndCount < int > ());
cout << "count: " << displayAndCount . count << endl ;
return 0 ;
}
对于displayAndCount = for_each(vec.begin(), vec.end(), DisplayAndCount<int>());这行代码,我们可以分步来理解:
1. for_each 函数的作用 首先,std::for_each 是 C++ 标准库中的一个算法,它的作用是对一个范围内的每个元素应用一个操作。
它的函数签名大致是这样的: for_each(InputIterator first, InputIterator last, UnaryFunction f)
first 和 last:表示要遍历的范围,例如 vec.begin() 和 vec.end()。f:一个可调用的对象(函数、函数指针、Lambda表达式或函数对象 ),它会对范围内的每个元素执行一次操作。for_each 函数的一个关键特性是它的返回值拷贝 。
2. DisplayAndCount<int>() 这部分代码创建了一个 DisplayAndCount<int> 类型的临时匿名对象for_each 函数时,会发生以下过程:
for_each 接收这个对象的一个拷贝 。for_each 遍历 vec 中的每个元素(1, 2, 3, 4, 5)。对于每个元素,它都会调用这个拷贝对象的 operator() 方法。 在每次调用时,这个拷贝对象的 count 成员变量会递增。 3. for_each 的返回值 当 for_each 遍历完所有元素后,它会将 它内部那个 DisplayAndCount<int> 对象的拷贝 返回。此时,这个被返回的对象中的 count 已经变为了 5。
4. 赋值操作 最后,这个 for_each 返回的、count 值为 5 的临时对象,通过赋值操作符 = 赋给了你在 main 函数中创建的 displayAndCount 对象。
思考:是否可以使用按引用传递的方式来传递这个函数对象,而不用接收匿名对象的拷贝?
回答:可以的,我们使用for_each算法时,将函数对象的参数使用 std::ref() 包裹起来,这样就可以避免拷贝构造函数的调用。但是为什么 STL 算法通过返回值来传递结果是一种常见模式,这在 C++ 标准库中非常普遍。
使用值传递拷贝并返回,而不是按引用。设计上的考量主要有三点:
一是优化和内联,像这种轻量级的函数对象,可以很轻松的内联避免函数调用开销。并且在运行过程中,这个对象就成了栈上的局部变量,可以进行更激进的寄存器分配和优化。如果使用引用传递,编译器在优化时会变得更保守,因为它必须考虑到你传入的这个引用可能指向一个全局变量、堆内存或其他地方,这会使得它无法像处理局部变量那样简单地进行优化。 二是线程安全考虑,如果 for_each 默认使用引用传递,那么在多线程环境中调用它会变得很危险。多个线程可能会同时使用同一个仿函数对象,导致数据竞争(data race),因为它们都在试图修改同一个 count 变量,从而产生未定义的行为。而值传递方案则能天然地解决这个问题。每个线程调用 for_each 时,都会得到一个独立的、属于它自己的仿函数副本。这个副本只会在该线程内部被修改,因此不同线程之间不会互相干扰,实现了线程安全。 第三是设计模式,在函数式编程中,函数不应该有副作用(side effect),即不应该修改传入的参数或者任何外部状态。for_each 通过值传递仿函数,并返回一个新对象来承载结果,这种模式很好地遵循了这一原则。 一元谓词 一元谓词是接受一个参数并返回布尔值的函数对象。它通常用于 STL 算法中进行条件判断。
下面这个例子,设计一个IsMultiple类,用于判断一个数是否是另一个数的倍数。
#include <iostream>
#include <vector>
#include <algorithm>
using namespace std ;
template < typename T >
struct IsMultiple {
T multiple ;
IsMultiple ( T multiple ) : multiple ( multiple ) {}
bool operator () ( T element ) const {
return (( element % multiple ) == 0 );
}
};
int main () {
vector < int > vec = { 1 , 2 , 3 , 4 , 5 };
int divisor = 2 ;
auto it = find_if ( vec . begin (), vec . end (), IsMultiple < int > ( divisor ));
if ( it != vec . end ()) {
cout << "找到第一个倍数: " << * it << endl ;
} else {
cout << "没有找到倍数" << endl ;
}
return 0 ;
}
find_if() 使用了一元谓词,这里将函数对象 IsMutilple 初始化为用户提供的除数, find_if() 对指定范围内的每个元素调用一元谓词 IsMutilple::operator() 。当 operator() 返回 true(即元素可被用户提供的除数整除)时,find_if() 返回一个指向该元素的迭代器。然后,将 find_if() 操作的结果与容器的 end() 进行比较,以核实是否找到了满足条件的元素,接下来使用迭代器 iElement 显示该元素的值。
一元谓词被大量用于 STL 算法中。例如,算法 std::partition() 使用一元谓词来划分范围,算法 stable_partition() 也使用一元谓词来划分范围,但保持元素的相对顺序不变。诸如 std::find_if() 等查找函数以及 std::remove_if() 等删除元素的函数也使用一元谓词,其中 std::remove_if() 删除指定范围内满足谓词条件的元素。
二元函数 二元函数是接受两个参数并返回一个值的函数对象。它通常用于 STL 算法中进行元素操作。
下面这个例子,设计一个 Multiply 结构体,来计算两个数的乘积。
#include <iostream>
#include <vector>
#include <algorithm>
using namespace std ;
template < typename T >
struct Multiply
{
T operator () ( const T & a , const T & b ) const {
return a * b ;
}
};
int main () {
vector < int > vec = { 0 , 1 , 2 , 3 , 4 };
vector < int > vec2 = { 1 , 2 , 3 , 4 , 5 };
vector < int > vecResult ;
vecResult . resize ( vec2 . size ());
transform ( vec . begin (), vec . end (), vec2 . begin (), vecResult . begin (), Multiply < int > ());
cout << "vecResult: " << endl ;
for ( int i : vecResult ) {
cout << i << endl ;
}
return 0 ;
}
二元谓词 二元谓词是接受两个参数并返回布尔值的函数对象。它通常用于 STL 算法中进行比较操作。
举之前的一个例子,接受两个字符串,进行不区分大小写的比较。常用于电话簿,app列表等。
#include <iostream>
#include <set>
#include <string>
#include <algorithm>
using namespace std ;
template < typename S >
struct CompareStringNoCase
{
bool operator () ( const S & a , const S & b ) const
{
string aLower ;
string bLower ;
aLower . resize ( a . size ());
bLower . resize ( b . size ());
transform ( a . begin (), a . end (), aLower . begin (), :: tolower );
transform ( b . begin (), b . end (), bLower . begin (), :: tolower );
return aLower < bLower ;
}
};
int main ()
{
set < string , CompareStringNoCase < string >> setContacts ;
setContacts . insert ( "Amy" );
setContacts . insert ( "Bob" );
setContacts . insert ( "Caroline" );
setContacts . insert ( "alice" );
setContacts . insert ( "dave" );
setContacts . insert ( "Eve" );
setContacts . insert ( "carl" );
for ( const string & contact : setContacts )
{
cout << contact << endl ;
}
return 0 ;
}
lambda 表达式 可将 lambda 表达式视为包含公有 operator() 的匿名结构(或类),从这种意义上说,lambda 表达式属于前面介绍的函数对象。
例如将之前的 DisplayElement 类,用 lambda 表达式来实现。
// struct that behaves as a unary function
template < typename elementType >
struct DisplayElement
{
void operator () ( const elementType & element ) const
{
cout << element << ' ' ;
}
};
#include <iostream>
#include <vector>
#include <list>
#include <algorithm>
using namespace std ;
int main () {
vector < int > vec = { 1 , 2 , 3 , 4 , 5 };
for_each ( vec . begin (), vec . end (), []( int element ) {
cout << element << "" << endl ;
});
return 0 ;
}
编译器见到上述lambda表达式,会将其转换为一个匿名的函数对象,该函数对象的 operator() 函数体就是lambda表达式的函数体。
struct NoName
{
void operator () ( const int & element ) const
{
cout << element << ' ' ;
}
};
一元函数的lambda表达式 与一元 operator(Type) 对应的 lambda 表达式接受一个参数,其定义如下:
[]( Type paramName ) {
// lambda expression code here;
}
请注意,如果您愿意,也可按引用传递参数:
[]( Type & paramName ) {
// lambda expression code here;
}
另外,lambda表达式的参数声明中,也可以直接使用auto,编译器会根据lambda表达式的参数类型,自动推导参数类型。
#include <iostream>
#include <vector>
#include <list>
#include <algorithm>
using namespace std ;
int main ()
{
vector < int > vec = { 1 , 2 , 3 , 4 , 5 };
for_each ( vec . begin (), vec . end (), []( auto element ) {
cout << element << "" << endl ;
});
list < char > charList = { 'a' , 'b' , 'c' , 'd' , 'e' };
for_each ( charList . begin (), charList . end (), []( auto element ) {
cout << element << "" << endl ;
});
return 0 ;
}
这个 lambda 表达式通过关键字 auto 利用了编译器的类型自动推断功能。遵循 C++14 的编译器都支持这种对 lambda 表达式的改进。
一元谓词的lambda表达式 例如判断一个整数是否是偶数,在返回结果里写成是否可以被2整除。编译器可以自动判断返回值为bool。
#include <iostream>
#include <vector>
#include <algorithm>
using namespace std ;
int main ()
{
vector < int > vec = { 1 , 2 , 3 , 4 , 5 };
auto it = find_if ( vec . begin (), vec . end (), []( const int & element ) {
return element % 2 == 0 ;
});
if ( it != vec . end ()) {
cout << "找到第一个偶数: " << * it << endl ;
} else {
cout << "没有找到偶数" << endl ;
}
return 0 ;
}
插入:符号[]的作用 C++ lambda 表达式中的 [] 叫做 capture clause (捕获子句),它的作用是让 lambda 表达式能够访问其创建时上下文(surrounding scope)中的变量。即用于指定在 lambda 表达式中可以访问的变量或对象。它主要有以下几种用法:
1. 不捕获任何变量 [] 这是最基本的形式,表示 lambda 表达式不访问任何外部变量。
#include <iostream>
int main () {
int x = 10 ;
auto my_lambda = []() {
// 无法访问 x,因为没有加入捕获
std :: cout << "Hello, World!" << std :: endl ;
};
my_lambda ();
return 0 ;
}
2. 按值捕获 [var] 或 [=] 按值捕获单个变量: [x]x 的值在 lambda 创建时被 复制 到 lambda 内部。即使外部的 x 后来改变了,lambda 内部的 x 也不会受影响。 #include <iostream>
int main () {
int x = 10 ;
auto my_lambda = [ x ]() {
// x 的值是 10
std :: cout << "The value of x is: " << x << std :: endl ;
};
x = 20 ; // 改变外部的 x
my_lambda (); // 输出依然是 10
return 0 ;
}
按值捕获所有变量: [=]捕获 其所在作用域中 所有被 lambda 内部使用的局部变量。 同样是值复制,不会随外部变量变化。 #include <iostream>
int main () {
int a = 1 , b = 2 ;
auto my_lambda = [ = ]() {
// a 和 b 的值在 lambda 创建时被复制
std :: cout << "The value of a is: " << a << std :: endl ;
std :: cout << "The value of b is: " << b << std :: endl ;
};
a = 3 ; // 改变外部的 a
my_lambda (); // 输出依然是 1 和 2
return 0 ;
}
3. 按引用捕获 [&var] 或 [&] 按引用捕获单个变量: [&x]x 的引用被传递到 lambda 内部。这意味着 lambda 内部对 x 的任何修改都会影响到外部的 x。 当外部 x 的值改变时,lambda 内部也能看到最新的值。 #include <iostream>
int main () {
int x = 10 ;
auto my_lambda = [ & x ]() {
// 访问的是外部的 x
x += 5 ; // 修改了外部的 x
std :: cout << "The value of x inside lambda is: " << x << std :: endl ;
};
my_lambda (); // x 变为 15
std :: cout << "The value of x outside lambda is: " << x << std :: endl ; // 输出 15
return 0 ;
}
按引用捕获所有变量: [&]捕获其所在作用域中所有被 lambda 内部使用的局部变量的引用。 这种方式非常方便,但要小心,因为它可能导致悬空引用(dangling reference)问题,特别是当 lambda 的生命周期比它捕获的变量更长时。 4. 混合捕获 [&, x] 或 [=, &x] 你可以混合使用值捕获和引用捕获:
[&, x]:x 单独按值捕获。[=, &x]:x 按引用捕获。#include <iostream>
int main () {
int a = 1 , b = 2 ;
// 默认按值捕获,但 b 按引用捕获
auto my_lambda = [ = , & b ]() {
// a 是值捕获,不能修改
std :: cout << "The value of a is: " << a << std :: endl ;
// b 是引用捕获,可以修改
b = 3 ;
};
my_lambda ();
std :: cout << "The value of b outside lambda is: " << b << std :: endl ; // 输出 3
return 0 ;
}
总而言之,[] 括号就是 C++ 中 lambda 表达式的 捕获列表 ,它决定了 lambda 如何与外部世界的变量进行交互。正确使用捕获子句是编写强大、灵活的 lambda 表达式的关键。
例如,除了找到列表中能被 2 整除的数,我们希望可以由用户指定除数,增加灵活性。
#include <iostream>
#include <vector>
#include <algorithm>
using namespace std ;
int main ()
{
vector < int > numVec = { 1 , 2 , 3 , 4 , 5 , 6 , 7 , 8 , 9 , 10 };
int divisor = 0 ;
cout << "请输入除数:" << endl ;
cin >> divisor ;
auto it = find_if ( numVec . begin (), numVec . end (), [ divisor ]( int num ) {
return num % divisor == 0 ;
});
if ( it != numVec . end ())
{
cout << "找到第一个能被" << divisor << "整除的数: " << * it << endl ;
}
else
{
cout << "没有找到能被" << divisor << "整除的数" << endl ;
}
return 0 ;
}
二元函数的lambda表达式 二元函数接受两个参数,可以返回一个值。
例如,将两个vector中的各个元素对应相加,并将结果存储到第三个vector中。
#include <iostream>
#include <vector>
#include <algorithm>
using namespace std ;
int main ()
{
vector < int > vec1 = { 1 , 2 , 3 , 4 , 5 };
vector < int > vec2 = { 0 , 1 , 2 , 3 , 4 };
vector < int > vecResult ;
vecResult . resize ( vec2 . size ());
transform ( vec1 . begin (), vec1 . end (), vec2 . begin (), vecResult . begin (), []( const int & a , const int & b ) {
return a + b ;
});
for ( auto it = vecResult . begin (); it != vecResult . end (); it ++ ){
cout << * it << " " ;
}
cout << endl ;
return 0 ;
}
定义Lambda表达式时,习惯性在末尾加上了const。导致报错,原因如下:Lambda 表达式末尾的 const 是用来修饰 lambda 本身的,表示这个 lambda 是一个“常量”函数对象。它主要用于确保 lambda 内部不会改变其按值捕获的变量。当你没有按值捕获变量时,这个 const 并没有太大意义。 std::transform 等标准库算法所期望的函数对象通常不带这个 const 修饰符,所以加上它会导致签名不匹配的编译错误。
二元谓词对应的 lambda 表达式 返回 true 或 false、可帮助决策的二元函数被称为二元谓词。这种谓词可用于 std::sort() 等排序算法中,这些算法对容器中的两个值调用二元谓词,以确定将哪个放在前面。与二元谓词等价的 lambda 表达式的通用语法如下:
[...]( Type1 & param1Name , Type2 & param2Name ) {
// return bool expression;
}
例如,对一个姓名数组中的元素进行排序,忽略大小写按照字母表顺序:
#include <iostream>
#include <vector>
#include <string>
#include <algorithm>
using namespace std ;
int main ()
{
vector < string > nameVec = { "Stephenie" , "Amy" , "Bob" , "Cindy" , "David" , "Eva" };
sort ( nameVec . begin (), nameVec . end (), []( const string & a , const string & b ) {
string aLower = a ;
string bLower = b ;
transform ( aLower . begin (), aLower . end (), aLower . begin (), :: tolower );
transform ( bLower . begin (), bLower . end (), bLower . begin (), :: tolower );
return aLower < bLower ;
});
for ( auto it = nameVec . begin (); it != nameVec . end (); it ++ ){
cout << * it << " \t " ;
}
cout << endl ;
return 0 ;
}
lambda小结 STL算法 查找、搜索、删除和计数是一些通用算法,其应用范围很广。STL 通过通用的模板函数提供了这些算法以及其他的很多算法,可通过迭代器对容器进行操作。要使用 STL 算法,程序员必须包含头文件<algorithm>。
STL 算法通常分为两大类:非变序算法(Non-modifying Algorithms) 和 变序算法(Modifying Algorithms) 。
非变序算法 (Non-modifying Algorithms) 非变序算法不会改变 它们操作的元素的值或顺序。它们主要用于查询、计数、查找和比较操作。
常见示例:
std::for_each(): 对范围内的每个元素执行一个指定的函数。虽然它本身不改变容器的结构,但你传递给它的函数可以修改元素的值。std::find(): 在一个范围内查找第一个匹配给定值的元素。std::find_if(): 在一个范围内查找第一个满足特定条件的元素。find_end(): 在指定范围内搜索最后一个满足特定条件的元素。std::count(): 计算一个范围内某个特定值的出现次数。std::count_if(): 计算一个范围内满足特定条件的元素的数量。std::equal(): 检查两个范围内的元素是否完全相等。std::all_of(): 检查一个范围内所有元素是否都满足某个条件。std::any_of(): 检查一个范围内是否有任何元素满足某个条件。std::none_of(): 检查一个范围内是否没有任何元素满足某个条件。std::mismatch(): 比较两个范围,返回第一个不匹配的元素对。search_n() 在目标范围内搜索与指定值相等或满足指定谓词的 n 个元素find_first_of(): 在目标范围内搜索指定序列中的任何一个元素第一次出现的位置;在另一个重载版本中,它搜索满足指定条件的第一个元素adjacent_find(): 在集合中搜索两个相等或满足指定条件的元素比较算法
equal(): 比较两个元素是否相等或使用指定的二元谓词判断两者是否相等mismatch(): 使用指定的二元谓词找出两个元素范围的第一个不同的地方lexicographical_compare(): 比较两个序列中的元素,以判断哪个序列更小变序算法 (Modifying Algorithms) 变序算法会改变 它们操作的元素的值或顺序。这包括排序、复制、替换、删除和排列等操作。
常见示例:
初始化算法
fill(): 将指定值分配给指定范围中的每个元素fill_n(): 将指定值分配给指定范围中的前 n 个元素generate(): 将指定函数对象的返回值分配给指定范围中的每个元素generate_n(): 将指定函数的返回值分配给指定范围中的前 n 个元素 修改算法for_each(): 对指定范围内的每个元素执行指定的操作。当指定的参数修改了范围时,for_each 将是变序算法transform(): 对指定范围中的每个元素执行指定的一元函数复制算法copy(): 将一个范围复制到另一个范围copy_backward(): 将一个范围复制到另一个范围,但在目标范围中将元素的排列顺序反转删除算法
remove(): 将指定范围中包含指定值的元素删除remove_if(): 将指定范围中满足指定一元谓词的元素删除remove_copy(): 将源范围中除包含指定值外的所有元素复制到目标范围remove_copy_if(): 将源范围中除满足指定一元谓词外的所有元素复制到目标范围unique(): 比较指定范围内的相邻元素,并删除重复的元素。该算法还有一个重载版本,它使用二元谓词来判断要删除哪些元素unique_copy(): 将源范围内的所有元素复制到目标范围,但相邻的重复元素除外替换算法
replace(): 用一个值来替换指定范围中与指定值匹配的所有元素replace_if(): 用一个值来替换指定范围中满足指定条件的所有元素排序算法
sort(): 使用指定的排序标准对指定范围内的元素进行排序,排序标准由二元谓词提供。排序可能改变相等元素的相对顺序stable_sort(): 类似于 sort,但在排序时保持相对顺序不变partial_sort(): 将源范围内指定数量的元素排序partial_sort_copy(): 将源范围内的元素复制到目标范围,同时对它们排序分区算法
partition(): 在指定范围中,将元素分为两组:满足指定一元谓词的元素放在第一个组中,其他元素放在第二组中。不一定会保持集合中元素的相对顺序stable_partition(): 与 partition 一样将指定范围分为两组,但保持元素的相对顺序不变 可用于有序容器的算法binary_search(): 用于判断一个元素是否存在于一个排序集合中equal_range(): 返回一个范围,该范围包含所有与指定值相等的元素lower_bound(): 根据元素的值或二元谓词判断元素可能插入到排序集合中的第一个位置,并返回一个指向该位置的迭代器upper_bound(): 根据元素的值或二元谓词判断元素可能插入到排序集合中的最后一个位置,并返回一个指向该位置的迭代器这些只是 STL 算法库中的一部分,但它们是最常用和最基础的。掌握它们可以让你用更简洁、更高效的方式编写 C++ 代码。
使用:查找元素 STL 算法 find() 和 find_if() 用于在 vector 等容器中查找与值匹配或满足条件的元素。find() 的用法如下:
auto element = find ( numsInVec . cbegin (), // Start of range
numsInVec . cend (), // End of range
numToFind ); // Element to find
// Check if find() succeeded
if ( element != numsInVec . cend ())
cout << "Result: Value found!" << endl ;
find_if() 的用法与此类似,但需要通过第三个参数提供一个一元谓词(返回 true 或 false 的一元函数):
auto evenNum = find_if ( numsInVec . cbegin (), // Start of range
numsInVec . cend (), // End of range
[]( int element ) { return ( element % 2 ) == 0 ; } );
if ( evenNum != numsInVec . cend ())
cout << "Result: Value found!" << endl ;
计算符合条件的元素数量 STL 算法 std::count() 和 count_if() 计算给定范围内的元素数。std::count() 计算包含给定值(使用相等运算符 == 进行测试)的元素数:
size_t numZeroes = count ( numsInVec . cbegin (), numsInVec . cend (), 0 );
cout << "Number of instances of '0': " << numZeroes << endl ;
std::count_if() 计算这样的元素数,即满足通过参数传递的一元谓词(可以是函数对象,也可以是lambda 表达式):
// Unary predicate:
template < typename elementType >
bool IsEven ( const elementType & number )
{
return (( number % 2 ) == 0 ); // true, if even
}
...
// Use the count_if algorithm with the unary predicate IsEven:
size_t numEvenNums = count_if ( numsInVec . cbegin (),
numsInVec . cend (), IsEven < int > );
cout << "Number of even elements: " << numEvenNums << endl ;
使用举例:
#include <iostream>
#include <vector>
#include <algorithm>
using namespace std ;
template < typename elementType >
bool IsEven ( const elementType & number )
{
return (( number % 2 ) == 0 ); // true, if even
}
int main () {
vector < int > numsInVec = { 1 , 2 , 3 , 4 , 5 , 6 , 7 , 8 , 9 , 10 };
size_t numZeroes = count ( numsInVec . cbegin (), numsInVec . cend (), 0 );
cout << "Number of instances of '0': " << numZeroes << endl ;
size_t numEvenNums = count_if ( numsInVec . cbegin (),
numsInVec . cend (), IsEven < int > );
cout << "Number of even elements: " << numEvenNums << endl ;
return 0 ;
}
搜索元素或者序列 STL 算法 search() 用于在一个范围内搜索另一个范围的序列。它有两个重载版本:
template < typename ForwardIterator1 , typename ForwardIterator2 >
ForwardIterator1 search ( ForwardIterator1 first1 , ForwardIterator1 last1 ,
ForwardIterator2 first2 , ForwardIterator2 last2 );
template < typename ForwardIterator1 , typename ForwardIterator2 , typename BinaryPredicate >
ForwardIterator1 search ( ForwardIterator1 first1 , ForwardIterator1 last1 ,
ForwardIterator2 first2 , ForwardIterator2 last2 ,
BinaryPredicate pred );
第一个版本使用相等运算符==来比较元素,第二个版本使用传递的二元谓词来比较元素。
auto range = search ( numsInVec . cbegin (), // Start range to search in
numsInVec . cend (), // End range to search in
numsInList . cbegin (), // start range to search
numsInList . cend () ); // End range to search for
算法 search_n() 用于在一个范围内搜索指定数量的连续元素,该元素与指定值匹配或满足指定条件。
auto partialRange = search_n ( numsInVec . cbegin (), // Start range
numsInVec . cend (), // End range
3 , // num items to be searched for
9 // value to search for
);
这两个函数都返回一个迭代器,它指向找到的第一个模式;使用该迭代器之前,务必将其与 end() 进行比较。
用法演示:
#include <iostream>
#include <vector>
#include <list>
#include <algorithm>
using namespace std ;
int main ()
{
vector < int > numsInVec = { 1 , 2 , 3 , 4 , 5 , 6 , 7 , 8 , 9 , 10 , 11 };
list < int > numsInList = { 9 , 10 , 11 };
list < int > numsInList2 = { 9 , 10 , 11 , 12 };
auto range = search ( numsInVec . cbegin (), // Start range to search in
numsInVec . cend (), // End range to search in
numsInList . cbegin (), // start range to search
numsInList . cend () ); // End range to search for
if ( range != numsInVec . cend ())
{
cout << "Range found at position: " << distance ( numsInVec . cbegin (), range ) << endl ;
}
else
{
cout << "Range not found" << endl ;
}
range = search ( numsInVec . cbegin (), // Start range to search in
numsInVec . cend (), // End range to search in
numsInList2 . cbegin (), // start range to search
numsInList2 . cend () ); // End range to search for
if ( range != numsInVec . cend ())
{
cout << "Range found at position: " << distance ( numsInVec . cbegin (), range ) << endl ;
}
else
{
cout << "Range not found" << endl ;
}
return 0 ;
}
search_n() 使用举例:
#include <iostream>
#include <vector>
#include <algorithm>
using namespace std ;
int main ()
{
vector < int > numsInVec = { 1 , 2 , 3 , 9 , 9 , 9 , 9 , 10 };
auto range = search_n ( numsInVec . cbegin (), // Start range to search in
numsInVec . cend (), // End range to search in
3 , 9 ); // End range to search for
if ( range != numsInVec . cend ())
{
cout << "999 found at position: " << distance ( numsInVec . cbegin (), range ) << endl ;
}
else
{
cout << "Range not found" << endl ;
}
return 0 ;
}
使用fill STL 算法 fill() 和 fill_n() 用于将指定范围的内容设置为指定值。fill() 将指定范围内的元素设置为指定值:
vector < int > numsInVec ( 3 );
// fill all elements in the container with value 9
fill ( numsInVec . begin (), numsInVec . end (), 9 );
顾名思义,fill_n() 将 n 个元素设置为指定的值,接受的参数包括起始位置、元素数以及要设置 的值:
fill_n ( numsInVec . begin () + 3 , /*count*/ 3 , /*fill value*/ - 9 );
使用示例:
#include <iostream>
#include <vector>
#include <algorithm>
using namespace std ;
template < typename T >
void DisplayContents ( const T & container )
{
for ( auto it = container . begin (); it != container . end (); ++ it )
cout << * it << " " ;
cout << endl ;
}
int main ()
{
vector < int > numsInVec ( 3 );
fill ( numsInVec . begin (), numsInVec . end (), 9 );
DisplayContents ( numsInVec );
// Output: 9 9 9
numsInVec . resize ( 6 );
fill_n ( numsInVec . begin () + 3 , 3 , 7 );
// Output: 9 9 9 7 7 7
DisplayContents ( numsInVec );
return 0 ;
}
fill函数要修改容器的元素值,就不可以使用cbegin()常量迭代器,cbegin()不能用于修改容器的元素值。
使用 std::generate() 将元素设置为运行阶段生成的值 std::generate() 是 C++ 标准库 <algorithm> 中的一个泛型算法,它的主要作用是根据一个生成器函数 (generator function)来为指定范围内的所有元素赋值。
简单来说,它的功能就是:用一个函数不断地生成值,并把这些值依次填充到一个容器或数组中。
std::generate() 的工作流程非常直接:
它从 first 迭代器指向的元素开始。 对范围中的每一个元素,它都会调用一次你提供的 Generator g。 g 的返回值会被赋给当前元素。它将迭代器向前移动,然后重复这个过程,直到到达 last 迭代器为止。 1. 使用 Lambda 表达式生成递增序列 这个例子使用一个 Lambda 表达式作为生成器,每次调用时让一个变量加2。
#include <iostream>
#include <vector>
#include <algorithm>
using namespace std ;
int main ()
{
vector < int > numsInVec ( 5 );
int start_value = 2 ;
generate ( numsInVec . begin (), numsInVec . end (), [ & ]()
{ return start_value += 2 ; });
for_each ( numsInVec . begin (), numsInVec . end (), []( int & n )
{ cout << n << endl ; });
return 0 ;
}
这里的 Lambda 表达式捕获了外部变量 start_value 的引用,每次被调用时都会返回 start_value 的当前值,然后将其递增。 注意细节,符号运算 += 和 ++ 不可混淆,后置自增(i++)是先创建一个副本,再增加原始变量,最后返回副本,所以看起来像是先返回再计算。而这个 += 符号就是直接运算,然后返回计算后的结果。
2. 使用函数生成随机数 这个例子使用一个自定义函数作为生成器来填充随机数。
#include <iostream>
#include <vector>
#include <algorithm>
#include <random> // C++11 之后的标准库随机数生成
// 生成随机数的函数
int generate_random_number () {
static std :: mt19937 generator ( std :: random_device {}()); // 静态生成器,只初始化一次
static std :: uniform_int_distribution < int > distribution ( 1 , 100 ); // 1到100的均匀分布
return distribution ( generator );
}
int main () {
std :: vector < int > random_numbers ( 5 );
// 将函数名作为生成器传递给 generate()
std :: generate ( random_numbers . begin (), random_numbers . end (), generate_random_number );
for ( int num : random_numbers ) {
std :: cout << num << " " ; // 输出类似: 56 12 87 34 99
}
std :: cout << std :: endl ;
return 0 ;
}
generate() 的第三个参数可以接受任何可调用对象,这里我们直接传入了函数名 generate_random_number。总结 std::generate() 是一个非常有用的工具,当你需要用重复的、有规律的或随机的方法 来填充一个序列时,它比手写一个 for 循环要更简洁、更具表达力。
对于生成递增或递减的序列,C++ 标准库还提供了更专用的 std::iota() 函数,它在某些场景下会更清晰。但 generate() 的优势在于其通用性 ,你可以用它来处理任何可以通过一个无参数函数来生成值的场景。
使用 for_each() 处理指定范围内的元素 算法 for_each() 对指定范围内的每个元素执行指定的一元函数对象,其用法如下:
fnObjType retValue = for_each ( start_of_range ,
end_of_range ,
unaryFunctionObject );
也可使用接受一个参数的 lambda 表达式代替一元函数对象。
返回值表明,for_each() 返回用于对指定范围内的每个元素进行处理的函数对象(functor)。这意味着使用结构或类作为函数对象可存储状态信息,并在 for_each() 执行完毕后查询这些信息。
实例,打印列表内每一个元素,并计算打印了多少次:
#include <iostream>
#include <vector>
#include <string>
#include <algorithm>
using namespace std ;
template < typename T >
struct DisplayAndCount
{
int count = 0 ;
DisplayAndCount () : count ( 0 ) {}
void operator ()( const T & value )
{
cout << value << " " ;
count ++ ;
}
};
int main ()
{
vector < int > numbers = { 1 , 2 , 3 , 4 , 5 };
DisplayAndCount < int > displayAndCount ;
displayAndCount = for_each ( numbers . cbegin (), numbers . cend (), DisplayAndCount < int > ());
cout << endl ;
cout << "Count: " << displayAndCount . count << endl ;
string text = "we are the world." ;
for_each ( text . cbegin (), text . cend (), []( const char & c )
{ cout << c << " " ; });
cout << endl ;
return 0 ;
}
后面演示了使用lambda表达式来遍历操作每个元素的方式。
std::for_each() 和 std::transform() 很像,都对源范围内的每个元素调用指定的函数对象。然而, std::transform() 有两个版本,第一个版本一个接受一元函数,常用于将字符串转换为大写或小写(使用的一元函数分别是 toupper() 和 tolower() ):
string str ( "THIS is a TEst string!" );
transform ( str . cbegin (), // start source range
str . cend (), // end source range
strLowerCaseCopy . begin (), // start destination range
:: tolower ); // unary function
第二个版本接受一个二元函数,让 transform() 能够处理一对 来自两个不同范围的元素 :
// sum elements from two vectors and store result in a deque
transform ( numsInVec1 . cbegin (), // start of source range 1
numsInVec1 . cend (), // end of source range 1
numsInVec2 . cbegin (), // start of source range 2
sumInDeque . begin (), // store result in a deque
plus < int > ()); // binary function plus
不像 for_each() 那样只处理一个范围,这两个版本的 transform() 都将指定变换函数的结果赋给指定的目标范围。
使用 std::transform() ,对两个列表的元素进行相加的实例。之前已经写过这个例子,有意思的是, 如果两个列表的元素数量不一致, transform() 函数的表现是怎样的呢?
#include <iostream>
#include <vector>
#include <algorithm>
using namespace std ;
int main ()
{
vector < int > numbersOne = { 1 , 2 , 3 , 4 , 5 };
vector < int > numbersTwo = { 6 , 7 , 8 , 9 , 10 , 20 };
vector < int > result ( 10 );
transform ( numbersOne . begin (), numbersOne . end (), numbersTwo . begin (), result . begin (), []( int a , int b )
{ return a + b ; });
for ( int num : result )
{
cout << num << " " ;
}
return 0 ;
}
这里的 transform() 函数的行为是,将 numbersOne 和 numbersTwo 中对应位置的元素相加,结果存储在 result 中。如果 numbersOne 和 numbersTwo 的元素数量不一致, transform() 函数会以第一个元素为基准,遍历完第一个列表,第二个列表缺失的话,第二个元素会被置为默认值,例如int元素处理为0,string元素处理为空字符串。
如果承载的容器大小不足,例如result长度设置为 3 会发生什么呢?经运行测试,在 result 装满之后没有自动扩容,也没有报错。
复制元素和删除元素 copy() 复制元素,copy 沿向前的方向将源范围的内容赋给目标范围:
auto lastElement = copy ( numsInList . cbegin (), // start source range
numsInList . cend (), // end source range
numsInVec . begin ()); // start dest range
copy_if() 是 C++11 新增的,仅在指定的一元谓词返回 true 时才复制元素:
// copy odd numbers from list into vector
copy_if ( numsInList . cbegin (), numsInList . cend (),
lastElement , // copy position in dest range
[]( int element ){ return (( element % 2 ) == 1 );});
copy_backward() 沿向后的方向将源范围的内容赋给目标范围,这并不是从后往前复制一个翻转的列表,而是将源范围的元素从后往前复制到目标范围的指定位置。主要用于处理 重叠内存区域 ,特别是在你想要将一个序列向后移动(比如在 vector 中间插入一个元素时,需要将后面的元素向后移)。它通过从后往前复制,确保 在将数据复制到新位置之前,旧位置的数据不会被覆盖 。
copy_backward ( numsInList . cbegin (),
numsInList . cend (),
numsInVec . end ());
remove( )将容器中与指定值匹配的元素删除:
// Remove all instances of '0', resize vector using erase()
auto newEnd = remove ( numsInVec . begin (), numsInVec . end (), 0 );
numsInVec . erase ( newEnd , numsInVec . end ());
remove_if( )使用一个一元谓词,并将容器中满足该谓词的元素删除:
// Remove all odd numbers from the vector using remove_if
newEnd = remove_if ( numsInVec . begin (), numsInVec . end (),
[]( int num ) { return (( num % 2 ) == 1 );} ); //predicate
numsInVec . erase ( newEnd , numsInVec . end ()); // resizing
使用实例:
#include <iostream>
#include <vector>
#include <algorithm>
using namespace std ;
int main ()
{
vector < int > numsInVec = { 1 , 2 , 3 , 4 , 5 , 0 , 6 , 7 , 8 , 9 , 0 };
// Copy elements from numsInVec to another vector
vector < int > copiedVec ( numsInVec . size ());
copy ( numsInVec . begin (), numsInVec . end (), copiedVec . begin ());
cout << "Copied Vector: " ;
for ( const auto & num : copiedVec )
cout << num << " " ;
cout << endl ;
// Remove all instances of '0'
auto newEnd = remove ( numsInVec . begin (), numsInVec . end (), 0 );
numsInVec . erase ( newEnd , numsInVec . end ());
cout << "After removing '0': " ;
for ( const auto & num : numsInVec )
cout << num << " " ;
cout << endl ;
// Remove all odd numbers
newEnd = remove_if ( numsInVec . begin (), numsInVec . end (),
[]( int num ) { return ( num % 2 ) == 1 ; });
numsInVec . erase ( newEnd , numsInVec . end ());
cout << "After removing odd numbers: " ;
for ( const auto & num : numsInVec )
cout << num << " " ;
cout << endl ;
return 0 ;
}
为什么每次调完remove() 都要调用erase() ?
因为remove() 函数中,在遍历时,它遍历一个范围内的元素。对于所有不等于你要移除的值的元素,它会 把它们移到范围的前面 。它返回一个迭代器,指向新的“逻辑上”的末尾。这个迭代器后面的元素是“垃圾”,它们仍然在容器中,但它们的值是不确定的,也不再属于有效序列。然后使用容器的 erase() 成员函数,它负责根据第一步返回的迭代器,真正地从容器中删除后面的元素,并调整容器大小。这一步是特定于容器的,所以很高效, 因为它只需要知道一个起点,就可以批量删除。
替换值以及替换满足给定条件的元素 STL算法 replace() 与 replace_if() 分别用于替换集合中等于指定值和满足给定条件的元素。 replace() 根据比较运算符==的返回值来替换元素:
cout << "Using 'std::replace' to replace value 5 by 8" << endl ;
replace ( numsInVec . begin (), numsInVec . end (), 5 , 8 );
replace_if( )需要一个用户指定的一元谓词,对于要替换的每个值,该谓词都返回 true:
cout << "Using 'std::replace_if' to replace even values by -1" << endl ;
replace_if ( numsInVec . begin (), numsInVec . end (),
[]( int element ) { return (( element % 2 ) == 0 ); }, - 1 );
使用示例:
#include <iostream>
#include <vector>
#include <algorithm>
using namespace std ;
int main ()
{
vector < int > numsInVec = { 1 , 2 , 3 , 4 , 5 , 6 , 7 , 8 , 9 , 10 };
cout << "Original Vector: " ;
for ( const auto & num : numsInVec )
cout << num << " " ;
cout << endl ;
// Replace value 5 with 8
replace ( numsInVec . begin (), numsInVec . end (), 5 , 8 );
cout << "After replacing 5 with 8: " ;
for ( const auto & num : numsInVec )
cout << num << " " ;
cout << endl ;
// Replace even values with -1
replace_if ( numsInVec . begin (), numsInVec . end (),
[]( int element ) { return ( element % 2 ) == 0 ; }, - 1 );
cout << "After replacing even values with -1: " ;
for ( const auto & num : numsInVec )
cout << num << " " ;
cout << endl ;
return 0 ;
}
排序,有序搜索,去重 进行排序,可使用 STL 算法 sort( ):
sort ( numsInVec . begin (), numsInVec . end ()); // ascending order
这个版本的 sort( )将 std::less<>用作二元谓词,而该谓词使用 vector 存储的数据类型实现的运算符<。您可使用另一个重载版本,以指定谓词,从而修改排列顺序:
sort ( numsInVec . begin (), numsInVec . end (),
[]( int lhs , int rhs ) { return ( lhs > rhs );} ); // descending order
同样,在显示集合的内容前,需要删除重复的元素。要删除相邻的重复值,可使用 unique( ):
auto newEnd = unique ( numsInVec . begin (), numsInVec . end ());
numsInVec . erase ( newEnd , numsInVec . end ()); // to resize
要进行快速查找,可使用 STL 算法 binary_search( ),这种算法只能用于有序容器:
bool elementFound = binary_search ( numsInVec . begin (), numsInVec . end (), 2011 );
if ( elementFound )
cout << "Element found in the vector!" << endl ;
使用实例:
#include <iostream>
#include <vector>
#include <algorithm>
using namespace std ;
int main ()
{
vector < int > numsInVec = { 5 , 3 , 8 , 1 , 2 , 2 , 7 , 4 , 6 , 5 , 5 };
cout << "Original Vector: " ;
for ( const auto & num : numsInVec )
cout << num << " " ;
cout << endl ;
// Sort the vector in ascending order
sort ( numsInVec . begin (), numsInVec . end ());
cout << "Sorted Vector (Ascending): " ;
for ( const auto & num : numsInVec )
cout << num << " " ;
cout << endl ;
// Remove duplicates
auto newEnd = unique ( numsInVec . begin (), numsInVec . end ());
numsInVec . erase ( newEnd , numsInVec . end ());
cout << "After removing duplicates: " ;
for ( const auto & num : numsInVec )
cout << num << " " ;
cout << endl ;
// Search for an element
bool elementFound = binary_search ( numsInVec . begin (), numsInVec . end (), 4 );
if ( elementFound )
cout << "Element 4 found in the vector!" << endl ;
else
cout << "Element 4 not found in the vector!" << endl ;
return 0 ;
}
请注意,与 remove() 一样, unique() 也不调整容器的大小。它将元素前移,但不会减少元素总数。为避免容器末尾包含不想要或未知的值,务必在调用 unique() 后调用 vector::erase() ,并将 unique() 返回的迭代器传递给它。
binary_search( )算法只能用于经过排序的容器,如果将其用于未经排序的 vector,结果可能出乎意料。
stable_sort( )的用法与 sort( )类似,这在前面介绍过。stable_sort( )确保排序后元素的相对顺序保持不变。为了确保相对顺序保持不变,将降低性能,这是一个需要考虑的因素,尤其在元素的相对顺序不重要时。
将范围分区 std::partition() 将输入范围分为两部分:一部分满足一元谓词;另一部分不满足:
bool IsEven ( const int & num ) // unary predicate
{
return (( num % 2 ) == 0 );
}
...
partition ( numsInVec . begin (), numsInVec . end (), IsEven );
然而,std::partition( ) 不保证每个分区中元素的相对顺序不变。在相对顺序很重要,需要保持不变时,应使用 std::stable_partition( ) :
stable_partition ( numsInVec . begin (), numsInVec . end (), IsEven );
使用举例:
#include <iostream>
#include <vector>
#include <algorithm>
using namespace std ;
int main ()
{
vector < int > numsInVec = { 5 , 3 , 8 , 1 , 2 , 2 , 7 , 4 , 6 , 5 , 5 , 9 };
vector < int > vecCopy ( numsInVec );
cout << "Original vector numsInVec: " ;
for ( const auto & num : numsInVec )
{
cout << num << " " ;
}
cout << endl ;
cout << "Partitioned vector numsInVec: " ;
auto partitionedEnd = partition ( numsInVec . begin (), numsInVec . end (), []( const int & a )
{ return (( a % 2 ) == 0 ); });
cout << "Partition Left size: " << distance ( numsInVec . begin (), partitionedEnd ) << endl ;
cout << "Partition Right size: " << distance ( partitionedEnd , numsInVec . end ()) << endl ;
for ( auto it = numsInVec . cbegin (); it != numsInVec . cend (); it ++ )
{
cout << * it << " " ;
}
cout << endl ;
cout << "Stable Partitioned vector vecCopy: " ;
stable_partition ( vecCopy . begin (), vecCopy . end (), []( const int & a )
{ return (( a % 2 ) == 0 ); });
for ( auto it = vecCopy . cbegin (); it != vecCopy . cend (); it ++ )
{
cout << * it << " " ;
}
cout << endl ;
return 0 ;
}
partition() 会返回一个迭代器,指向第一个不满足谓词的元素。就这个例子来说,其指向的就是 1 这个元素。
丅
6 4 8 2 2 1 7 3 5 5 5 9
stable_partition() 可以保证元素分区后相对位置不变,其速度比 partition() 慢,因此应只在容器中元素的相对顺序很重要时使用它。
在有序集合中插入元素 将元素插入到有序集合中时,将其插入到正确位置很重要。为了满足这种需求,STL 提供了 std::lower_bound( ) 和 std::upper_bound( ) 等函数:
auto minInsertPos = lower_bound ( names . begin (), names . end (),
"Brad Pitt" );
// alternatively:
auto maxInsertPos = upper_bound ( names . begin (), names . end (),
"Brad Pitt" );
lower_bound() 和 upper_bound() 都返回一个迭代器,分别指向在不破坏现有顺序的情况下,元素可插入到有序范围内的最前位置和最后位置。
例如,要将 2 插入到1222345中,lower_bound() 会返回指向第一个 2 的迭代器,而 upper_bound() 会返回指向 3 的迭代器。
使用举例:
#include <iostream>
#include <vector>
#include <algorithm>
using namespace std ;
int main ()
{
vector < int > numsInVec = { 1 , 2 , 3 , 4 , 5 , 6 , 7 , 8 , 9 , 10 };
// Insert an element while maintaining order
int elementToInsert = 5 ;
auto insertPos = lower_bound ( numsInVec . begin (), numsInVec . end (), elementToInsert );
numsInVec . insert ( insertPos , elementToInsert );
cout << "After inserting " << elementToInsert << ": " ;
for ( const auto & num : numsInVec )
cout << num << " " ;
cout << endl ;
return 0 ;
}
STL 算法小结 使用算法 remove() 、remove_if() 或 unique() 后,务必使用容器的成员方法 erase() 调整容器的大小。 调用 unique() 删除重复的相邻值之前,别忘了使用 sort() 对容器进行排序。sort() 确保包含相同值的元素彼此相邻,这样 unique() 才能发挥作用。 使用 find() 、find_if() 、search() 或 search_n() 返回的迭代器之前,务必将其与容器的 end() 进行比较,以确定它有效。如果迭代器等于 end() ,则表示未找到元素。 仅当元素的相对顺序很重要时,才应使用 stable_partition() (而不是 partition() )和 stable_sort() (而不是 sort() ),因为 stable_* 可能降低应用程序的性能。 对于已排序的容器,不要在随机选择的位置插入元素,而应将其插入到 lower_bound() 或 upper_bound() 返回的位置,以确保插入元素后容器依然是有序的。 别忘了,binary_search() 只能用于已排序的容器。 栈与队列 栈是 LIFO(后进先出)系统,只能从栈顶插入或删除元素。栈的操作包括 push() (插入)和 pop() (删除)。要使用 std::stack,必须包含头文件 <stack> 。
队列是 FIFO(先进先出)系统,只能从队头删除元素,从队尾插入元素。队列的操作包括 enqueue() (插入)和 dequeue() (删除)。要使用 std::queue,必须包含头文件<queue> 。
栈的使用 在有些 STL 实现中,std::stack 的定义如下:
template <
class elementType ,
class Container = deque < Type >
> class stack ;
参数 elementType 是 stack 存储的对象类型。第二个模板参数 Container 是 stack 使用的默认底层容器实现类。stack 默认在内部使用 std::deque 来存储数据,但 可指定使用 vector 或 list 来存储数据 。因此,实例化整型栈的代码类似于下面这样:
std :: stack < int > numsInStack ;
要创建存储类(如 Tuna)对象的栈,可使用下述代码:
std :: stack < Tuna > tunasInStack ;
要创建使用不同底层容器的栈,可使用如下代码:
std :: stack < double , vector < double >> doublesStackedInVec ;
各种实例化方式:
#include <iostream>
#include <stack>
#include <vector>
using namespace std ;
int main ()
{
// Stack of integers using default deque container
stack < int > intStack ;
// Stack of strings using default deque container
stack < string > stringStack ;
// Stack of doubles using vector as the underlying container
stack < double , vector < double >> doubleStack ;
// initializing one stack to be a copy of another
stack < int > intStackTwo ( intStack );
return 0 ;
}
stack常用成员函数 stack 改变了另一种容器(如 deque、list 或 vector)的行为,通过 限制元素插入或删除的方式 实现其功能,从而提供严格遵守栈机制的行为特征。
成员函数 说明 empty() 如果栈为空,返回 true;否则返回 false。 size() 返回栈中元素的数量。 top() 返回栈顶元素的引用。 push(const Type& x) 将元素 x 插入到栈顶。 pop() 删除栈顶元素。
使用举例:
#include <iostream>
#include <stack>
using namespace std ;
int main ()
{
stack < int > numsInStack ;
// Push elements onto the stack
for ( int i = 1 ; i <= 5 ; ++ i )
{
numsInStack . push ( i );
cout << "Pushed: " << i << ", Stack size: " << numsInStack . size () << endl ;
}
// Access and pop elements from the stack
while ( ! numsInStack . empty ())
{
cout << "Top element: " << numsInStack . top () << endl ;
numsInStack . pop ();
cout << "Popped, Stack size: " << numsInStack . size () << endl ;
}
return 0 ;
}
queue队列的使用 STL queue 是一个模板类,要使用它,必须包含头文件。queue 是一个泛型类,只允许在末尾插入元素以及从开头删除元素。queue 不允许访问中间的元素,但可以访问开头和末尾的元素。从这种意义上说,std::queue 的行为与超市收银台前的队列极其相似。
std::queue 的定义如下:
template <
class elementType ,
class Container = deque < Type >
> class queue ;
其中 elementType 是 queue 对象包含的元素的类型。Container 是 std::queue 用于存储其数据的集合类型,可将该模板参数设置为 std::list、vector 或 deque,默认为 deque。
实例化整型 queue 的最简单方式如下:
std :: queue < int > numsInQ ;
如果要创建这样的 queue,即其元素类型为 double,并使用 std::list(而不是默认的 queue)存储这些元素,可以像下面这样做:
std :: queue < double , list < double >> dblsInQInList ;
与 stack 一样,也可使用一个 queue 来实例化另一个 queue:
std :: queue < int > copyQ ( numsInQ );
queue常用成员函数 有以下这些成员函数:
成员函数 说明 empty() 如果队列为空,返回 true;否则返回 false。 size() 返回队列中元素的数量。 front() 返回队列头元素的引用。 back() 返回队列尾元素的引用。 push(const Type& x) 将元素 x 插入到队列尾。 pop() 删除队列头元素。
使用举例:
#include <iostream>
#include <queue>
using namespace std ;
int main ()
{
queue < int > numsInQ ;
// Enqueue elements into the queue
for ( int i = 1 ; i <= 5 ; ++ i )
{
numsInQ . push ( i );
cout << "Enqueued: " << i << ", Queue size: " << numsInQ . size () << endl ;
}
// Access and dequeue elements from the queue
while ( ! numsInQ . empty ())
{
cout << "Front element: " << numsInQ . front () << endl ;
numsInQ . pop ();
cout << "Dequeued, Queue size: " << numsInQ . size () << endl ;
}
return 0 ;
}
priority_queue优先级队列 std::priority_queue 是一个特殊类型的队列,它允许你按照优先级来处理元素。它的行为类似于一个最大堆(max-heap),即每次从队列中取出的元素都是当前队列中最大的元素。你可以使用 std::priority_queue 来实现优先队列,例如任务调度、事件处理等。
std::priority_queue 类的定义如下:
template <
class elementType ,
class Container = vector < Type >,
class Compare = less < typename Container :: value_type >
>
class priority_queue
其中 elementType 是一个模板参数,指定了优先级队列将包含的元素的类型。第二个模板参数指定 priority_queue 在内部将使用哪个集合类来存储数据,第三个参数让程序员能够指定一个二元谓词,以帮助队列判断哪个元素应位于队首。如果没有指定二元谓词,priority_queue 类将默认使用 std::less,它使用运算符<比较对象。
要实例化整型 priority_queue,最简单的方式如下:
std :: priority_queue < int > numsInPrioQ ;
如果要创建一个这样的 priority_queue,即其元素类型为 double,且按小到大的顺序存储在 std::deque中,则可这样做:
priority_queue < int , deque < int > , greater < int >> numsInDescendingQ ;
与 stack 一样,也可使用一个 priority_queue 来实例化另一个 priority_queue:
std :: priority_queue < int > copyQ ( numsInPrioQ );
priority_queue常用成员函数 有以下这些成员函数:
成员函数 说明 empty() 如果队列为空,返回 true;否则返回 false。 size() 返回队列中元素的数量。 top() 返回队列头元素的引用。 push(const Type& x) 将元素 x 插入到队列尾。 pop() 删除队列头元素。
使用举例:
#include <iostream>
#include <queue>
#include <vector>
using namespace std ;
int main ()
{
priority_queue < int > pq ;
vector < int > vec = { 5 , 1 , 3 , 2 , 4 };
for ( int num : vec )
{
pq . push ( num );
}
while ( ! pq . empty ())
{
cout << pq . top () << endl ;
pq . pop ();
}
return 0 ;
}
按照51324的顺序插入之后,使用top获取后弹出,打印顺序为54321。可以得知,priority_queue 默认实例里,每次取出的元素都是当前队列中最大的元素。
使用谓词 std::greater <int> 实例化一个 priority_queue。该谓词导致优先级队列认为包含的数字最小的元素为最大的元素,并将其放在队首。
#include <iostream>
#include <queue>
#include <vector>
using namespace std ;
int main ()
{
priority_queue < int , vector < int > , greater < int >> pq ;
vector < int > vec = { 5 , 1 , 3 , 2 , 4 };
for ( int num : vec )
{
pq . push ( num );
}
while ( ! pq . empty ())
{
cout << pq . top () << endl ;
pq . pop ();
}
return 0 ;
}
HelloWorld #include <iostream>
int main ()
{
std :: cout << "Hello World" << std :: endl ;
return 0 ;
}
命名空间 名称空间是给代码指定的名称,有助于降低命名冲突的风险。通过使用 std::cout,您命令编译器调用名称空间 std 中独一无二的 cout。
// Pre-processor directive
#include <iostream>
// Start of your program
int main ()
{
// Tell the compiler what namespace to look in
using namespace std ;
/* Write to the screen using cout */
cout << "Hello World" << endl ;
// Return a value to the OS
return 0 ;
}
使用函数之前需要声明 #include <iostream>
using namespace std ;
// Function declaration
int DemoConsoleOutput ();
int main ()
{
// Function call
DemoConsoleOutput ();
return 0 ;
}
// Function definition
int DemoConsoleOutput ()
{
cout << "This is a simple string literal" << endl ;
cout << "Writing number five: " << 5 << endl ;
cout << "Performing division 10 / 5 = " << 10 / 5 << endl ;
cout << "Pi when approximated is 22 / 7 = " << 22 / 7 << endl ;
cout << "Pi actually is 22 / 7 = " << 22.0 / 7 << endl ;
return 0 ;
}
使用变量最好初始化 除非给变量赋初值,否则无法确保相应内存单元的内容是什么,这对程序可能不利。因此,初始化虽然是可选的,但这样做通常是一个不错的编程习惯。
常见变量类型 基本类型(基本数据类型)
整型(Integer types)
int:标准整型,通常是32位。 short:短整型,通常是16位。 long:长整型,通常是32位或64位,取决于系统。 long long:更长整型,通常是64位。 unsigned:无符号整型,可以是unsigned int、unsigned short等。
字符型(Character types)
char:字符类型,通常是8位。 signed char:有符号字符类型。 unsigned char:无符号字符类型。
浮点型(Floating-point types)
float:单精度浮点型,通常是32位。 double:双精度浮点型,通常是64位。 long double:扩展精度浮点型,通常是80位或更高。
布尔型(Boolean type)
bool:布尔类型,可以存储true或false。
auto可以自动推断类型 #include <iostream>
using namespace std ;
int main ()
{
auto coinFlippedHeads = true ;
auto largeNumber = 2500000000000 ;
cout << "coinFlippedHeads = " << coinFlippedHeads ;
cout << " , sizeof(coinFlippedHeads) = " << sizeof ( coinFlippedHeads ) << endl ;
cout << "largeNumber = " << largeNumber ;
cout << " , sizeof(largeNumber) = " << sizeof ( largeNumber ) << endl ;
return 0 ;
}
/**
coinFlippedHeads = 1 , sizeof(coinFlippedHeads) = 1
largeNumber = 2500000000000 , sizeof(largeNumber) = 8
*/
typedef更改变量类型别名 C++允许您将变量类型替换为您认为方便的名称,为此可使用关键字 typedef。
在下面的示例中,程序员想给 unsigned int 指定一个更具描述性的名称— STRICTLY_POSITIVE_INTEGER :
typedef unsigned int STRICTLY_POSITIVE_INTEGER ;
STRICTLY_POSITIVE_INTEGER numEggsInBasket = 4532 ;
常量const和constexpr 如果变量的值不应改变,就应将其声明为常量,这是一种良好的编程习惯。通过使用关键字 const,程序员可确保数据不变,避免应用程序无意间修改该常量。在多位程序员合作开发时,这特别有用。
通过constexpr将函数声明为返回常量的函数:
constexpr double GetPi () { return 22.0 / 7 ;}
会在编译期就算出这个值,并在使用处自动替换,可以优化性能。
但是像计算用户输入数字的两倍,这种地方,就无法计算结果,不保证可以优化性能。
枚举 后一个都比前一个大1。默认第一个数值从0开始,中间也可以自己指定。
#include <iostream>
using namespace std ;
enum CardinalDirections
{
North = 25 ,
South ,
East ,
West
};
int main ()
{
cout << "Displaying directions and their symbolic values" << endl ;
cout << "North: " << North << endl ;
cout << "South: " << South << endl ;
cout << "East: " << East << endl ;
cout << "West: " << West << endl ;
CardinalDirections windDirection = South ;
cout << "Variable windDirection = " << windDirection << endl ;
return 0 ;
}
#define pi 3.14286用来定义常量,已废弃 数组声明和访问元素 #include <iostream>
using namespace std ;
int main ()
{
int myNumbers [ 5 ] = { 34 , 56 , - 21 , 5002 , 365 };
cout << "First element at index 0: " << myNumbers [ 0 ] << endl ;
cout << "Second element at index 1: " << myNumbers [ 1 ] << endl ;
cout << "Third element at index 2: " << myNumbers [ 2 ] << endl ;
cout << "Fourth element at index 3: " << myNumbers [ 3 ] << endl ;
cout << "Fifth element at index 4: " << myNumbers [ 4 ] << endl ;
return 0 ;
}
多维数组 #include <iostream>
using namespace std ;
int main ()
{
int threeRowsThreeColumns [ 3 ][ 3 ] = { { - 501 , 205 , 2011 }, { 989 , 101 , 206 }, { 303 , 456 , 596 } };
cout << "Row 0: " << threeRowsThreeColumns [ 0 ][ 0 ] << " " << threeRowsThreeColumns [ 0 ][ 1 ] << " " << threeRowsThreeColumns [ 0 ][ 2 ] << endl ;
cout << "Row 1: " << threeRowsThreeColumns [ 1 ][ 0 ] << " " << threeRowsThreeColumns [ 1 ][ 1 ] << " " << threeRowsThreeColumns [ 1 ][ 2 ] << endl ;
cout << "Row 2: " << threeRowsThreeColumns [ 2 ][ 0 ] << " " << threeRowsThreeColumns [ 2 ][ 1 ] << " " << threeRowsThreeColumns [ 2 ][ 2 ] << endl ;
return 0 ;
}
使用vector声明动态数组 #include <iostream>
#include <vector>
using namespace std ;
int main ()
{
vector < int > dynArray ( 3 );
dynArray [ 0 ] = 365 ;
dynArray [ 1 ] = - 421 ;
dynArray [ 2 ] = 789 ;
cout << "Number of integers in array: " << dynArray . size () << endl ;
cout << "Enter another element to insert" << endl ;
int newValue = 0 ;
cin >> newValue ;
dynArray . push_back ( newValue );
cout << "Number of integers in array: " << dynArray . size () << endl ;
cout << "Last element in array: " ;
cout << dynArray [ dynArray . size () - 1 ] << endl ;
return 0 ;
}
c风格字符串 char sayHello [] = { 'H' , 'e' , 'l' , 'l' , 'o' , ' ' , 'W' , 'o' , 'r' , 'l' , 'd' ,
'\0' };
std :: cout << sayHello << std :: endl ;
末尾是一个 \0 ,来告诉编译器字符串到这里就完结了。
危险性 使用 C 语言编写的应用程序经常使用 strcpy() 等字符串复制函数、strcat() 等拼接函数,还经常使用 strlen() 来确定字符串的长度;具有 C 语言背景的 C++程序员编写的应用程序亦如此。
这些 C 风格字符串作为输入的函数非常危险,因为它们寻找终止空字符,如果程序员没有在字符数组末尾添加空字符,这些函数将跨越字符数组的边界。
C++ string 要使用 C++字符串,需要包含头文件 string, #include <string> 不同于字符数组(C 风格字符串实现),std::string 是动态的,在需要存储更多数据时其容量将增大。
#include <iostream>
#include <string>
using namespace std ;
int main ()
{
string greetStrings ( "Hello std::string!" );
cout << greetStrings << endl ;
cout << "Enter a line of text: " << endl ;
string firstLine ;
getline ( cin , firstLine );
cout << "Enter another: " << endl ;
string secondLine ;
getline ( cin , secondLine );
cout << "Result of concatenation: " << endl ;
string concatString = firstLine + " " + secondLine ;
cout << concatString << endl ;
cout << "Copy of concatenated string: " << endl ;
string aCopy ;
aCopy = concatString ;
cout << aCopy << endl ;
cout << "Length of concat string: " << concatString . length () << endl ;
return 0 ;
}
函数值传递 默认情况下, 函数参数在作用域生效的是外部实参的拷贝 ,内部的操作不会影响原参数。
可以使用按引用传递的参数,在函数体内部也可以对外部传来的参数做修改。
#include <iostream>
using namespace std ;
const double Pi = 3.1416 ;
// output parameter result by reference
void Area ( double radius , double & result )
{
result = Pi * radius * radius ;
}
int main ()
{
cout << "Enter radius: " ;
double radius = 0 ;
cin >> radius ;
double areaFetched = 0 ;
Area ( radius , areaFetched );
cout << "The area is: " << areaFetched << endl ;
return 0 ;
}
函数调用栈的概念 栈是一种后进先出的内存结构,很像堆叠在一起的盘子,您从顶部取盘子,这个盘子是最后堆叠上去的。将数据加入栈被称为压入操作;从栈中取出数据被称为弹出操作。栈增大时,栈指针将不断递增,始终指向栈顶。
栈的性质使其非常适合用于处理函数调用。函数被调用时,所有局部变量都在栈中实例化,即被压入栈中。函数执行完毕时,这些局部变量都从栈中弹出,栈指针返回到原来的地方。
inline函数 也叫内联函数,函数执行时间 比 入栈出栈时间 相当的简单函数,可以使用inline关键字,编译器会直接将其展开到调用处,省去入栈出栈的时间。
现代编译器甚至会自动寻找内联机会,帮助合理优化性能。
auto用于函数,同样可以自动推断返回值 指针初始化,以免自动指向垃圾值 与大多数变量一样,除非对指针进行初始化,否则它包含的值将是随机的。
您不希望访问随机的内存地址,因此将指针初始化为 NULL 。
NULL 是一个可以检查的值,且不会是内存地址。
指针语法 声明一个指针类型,使用 指向的变量类型加上星号(*) ,后跟指针名称。
使用取地址运算符(&)获取变量的内存地址,取地址运算符是编程中用于获取变量在内存中的地址的符号,通常用符号&表示。它在支持指针操作的编程语言中广泛使用,功能是返回变量的内存地址,以便后续操作。
#include <iostream>
using namespace std ;
int main ()
{
int age = 30 ;
int * pointsToInt = & age ;
cout << "pointsToInt points to age now" << endl ;
// Displaying the value of pointer
cout << "pointsToInt = 0x" << hex << pointsToInt << endl ;
int DogsAge = 9 ;
pointsToInt = & DogsAge ;
cout << "pointsToInt points to DogsAge now" << endl ;
cout << "pointsToInt = 0x" << hex << pointsToInt << endl ;
return 0 ;
}
使用解引用运算符(*)获取指针指向的数据值 解引用运算符是编程中用于访问指针所指向内存地址存储值的符号,通常用星号(*)表示。它在支持指针操作的编程语言如C语言和C++中广泛使用,主要功能是通过指针间接访问和修改数据。
其核心工作原理是:当对指针使用解引用运算符(如ptr)时,会获取该指针指向内存位置的实际值。例如,若指针int ptr指向整数变量num的地址,则*ptr操作等同于直接操作num的值。
与取地址运算符(&)形成互补关系:取地址运算符用于获取变量的内存地址(如&num返回地址),而解引用运算符则通过地址反向获取值。在面向对象编程中,解引用运算符还用于通过指针访问对象的成员,例如obj->member等价于(*obj).member,其中->被称为结构解引用运算符,是解引用与成员访问的语法糖。
使用时的注意事项包括:
空指针解引用风险:若指针未初始化或指向无效内存(如空指针),解引用会导致程序崩溃或未定义行为; 类型匹配:解引用指针类型需与目标数据类型一致,否则可能引发内存错误; 运算符优先级:解引用运算符(*)的优先级高于自增(++),因此*p++会先解引用再对指针自增,而(*p)++则是对解引用的值自增。 典型应用场景包括动态内存管理、数据结构(如链表)操作及数组遍历。例如,通过指针遍历数组时,*(arr + i)等效于arr[i],这展示了指针算术与解引用的结合。
#include <iostream>
using namespace std ;
int main ()
{
int age = 30 ;
int dogsAge = 9 ;
cout << "Integer age = " << age << endl ;
cout << "Integer dogsAge = " << dogsAge << endl ;
int * pointsToInt = & age ;
cout << "pointsToInt points to age" << endl ;
// Displaying the value of pointer
cout << "pointsToInt = 0x" << hex << pointsToInt << endl ;
// Displaying the value at the pointed location
cout << "*pointsToInt = " << dec << * pointsToInt << endl ;
pointsToInt = & dogsAge ;
cout << "pointsToInt points to dogsAge now" << endl ;
cout << "pointsToInt = 0x" << hex << pointsToInt << endl ;
cout << "*pointsToInt = " << dec << * pointsToInt << endl ;
return 0 ;
}
如果指针未初始化,它所在的内存单元将包含随机值,此时对其解除引用通常会导致非法访问(Access Violation),即访问应用程序未获得授权的内存单元。
使用new和delete动态的申请和释放内存 这两个必须成对使用。
不再使用分配的内存后,如果不释放它们,这些内存仍被预留并分配给您的应用程序。这将减少可供其他应用程序使用的系统内存量,甚至降低您的应用程序的执行速度。这被称为 内存泄露 ,应不惜一切代价避免这种情况发生。
#include <iostream>
using namespace std ;
int main ()
{
// Request for memory space for an int
int * pointsToAnAge = new int ;
// Use the allocated memory to store a number
cout << "Enter your dog's age: " ;
cin >> * pointsToAnAge ;
// use indirection operator* to access value
cout << "Age " << * pointsToAnAge << " is stored at 0x" << hex << pointsToAnAge << endl ;
delete pointsToAnAge ; // release dynamically allocated memory
return 0 ;
}
不能将运算符 delete 用于任何包含地址的指针,而只能用于 new 返回的且未使用 delete 释放的指针。
对指针使用++和– 其会指向下一个int值,而不是移动一个内存地址指向中间,那毫无意义。 如果声明了如下指针:
则执行 ++pType 后, pType 将指向 Address + sizeof(Type)。
可以推断,数组其实就是一个指向第一个元素的指针类型。
数组和指针 由于数组变量就是指针,因此也可将用于指针的解除引用运算符(*)用于数组。同样,可将数组运算符[ ]用于指针。
#include <iostream>
using namespace std ;
int main ()
{
const int ARRAY_LEN = 5 ;
// Static array of 5 integers, initialized
int myNumbers [ ARRAY_LEN ] = { 24 , - 1 , 365 , - 999 , 2011 };
// Pointer initialized to first element in array
int * pointToNums = myNumbers ;
cout << "Display array using pointer syntax, operator*" << endl ;
for ( int index = 0 ; index < ARRAY_LEN ; ++ index )
cout << "Element " << index << " = " << * ( myNumbers + index ) << endl ;
cout << "Display array using ptr with array syntax, operator[]" << endl ;
for ( int index = 0 ; index < ARRAY_LEN ; ++ index )
cout << "Element " << index << " = " << pointToNums [ index ] << endl ;
return 0 ;
}
const指针 指针的主要功能是指向一个 变量的地址 ,理解为越靠近变量的限制性越高级。
const贴近变量名,不允许修改指针指向的地址,可以修改指向的变量。 #include <iostream>
using namespace std ;
int main ()
{
int age = 30 ;
int dogsAge = 9 ;
int * const pointsToAge = & age ;
cout << "*pointsToAge = " << * pointsToAge << endl ;
// pointsToAge = &dogsAge; // error! can't change pointer value
* pointsToAge = 31 ; // ok! can change value pointed to
cout << "*pointsToAge = " << * pointsToAge << endl ;
return 0 ;
}
const远离变量名,在最前,不允许修改指向变量的值,指针可以指向其他地方。 #include <iostream>
using namespace std ;
int main ()
{
int age = 30 ;
int dogsAge = 9 ;
const int * pointsToAge = & age ;
cout << "*pointsToAge = " << * pointsToAge << endl ;
// *pointsToAge = 31; // error! can't change value pointed to
pointsToAge = & dogsAge ; // ok! can change pointer value
cout << "*pointsToAge = " << * pointsToAge << endl ;
return 0 ;
}
#include <iostream>
using namespace std ;
int main ()
{
int age = 30 ;
int dogsAge = 9 ;
const int * const pointsToAge = & age ;
cout << "*pointsToAge = " << * pointsToAge << endl ;
// *pointsToAge = 31; // error! can't change value pointed to
// pointsToAge = &dogsAge; // error! can't change pointer value
return 0 ;
}
指针传递给函数 需要提前规定好 函数内部可以修改哪些值,不可以修改哪些值 。
#include <iostream>
using namespace std ;
void CalcArea ( const double * const ptrPi , // const pointer to const data
const double * const ptrRadius , // i.e. no changes allowed
double * const ptrArea ) // can change data pointed to,but not pointer
{
// check pointers for validity before using!
if ( ptrPi && ptrRadius && ptrArea )
* ptrArea = ( * ptrPi ) * ( * ptrRadius ) * ( * ptrRadius );
}
int main ()
{
const double Pi = 3.1416 ;
cout << "Enter radius of circle: " ;
double radius = 0 ;
cin >> radius ;
double area = 0 ;
CalcArea ( & Pi , & radius , & area );
cout << "Area is = " << area << endl ;
return 0 ;
}
使用new的内存分配请求可能失败 为防止报错,此时使用 try-catch 或者使用 new(nothrow) ,它在分配内存失败时返回 NULL 。也不会报错退出。
#include <iostream>
using namespace std ;
// remove the try-catch block to see this application crash
int main ()
{
try
{
// Request a LOT of memory!
int * pointsToManyNums = new int [ 0x1fffffff ];
// Use the allocated memory
delete [] pointsToManyNums ;
}
catch ( bad_alloc )
{
cout << "Memory allocation failed. Ending program" << endl ;
}
return 0 ;
}
#include <iostream>
using namespace std ;
int main ()
{
// Request LOTS of memory space, use nothrow
int * pointsToManyNums = new ( nothrow ) int [ 0x1fffffff ];
if ( pointsToManyNums ) // check pointsToManyNums != NULL
{
// Use the allocated memory
delete [] pointsToManyNums ;
}
else
cout << "Memory allocation failed. Ending program" << endl ;
return 0 ;
}
引用&是变量的别名 引用是变量的别名。声明引用时,需要将其初始化为一个变量,因此引用只是另一种访问相应变量存储的数据的方式。
#include <iostream>
using namespace std ;
int main ()
{
int original = 30 ;
cout << "original = " << original << endl ;
cout << "original is at address: " << hex << & original << endl ;
int & ref1 = original ;
cout << "ref1 is at address: " << hex << & ref1 << endl ;
int & ref2 = ref1 ;
cout << "ref2 is at address: " << hex << & ref2 << endl ;
cout << "Therefore, ref2 = " << dec << ref2 << endl ;
return 0 ;
}
他们指向同一个地址。
引用的用处 函数参数,如果在合适的时机,按引用传递,可以省去变量复制的步骤,优化性能。
#include <iostream>
using namespace std ;
void GetSquare ( int & number )
{
number *= number ;
}
int main ()
{
cout << "Enter a number you wish to square: " ;
int number = 0 ;
cin >> number ;
GetSquare ( number );
cout << "Square is: " << number << endl ;
return 0 ;
}
const用于引用 通过引用可以修改变量的值。可能需要禁止通过引用修改它指向的变量的值,为此可在声明引用时使用关键字 const。
int original = 30 ;
const int & constRef = original ;
constRef = 40 ; // Not allowed: constRef can’t change value in original
int & ref2 = constRef ; // Not allowed: ref2 is not const
const int & constRef2 = constRef ; // OK
结合上一个,传参时,使用const引用,又可以避免复制,又可以确保函数体中,不可以修改按引用传进去的变量的值
声明和使用类 #include <iostream>
#include <string>
using namespace std ;
class Human
{
public:
string name ;
int age ;
void IntroduceSelf ()
{
cout << "I am " + name << " and am " ;
cout << age << " years old" << endl ;
}
};
int main ()
{
// An object of class Human with attribute name as "Adam"
Human firstMan ;
firstMan . name = "Adam" ;
firstMan . age = 30 ;
// An object of class Human with attribute name as "Eve"
Human firstWoman ;
firstWoman . name = "Eve" ;
firstWoman . age = 28 ;
firstMan . IntroduceSelf ();
firstWoman . IntroduceSelf ();
}
使用指针运算符访问成员 如果对象是使用 new 在自由存储区中实例化的,或者有指向对象的指针,则可使用指针运算符 -> 来访问成员属性和方法:
Human * firstWoman = new Human ();
firstWoman -> dateOfBirth = "1970" ;
firstWoman -> IntroduceSelf ();
delete firstWoman ;
类中的变量和函数,如果未标明,默认都为 private ,外部不可以访问 默认构造函数:不用传参的构造函数,并非仅指无参构造函数。
构造函数可以重载,也可以设置成必须要初始化参数,还可以带默认参数 带初始化列表的构造函数。
写法如下:
#include <iostream>
#include <string>
using namespace std ;
class Human
{
private:
int age ;
string name ;
public:
Human ( string humansName = "Adam" , int humansAge = 25 )
: name ( humansName ), age ( humansAge )
{
cout << "Constructed a human called " << name ;
cout << ", " << age << " years old" << endl ;
}
};
int main ()
{
Human adam ;
Human eve ( "Eve" , 18 );
return 0 ;
}
析构函数 用于回收资源,当类中有动态申请内存的操作时,一般需要设计析构函数,在类销毁时释放内存,声明为 ~ClassName() {}
#include <iostream>
#include <string.h>
using namespace std ;
class MyString
{
private:
char * buffer ;
public:
MyString ( const char * initString ) // constructor
{
if ( initString != NULL )
{
buffer = new char [ strlen ( initString ) + 1 ];
strcpy ( buffer , initString );
}
else
buffer = NULL ;
}
~ MyString ()
{
cout << "Invoking destructor, clearing up" << endl ;
if ( buffer != NULL )
delete [] buffer ;
}
int GetLength ()
{
return strlen ( buffer );
}
const char * GetString ()
{
return buffer ;
}
};
int main ()
{
MyString sayHello ( "Hello from String Class" );
cout << "String buffer in sayHello is " << sayHello . GetLength ();
cout << " characters long" << endl ;
cout << "Buffer contains: " << sayHello . GetString () << endl ;
}
类的浅复制的问题 把类当作参数传递给函数时,使用值传递模式,其会被复制。
如果其内部有指针指向的new出来的缓冲区,复制时会复制指针成员,但是不会复制一份缓冲区,在函数结束时,回收这个复制出来的类对象,删除掉了缓冲区,导致外部的类指向无效的内存地址。在外部类生命周期完结时,delete无效内存会报错。
#include <iostream>
#include <string.h>
using namespace std ;
class MyString
{
private:
char * buffer ;
public:
MyString ( const char * initString ) // Constructor
{
buffer = NULL ;
if ( initString != NULL )
{
buffer = new char [ strlen ( initString ) + 1 ];
strcpy ( buffer , initString );
}
}
~ MyString () // Destructor
{
cout << "Invoking destructor, clearing up" << endl ;
delete [] buffer ;
}
int GetLength ()
{ return strlen ( buffer ); }
const char * GetString ()
{ return buffer ; }
};
void UseMyString ( MyString str )
{
cout << "String buffer in MyString is " << str . GetLength ();
cout << " characters long" << endl ;
cout << "buffer contains: " << str . GetString () << endl ;
return ;
}
int main ()
{
MyString sayHello ( "Hello from String Class" );
UseMyString ( sayHello );
return 0 ;
}
/**
String buffer in MyString is 23 characters long
buffer contains: Hello from String Class
Invoking destructor, clearing up
Invoking destructor, clearing up
<crash as seen in Figure 9.2>
*/
复制构造函数 一个专门的用于复制流程的构造函数,当通过 = 传递来复制类,或者当作函数参数来复制时。编译器会自动调用这个构造函数来生成一个新的对象。
默认格式为,传入一个 const引用 的构造函数,借用这个外部对象的数据来重新构造一个新的复制对象。
#include <iostream>
#include <string.h>
using namespace std ;
class MyString
{
private:
char * buffer ;
public:
MyString () {}
MyString ( const char * initString ) // constructor
{
buffer = NULL ;
cout << "Default constructor: creating new MyString" << endl ;
if ( initString != NULL )
{
buffer = new char [ strlen ( initString ) + 1 ];
strcpy ( buffer , initString );
cout << "buffer points to: 0x" << hex ;
cout << ( unsigned int * ) buffer << endl ;
}
}
MyString ( const MyString & copySource ) // Copy constructor
{
buffer = NULL ;
cout << "Copy constructor: copying from MyString" << endl ;
if ( copySource . buffer != NULL )
{
// allocate own buffer
buffer = new char [ strlen ( copySource . buffer ) + 1 ];
// deep copy from the source into local buffer
strcpy ( buffer , copySource . buffer );
cout << "buffer points to: 0x" << hex ;
cout << ( unsigned int * ) buffer << endl ;
}
}
MyString operator + ( const MyString & addThis )
{
MyString newString ;
if ( addThis . buffer != NULL )
{
newString . buffer = new char [ GetLength () + strlen ( addThis . buffer ) + 1 ];
strcpy ( newString . buffer , buffer );
strcat ( newString . buffer , addThis . buffer );
}
return newString ;
}
// Destructor
~ MyString ()
{
cout << "Invoking destructor, clearing up" << endl ;
delete [] buffer ;
}
int GetLength ()
{ return strlen ( buffer ); }
const char * GetString ()
{ return buffer ; }
};
void UseMyString ( MyString str )
{
cout << "String buffer in MyString is " << str . GetLength ();
cout << " characters long" << endl ;
cout << "buffer contains: " << str . GetString () << endl ;
return ;
}
int main ()
{
MyString sayHello ( "Hello from String Class" );
UseMyString ( sayHello );
return 0 ;
}
将复制构造函数和 = 运算符覆写成私有的 这个类不允许复制操作,编译时就会提示。
单例类 进一步将构造函数设置私有,提供一个static函数,返回一个static对象的引用,就是一个单例类,禁止复制,赋值,创建多实例。static对象只会创建一次,全局均可访问。所有的地方调用的都是这同一个实例。
#include <iostream>
#include <string>
using namespace std ;
class President
{
private:
President () {}; // private default constructor
President ( const President & ); // private copy constructor
const President & operator = ( const President & ); // assignment operator
string name ;
public:
static President & GetInstance ()
{
// static objects are constructed only once
static President onlyInstance ;
return onlyInstance ;
}
string GetName ()
{ return name ; }
void SetName ( string InputName )
{ name = InputName ; }
};
int main ()
{
President & onlyPresident = President :: GetInstance ();
onlyPresident . SetName ( "Abraham Lincoln" );
// uncomment lines to see how compile failures prohibit duplicates
// President second; // cannot access constructor
// President* third= new President(); // cannot access constructor
// President fourth = onlyPresident; // cannot access copy constructor
// onlyPresident = President::GetInstance(); // cannot access operator=
cout << "The name of the President is: " ;
cout << President :: GetInstance (). GetName () << endl ;
return 0 ;
}
将析构函数设为私有,就禁止在栈中实例化 只能通过 new 关键字,在自由存储区实例化
#include <iostream>
using namespace std ;
class MonsterDB
{
private:
~ MonsterDB () {}; // private destructor prevents instances on stack
public:
static void DestroyInstance ( MonsterDB * pInstance )
{
delete pInstance ; // member can invoke private destructor
}
void DoSomething () {} // sample member method
};
int main ()
{
MonsterDB * myDB = new MonsterDB (); // on heap
myDB -> DoSomething ();
// uncomment next line to see compile failure
// delete myDB; // private destructor cannot be invoked
// use static member to release memory
MonsterDB :: DestroyInstance ( myDB );
return 0 ;
}
隐式转换和预防 Human类构造函数接受一个int类型作为参数。
这样的转换构造函数让您能够执行隐式转换:
Human anotherKid = 11 ; // int converted to Human
DoSomething ( 10 ); // 10 converted to Human!
函数 DoSomething(Human person)被声明为接受一个 Human(而不是 int)参数!前面的代码为何可行呢?这是因为编译器知道 Human 类包含一个将整数作为参数的构造函数,进而替您执行了隐式转换:将您提供的整数作为参数发送给这个构造函数,从而创建一个Human 对象。
使用 explicit 关键字避免隐式转换:
#include <iostream>
using namespace std ;
class Human
{
int age ;
public:
// explicit constructor blocks implicit conversions
explicit Human ( int humansAge ) : age ( humansAge ) {}
};
void DoSomething ( Human person )
{
cout << "Human sent did something" << endl ;
return ;
}
int main ()
{
Human kid ( 10 ); // explicit converion is OK
Human anotherKid = Human ( 11 ); // explicit, OK
DoSomething ( kid ); // OK
// Human anotherKid = 11; // failure: implicit conversion not OK
// DoSomething(10); // implicit conversion
return 0 ;
}
this指针 当您在类成员方法中调用其他成员方法时,编译器将隐式地传递 this 指针—函数调用中不可见的参数:
class Human
{
private:
void Talk ( string Statement )
{
cout << Statement ;
}
public:
void IntroduceSelf ()
{
Talk ( "Bla bla" ); // same as Talk(this, "Bla Bla")
}
};
在这里,方法 IntroduceSelf( )使用私有成员 Talk( )在屏幕上显示一句话。实际上,编译器将在调用Talk 时嵌入 this 指针,即:
sizeof()用于类 在这种情况下,它将指出类声明中所有数据属性占用的总内存量,单位为字节。 sizeof() 可能对某些属性进行填充,使其与字边界对齐,也可能不这样做,这取决于您使用的编译器。
友元类和友元函数 可以访问类的私有private的属性和方法
#include <iostream>
#include <string>
using namespace std ;
class Human
{
private:
friend void DisplayAge ( const Human & person );
string name ;
int age ;
public:
Human ( string humansName , int humansAge )
{
name = humansName ;
age = humansAge ;
}
};
void DisplayAge ( const Human & person )
{
cout << person . age << endl ;
}
int main ()
{
Human firstMan ( "Adam" , 25 );
cout << "Accessing private member age via friend function: " ;
DisplayAge ( firstMan );
return 0 ;
} # include < iostream >
#include <string>
using namespace std ;
class Human
{
private:
friend class Utility ;
string name ;
int age ;
public:
Human ( string humansName , int humansAge )
{
name = humansName ;
age = humansAge ;
}
};
class Utility
{
public:
static void DisplayAge ( const Human & person )
{
cout << person . age << endl ;
}
};
int main ()
{
Human firstMan ( "Adam" , 25 );
cout << "Accessing private member age via friend class: " ;
Utility :: DisplayAge ( firstMan );
return 0 ;
}
盲猜用于共同实现某一功能的两个模块,比如混动车的燃油发动机给电动机供电。
struct结构体,和类类似,属性默认为公开 关键字 struct 来自 C 语言,在 C++编译器看来,它与类及其相似,差别在于程序员未指定时,默认的访问限定符(public 和 private)不同。因此,除非指定了,否则结构中的成员默认为公有的(而类成员默认为私有的);另外,除非指定了,否则结构以公有方式继承基结构(而类为私有继承)。
union共用体 共用体是一种特殊的类,每次只有一个非静态数据成员处于活动状态。因此,共用体与类一样,可包含多个数据成员,但不同的是只能使用其中的一个。
与结构类似,共用体的成员默认也是公有的,但不同的是,共用体不能继承。另外,将 sizeof() 用于共用体时,结果总是为共用体最大成员的长度,即便该成员并不处于活动状态。
常见使用场景
#include <iostream>
using namespace std ;
union SimpleUnion
{
int num ;
char alphabet ;
};
struct ComplexType
{
enum DataType
{
Int ,
Char
} Type ;
union Value
{
int num ;
char alphabet ;
Value () {}
~ Value () {}
} value ;
};
void DisplayComplexType ( const ComplexType & obj )
{
switch ( obj . Type )
{
case ComplexType :: Int :
cout << "Union contains number: " << obj . value . num << endl ;
break ;
case ComplexType :: Char :
cout << "Union contains character: " << obj . value . alphabet << endl ;
break ;
}
}
int main ()
{
SimpleUnion u1 , u2 ;
u1 . num = 2100 ;
u2 . alphabet = 'C' ;
// Alternative using aggregate initialization:
// SimpleUnion u1{ 2100 }, u2{ 'C' }; // Note that 'C' still initializes first / int member
cout << "sizeof(u1) containing integer: " << sizeof ( u1 ) << endl ;
cout << "sizeof(u2) containing character: " << sizeof ( u2 ) << endl ;
ComplexType myData1 , myData2 ;
myData1 . Type = ComplexType :: Int ;
myData1 . value . num = 2017 ;
myData2 . Type = ComplexType :: Char ;
myData2 . value . alphabet = 'X' ;
DisplayComplexType ( myData1 );
DisplayComplexType ( myData2 );
return 0 ;
}
/**
sizeof(u1) containing integer: 4
sizeof(u2) containing character: 4
Union contains number: 2017
Union contains character: X
*/
换句话说,这个结构使用枚举来存储信息类型,并使用共用体来存储实际值。这是共用体的一种常见用法,例如,在 Windows 应用程序编程中常用的结构 VARIANT 就以这样的方式使用了共用体.
聚合初始化 #include <iostream>
#include <string>
using namespace std ;
class Aggregate1
{
public:
int num ;
double pi ;
};
struct Aggregate2
{
char hello [ 6 ];
int impYears [ 3 ];
string world ;
};
int main ()
{
int myNums [] = { 9 , 5 , - 1 }; // myNums is int[3]
Aggregate1 a1 { 2017 , 3.14 };
cout << "Pi is approximately: " << a1 . pi << endl ;
Aggregate2 a2 { { 'h' , 'e' , 'l' , 'l' , 'o' }, { 2011 , 2014 , 2017 }, "world" };
// Alternatively
Aggregate2 a2_2 { 'h' , 'e' , 'l' , 'l' , 'o' , '\0' , 2011 , 2014 , 2017 , "world" };
cout << a2 . hello << ' ' << a2 . world << endl ;
cout << "C++ standard update scheduled in: " << a2 . impYears [ 2 ] << endl ;
return 0 ;
}
constexpr还可以用于类的构造函数和成员函数,编译器会尽可能将其视为常量处理 #include <iostream>
using namespace std ;
class Human
{
int age ;
public:
constexpr Human ( int humansAge ) : age ( humansAge ) {}
constexpr int GetAge () const { return age ; }
};
int main ()
{
constexpr Human somePerson ( 15 );
const int hisAge = somePerson . GetAge ();
Human anotherPerson ( 45 ); // not constant expression
return 0 ;
}
最简单的继承 #include <iostream>
using namespace std ;
class Fish
{
public:
bool isFreshWaterFish ;
void Swim ()
{
if ( isFreshWaterFish )
cout << "Swims in lake" << endl ;
else
cout << "Swims in sea" << endl ;
}
};
class Tuna : public Fish
{
public:
Tuna ()
{
isFreshWaterFish = false ;
}
};
class Carp : public Fish
{
public:
Carp ()
{
isFreshWaterFish = true ;
}
};
int main ()
{
Carp myLunch ;
Tuna myDinner ;
cout << "Getting my food to swim" << endl ;
cout << "Lunch: " ;
myLunch . Swim ();
cout << "Dinner: " ;
myDinner . Swim ();
return 0 ;
}
基类使用protected关键字,该成员只有子类和友元中可以访问,外部不可以访问 基类构造器可以带参数,子类构造器必须一起初始化基类的构造器
#include <iostream>
using namespace std ;
class Fish
{
protected:
bool isFreshWaterFish ; // accessible only to derived classes
public:
// Fish constructor
Fish ( bool isFreshWater ) : isFreshWaterFish ( isFreshWater ){}
void Swim ()
{
if ( isFreshWaterFish )
cout << "Swims in lake" << endl ;
else
cout << "Swims in sea" << endl ;
}
};
class Tuna : public Fish
{
public:
Tuna () : Fish ( false ) {}
};
class Carp : public Fish
{
public:
Carp () : Fish ( true ) {}
};
int main ()
{
Carp myLunch ;
Tuna myDinner ;
cout << "Getting my food to swim" << endl ;
cout << "Lunch: " ;
myLunch . Swim ();
cout << "Dinner: " ;
myDinner . Swim ();
return 0 ;
}
基类属性和方法的覆写 如果派生类实现了从基类继承的函数,且返回值和特征标相同,就相当于覆盖了基类的这个方法。
如果基类的方法是public的,外部可以通过域解析运算符::来调用基类方法。 myDinner.Fish::Swim(); // invokes Fish::Swim() using instance of Tuna在子类中,同样用上述方法来调用。
隐藏基类方法 基类中有同名的重载方法时,子类覆写其中一个,子类中会对外隐藏所有的同名方法。
#include <iostream>
using namespace std ;
class Fish
{
public:
void Swim ()
{
cout << "Fish swims... !" << endl ;
}
void Swim ( bool isFreshWaterFish )
{
if ( isFreshWaterFish )
cout << "Swims in lake" << endl ;
else
cout << "Swims in sea" << endl ;
}
};
class Tuna : public Fish
{
public:
void Swim ( bool isFreshWaterFish )
{
Fish :: Swim ( isFreshWaterFish );
}
void Swim ()
{
cout << "Tuna swims real fast" << endl ;
}
};
int main ()
{
Tuna myDinner ;
cout << "Getting my food to swim" << endl ;
myDinner . Swim ( false ); //failure: Tuna::Swim() hides Fish::Swim(bool)
myDinner . Swim ();
return 0 ;
}
要想解除隐藏,外部可以通过域解析运算符直接调用到基类的方法。或者在子类中使用using解除对基类方法的隐藏。
class Tuna : public Fish
{
public:
using Fish :: Swim ; // unhide all Swim() methods in class Fish
void Swim ()
{
cout << "Tuna swims real fast" << endl ;
}
};
构造和析构顺序 构造时先构造基类部分,再构造子类部分。
析构时先调用子类的,再调用基类的。
class Car:private Motor私有继承 只有子类可以访问基类中的属性,方法,外部不可以调用基类方法。也不可以通过域解析运算符访问。
私有继承时,子类的子类同样不可以访问基类的方法。例如RaceCar继承自Car,它也访问不了Motor
protected保护继承 同样屏蔽了外部访问,但是使用保护继承的子类的子类可以访问到基类的属性,方法。
仅当必要时才使用私有或保护继承。
对于大多数使用私有继承的情形(如 Car 和 Motor 之间的私有继承),更好的选择是,将基类对象作为派生类的一个成员属性。通过继承 Motor 类,相当于对 Car 类进行了限制,使其只能有一台发动机,同时,相比于将 Motor 对象作为私有成员,没有任何好处可言。汽车在不断发展,例如,混合动力车除电力发动机外,还有一台汽油发动机。在这种情况下,让 Car 类继承 Motor 类将成为兼容性瓶颈。
class Car
{
private:
Motor heartOfCar ;
public:
void Move ()
{
heartOfCar . SwitchIgnition ();
heartOfCar . PumpFuel ();
heartOfCar . FireCylinders ();
}
};
切除问题 一个方法接受一个基类参数,但是传递一个子类对象过去,这时候,复制机制只会复制基类部分,子类的部分将被切除。
可以同时继承多个基类 使用final关键字禁止继承,表示其为最终的子类 多态 上面的切除问题可以使用多态的特性来规避。让我们可以用类似的方式处理不同类型的对象。
将基类的方法声明为虚函数,可以确保编译器调用子类中的覆写方法。
下面的例子中,子类中的方法声明为:virtual void Swim()
#include <iostream>
using namespace std ;
class Fish
{
public:
virtual void Swim ()
{
cout << "Fish swims!" << endl ;
}
};
class Tuna : public Fish
{
public:
// override Fish::Swim
void Swim ()
{
cout << "Tuna swims!" << endl ;
}
};
class Carp : public Fish
{
public:
// override Fish::Swim
void Swim ()
{
cout << "Carp swims!" << endl ;
}
};
void MakeFishSwim ( Fish & InputFish )
{
// calling Swim
InputFish . Swim ();
}
int main ()
{
Tuna myDinner ;
Carp myLunch ;
// sending Tuna as Fish
MakeFishSwim ( myDinner );
// sending Carp as Fish
MakeFishSwim ( myLunch );
return 0 ;
}
/**
Tuna swims!
Carp swims!
*/
因为存在覆盖版本 Tuna::Swim() 和 Carp::Swim() ,它们优先于被声明为虚函数的 Fish::Swim() 。这很重要,它意味着在 MakeFishSwim() 中,可通过 Fish& 参数调用派生类定义的 Swim() ,而无需知道该参数指向的是哪种类型的对象。
这就是多态:将派生类对象视为基类对象,并执行派生类的 Swim() 实现。
类似的,析构函数也需要声明为虚析构函数 将子类指针当作基类指针传递参数时,函数体内调用删除方法,删除时只会调用基类的析构函数,子类的部分将不会回收,将造成内存泄漏。
将基类的析构函数声明为 vitual 的,再使用基类指针删除时,将确保调用到子类的析构函数。
#include <iostream>
using namespace std ;
class Fish
{
public:
Fish ()
{
cout << "Constructed Fish" << endl ;
}
virtual ~ Fish () // virtual destructor!
{
cout << "Destroyed Fish" << endl ;
}
};
class Tuna : public Fish
{
public:
Tuna ()
{
cout << "Constructed Tuna" << endl ;
}
~ Tuna ()
{
cout << "Destroyed Tuna" << endl ;
}
};
void DeleteFishMemory ( Fish * pFish )
{
delete pFish ;
}
int main ()
{
cout << "Allocating a Tuna on the free store:" << endl ;
Tuna * pTuna = new Tuna ;
cout << "Deleting the Tuna: " << endl ;
DeleteFishMemory ( pTuna );
cout << "Instantiating a Tuna on the stack:" << endl ;
Tuna myDinner ;
cout << "Automatic destruction as it goes out of scope: " << endl ;
return 0 ;
}
虚函数表 编译器将为实现了虚函数的基类和覆盖了虚函数的派生类分别创建一个虚函数表(VirtualFunction Table,VFT)。换句话说,Base 和 Derived 类都将有自己的虚函数表。实例化这些类的对象时,将创建一个隐藏的指针(我们称之为 VFT*),它指向相应的 VFT。可将 VFT 视为一个包含函数指针的静态数组,其中每个指针都指向相应的虚函数。
子类覆写了基类的某些虚函数时,子类的虚函数表的函数指针将指向子类自己的函数实现。
对于未覆写的基类函数,虚函数表中的函数指针会指向基类的函数。
外部调用时,就通过虚函数表来查找到底该调用的子类方法还是基类方法。
有纯虚函数的类可以称为抽象基类 纯虚函数定义:virtual void Swim() = 0;
子类继承了抽象基类,则必须覆写其定义的纯虚函数。
#include <iostream>
using namespace std ;
class Fish
{
public:
// define a pure virtual function Swim
virtual void Swim () = 0 ;
};
class Tuna : public Fish
{
public:
void Swim ()
{
cout << "Tuna swims fast in the sea!" << endl ;
}
};
class Carp : public Fish
{
void Swim ()
{
cout << "Carp swims slow in the lake!" << endl ;
}
};
void MakeFishSwim ( Fish & inputFish )
{
inputFish . Swim ();
}
int main ()
{
// Fish myFish; // Fails, cannot instantiate an ABC
Carp myLunch ;
Tuna myDinner ;
MakeFishSwim ( myLunch );
MakeFishSwim ( myDinner );
return 0 ;
}
虚继承解决菱形问题 鸭嘴兽具备哺乳动物、鸟类和爬行动物的特征,这意味着 Platypus 类需要继承Mammal、Bird 和 Reptile。然而,这些类都从同一个类—Animal 派生而来。全部使用常规继承方式,将创建三个animal的实例,甚至可以分别设置每一个的age属性。
当派生类可能用作基类时,使用vitual虚继承是更好的选择。这样当一个类继承多个从相同基类衍生而来的类时,只创建一个基类实例。
#include <iostream>
using namespace std ;
class Animal
{
public:
Animal ()
{
cout << "Animal constructor" << endl ;
}
// sample member
int age ;
};
class Mammal : public virtual Animal
{
};
class Bird : public virtual Animal
{
};
class Reptile : public virtual Animal
{
};
class Platypus final : public Mammal , public Bird , public Reptile
{
public:
Platypus ()
{
cout << "Platypus constructor" << endl ;
}
};
int main ()
{
Platypus duckBilledP ;
// no compile error as there is only one Animal::age
duckBilledP . age = 25 ;
return 0 ;
}
/**
Animal constructor
Platypus constructor
*/
C++关键字 virtual 的含义随上下文而异(我想这样做的目的很可能是为了省事),对其含义总结如下:
在函数声明中,virtual 意味着当基类指针指向派生对象时,通过它可调用派生类的相应函数。 从 Base 类派生出 Derived1 和 Derived2 类时,如果使用了关键字 virtual,则意味着再从Derived1 和 Derived2 派生出 Derived3 时,每个 Derived3 实例只包含一个 Base 实例。 也就是说,关键字 virtual 被用于实现两个不同的概念。
override关键字 子类中覆写基类方法时,通过override关键字,检查基类中对应的方法是否声明了虚函数,防止标记错误导致覆写失败。好的编程习惯是每个子类覆写函数后都加入override标记。
虚复制构造函数 不可能实现虚复制构造函数,因为在基类方法声明中使用关键字 virtual 时,表示它将被派生类的实现覆盖,这种多态行为是在运行阶段实现的。而构造函数只能创建固定类型的对象,不具备多态性,因此 C++不允许使用虚复制构造函数。
可以通过自己基类定义虚函数,并在子类实现,一个专门的Clone函数,外部来显式调用,定义返回一个基类指针类型,传入子类指针。就可以让返回的基类指针在调用方法时表现为子类的特性。
#include <iostream>
using namespace std ;
class Fish
{
public:
virtual Fish * Clone () = 0 ;
virtual void Swim () = 0 ;
virtual ~ Fish () {};
};
class Tuna : public Fish
{
public:
Fish * Clone () override
{
return new Tuna ( * this );
}
void Swim () override final
{
cout << "Tuna swims fast in the sea" << endl ;
}
};
class BluefinTuna final : public Tuna
{
public:
Fish * Clone () override
{
return new BluefinTuna ( * this );
}
// Cannot override Tuna::Swim as it is "final" in Tuna
};
class Carp final : public Fish
{
Fish * Clone () override
{
return new Carp ( * this );
}
void Swim () override final
{
cout << "Carp swims slow in the lake" << endl ;
}
};
int main ()
{
const int ARRAY_SIZE = 4 ;
Fish * myFishes [ ARRAY_SIZE ] = { NULL };
myFishes [ 0 ] = new Tuna ();
myFishes [ 1 ] = new Carp ();
myFishes [ 2 ] = new BluefinTuna ();
myFishes [ 3 ] = new Carp ();
Fish * myNewFishes [ ARRAY_SIZE ];
for ( int index = 0 ; index < ARRAY_SIZE ; ++ index )
myNewFishes [ index ] = myFishes [ index ] -> Clone ();
// invoke a virtual method to check
for ( int index = 0 ; index < ARRAY_SIZE ; ++ index )
myNewFishes [ index ] -> Swim ();
// memory cleanup
for ( int index = 0 ; index < ARRAY_SIZE ; ++ index )
{
delete myFishes [ index ];
delete myNewFishes [ index ];
}
return 0 ;
}
对类使用单目运算符 在类中定义:
return_type operator operator_symbol (... parameter list ...);
比如将Date类实现++运算操作。
// also contains postfix increment and decrement
#include <iostream>
using namespace std ;
class Date
{
private:
int day , month , year ;
public:
Date ( int inMonth , int inDay , int inYear )
: month ( inMonth ), day ( inDay ), year ( inYear ) {};
Date & operator ++ () // prefix increment
{
++ day ;
return * this ;
}
Date & operator -- () // prefix decrement
{
-- day ;
return * this ;
}
Date operator ++ ( int ) // postfix increment
{
Date copy ( month , day , year );
++ day ;
return copy ;
}
Date operator -- ( int ) // postfix decrement
{
Date copy ( month , day , year );
-- day ;
return copy ;
}
void DisplayDate ()
{
cout << month << " / " << day << " / " << year << endl ;
}
};
int main ()
{
Date holiday ( 12 , 25 , 2016 ); // Dec 25, 2016
cout << "The date object is initialized to: " ;
holiday . DisplayDate ();
++ holiday ; // move date ahead by a day
cout << "Date after prefix-increment is: " ;
holiday . DisplayDate ();
-- holiday ; // move date backwards by a day
cout << "Date after a prefix-decrement is: " ;
holiday . DisplayDate ();
return 0 ;
}
转换运算符 operator const char * ()
{
// operator implementation that returns a char*
}
在外部希望这个类以const char*的类型使用时,比如cout « date。可以类比java里的toString。
#include <iostream>
#include <sstream> // new include for ostringstream
#include <string>
using namespace std ;
class Date
{
private:
int day , month , year ;
string dateInString ;
public:
Date ( int inMonth , int inDay , int inYear )
: month ( inMonth ), day ( inDay ), year ( inYear ) {};
operator const char * ()
{
ostringstream formattedDate ; // assists easy string construction
formattedDate << month << " / " << day << " / " << year ;
dateInString = formattedDate . str ();
return dateInString . c_str ();
}
};
int main ()
{
Date Holiday ( 12 , 25 , 2016 );
cout << "Holiday is on: " << Holiday << endl ;
// string strHoliday (Holiday); // OK!
// strHoliday = Date(11, 11, 2016); // also OK!
return 0 ;
}
智能指针初体验 #include <iostream>
#include <memory> // new include to use unique_ptr
using namespace std ;
class Date
{
private:
int day , month , year ;
string dateInString ;
public:
Date ( int inMonth , int inDay , int inYear )
: month ( inMonth ), day ( inDay ), year ( inYear ) {};
void DisplayDate ()
{
cout << month << " / " << day << " / " << year << endl ;
}
};
int main ()
{
unique_ptr < int > smartIntPtr ( new int );
* smartIntPtr = 42 ;
// Use smart pointer type like an int*
cout << "Integer value is: " << * smartIntPtr << endl ;
unique_ptr < Date > smartHoliday ( new Date ( 12 , 25 , 2016 ));
cout << "The new instance of date contains: " ;
// use smartHoliday just as you would a Date*
smartHoliday -> DisplayDate ();
return 0 ;
}
这个示例表明,可像使用普通指针那样使用智能指针,如第 23 和 32 行所示。第 23 行使用了smartIntPtr 来显示指向的 int 值,而第 32 行使用了 smartHoliday->DisplayData(),就像这两个变量的类型分别是 int 和 Date。其中的秘诀在于,智能指针类 std::unique_ptr 实现了运算符 和->
类实现双目加减法 #include <iostream>
using namespace std ;
class Date
{
private:
int day , month , year ;
string dateInString ;
public:
Date ( int inMonth , int inDay , int inYear )
: month ( inMonth ), day ( inDay ), year ( inYear ) {};
Date operator + ( int daysToAdd ) // binary addition
{
Date newDate ( month , day + daysToAdd , year );
return newDate ;
}
Date operator - ( int daysToSub ) // binary subtraction
{
return Date ( month , day - daysToSub , year );
}
void DisplayDate ()
{
cout << month << " / " << day << " / " << year << endl ;
}
};
int main ()
{
Date Holiday ( 12 , 25 , 2016 );
cout << "Holiday on: " ;
Holiday . DisplayDate ();
Date PreviousHoliday ( Holiday - 19 );
cout << "Previous holiday on: " ;
PreviousHoliday . DisplayDate ();
Date NextHoliday ( Holiday + 6 );
cout << "Next holiday on: " ;
NextHoliday . DisplayDate ();
return 0 ;
}
字符串使用+拼接 优化MyString类: 定义运算符+
MyString operator + ( const MyString & addThis )
{
MyString newString ;
if ( addThis . buffer != NULL )
{
newString . buffer = new char [ GetLength () + strlen ( addThis . buffer ) + 1 ];
strcpy ( newString . buffer , buffer );
strcat ( newString . buffer , addThis . buffer );
}
return newString ;
}
重载==和!=运算符 定义这两个运算符之前,编译器会直接比较二进制数据,简单对象可以正常返回正确结果。但是如果有char* 等指针数据,我们需要比较的是其指向的数据,而不是指针成员的地址值。
#include <iostream>
using namespace std ;
class Date
{
private:
int day , month , year ;
public:
Date ( int inMonth , int inDay , int inYear )
: month ( inMonth ), day ( inDay ), year ( inYear ) {}
bool operator == ( const Date & compareTo )
{
return (( day == compareTo . day )
&& ( month == compareTo . month )
&& ( year == compareTo . year ));
}
bool operator != ( const Date & compareTo )
{
return ! ( this -> operator == ( compareTo ));
}
void DisplayDate ()
{
cout << month << " / " << day << " / " << year << endl ;
}
};
int main ()
{
Date holiday1 ( 12 , 25 , 2016 );
Date holiday2 ( 12 , 31 , 2016 );
cout << "holiday 1 is: " ;
holiday1 . DisplayDate ();
cout << "holiday 2 is: " ;
holiday2 . DisplayDate ();
if ( holiday1 == holiday2 )
cout << "Equality operator: The two are on the same day" << endl ;
else
cout << "Equality operator: The two are on different days" << endl ;
if ( holiday1 != holiday2 )
cout << "Inequality operator: The two are on different days" << endl ;
else
cout << "Inequality operator: The two are on the same day" << endl ;
return 0 ;
}
/**
holiday 1 is: 12 / 25 / 2016
holiday 2 is: 12 / 31 / 2016
Equality operator: The two are on different days
Inequality operator: The two are on different days
*/
小于(<)、大于(>)、小于等于(<=)和大于等于(>=)运算符大致同上 覆写,并指定自己的一套比较标准,返回结果即可。
复制赋值运算符= 复制构造函数是通过复制场景来创建一个类时调用,这个是将一个类通过复制运算符赋给另一个类时使用。
需要清空当前类里需要覆盖的部分,使用新值。
#include <iostream>
#include <string.h>
using namespace std ;
class MyString
{
private:
char * buffer ;
public:
MyString ( const char * initialInput )
{
if ( initialInput != NULL )
{
buffer = new char [ strlen ( initialInput ) + 1 ];
strcpy ( buffer , initialInput );
}
else
buffer = NULL ;
}
// Copy assignment operator
MyString & operator = ( const MyString & CopySource )
{
if (( this != & CopySource ) && ( CopySource . buffer != NULL ))
{
if ( buffer != NULL )
delete [] buffer ;
// ensure deep copy by first allocating own buffer
buffer = new char [ strlen ( CopySource . buffer ) + 1 ];
// copy from the source into local buffer
strcpy ( buffer , CopySource . buffer );
}
return * this ;
}
operator const char * ()
{
return buffer ;
}
~ MyString ()
{
delete [] buffer ;
}
MyString ( const MyString & CopySource )
{
cout << "Copy constructor: copying from MyString" << endl ;
if ( CopySource . buffer != NULL )
{
// ensure deep copy by first allocating own buffer
buffer = new char [ strlen ( CopySource . buffer ) + 1 ];
// copy from the source into local buffer
strcpy ( buffer , CopySource . buffer );
}
else
buffer = NULL ;
}
};
int main ()
{
MyString string1 ( "Hello " );
MyString string2 ( " World" );
cout << "Before assignment: " << endl ;
cout << string1 << string2 << endl ;
string2 = string1 ;
cout << "After assignment string2 = string1: " << endl ;
cout << string1 << string2 << endl ;
return 0 ;
}
/**
Before assignment:
Hello World
After assignment string2 = string1:
Hello Hello
*/
如果您编写的类管理着动态分配的资源(如使用 new 分配的数组),除构造函数和析构函数外,请务必实现复制构造函数和复制赋值运算符。
如果没有解决对象被复制时出现的资源所有权问题,您的类就是不完整的,使用时甚至会影响应用程序的稳定性
下标运算符[] 编写封装了动态数组的类(如封装了 char* buffer 的 MyString)时,通过实现下标运算符,可轻松地随机访问缓冲区中的各个字符。
#include <iostream>
#include <string>
#include <string.h>
using namespace std ;
class MyString
{
private:
char * Buffer ;
// private default constructor
MyString () {}
public:
// constructor
MyString ( const char * InitialInput )
{
if ( InitialInput != NULL )
{
Buffer = new char [ strlen ( InitialInput ) + 1 ];
strcpy ( Buffer , InitialInput );
}
else
Buffer = NULL ;
}
MyString operator + ( const char * stringIn )
{
string strBuf ( Buffer );
strBuf += stringIn ;
MyString ret ( strBuf . c_str ());
return ret ;
}
// Copy constructor
MyString ( const MyString & CopySource )
{
if ( CopySource . Buffer != NULL )
{
// ensure deep copy by first allocating own buffer
Buffer = new char [ strlen ( CopySource . Buffer ) + 1 ];
// copy from the source into local buffer
strcpy ( Buffer , CopySource . Buffer );
}
else
Buffer = NULL ;
}
// Copy assignment operator
MyString & operator = ( const MyString & CopySource )
{
if (( this != & CopySource ) && ( CopySource . Buffer != NULL ))
{
if ( Buffer != NULL )
delete [] Buffer ;
// ensure deep copy by first allocating own buffer
Buffer = new char [ strlen ( CopySource . Buffer ) + 1 ];
// copy from the source into local buffer
strcpy ( Buffer , CopySource . Buffer );
}
return * this ;
}
const char & operator [] ( int Index ) const
{
if ( Index < GetLength ())
return Buffer [ Index ];
}
// Destructor
~ MyString ()
{
if ( Buffer != NULL )
delete [] Buffer ;
}
int GetLength () const
{
return strlen ( Buffer );
}
operator const char * ()
{
return Buffer ;
}
};
int main ()
{
cout << "Type a statement: " ;
string strInput ;
getline ( cin , strInput );
MyString youSaid ( strInput . c_str ());
cout << "Using operator[] for displaying your input: " << endl ;
for ( int index = 0 ; index < youSaid . GetLength (); ++ index )
cout << youSaid [ index ] << " " ;
cout << endl ;
cout << "Enter index 0 - " << youSaid . GetLength () - 1 << ": " ;
int index = 0 ;
cin >> index ;
cout << "Input character at zero-based position: " << index ;
cout << " is: " << youSaid [ index ] << endl ;
return 0 ;
}
/**
Type a statement: Hey subscript operators[] are fabulous
Using operator[] for displaying your input:
H e y s u b s c r i p t o p e r a t o r s [ ] a r e f a b u l o u s
Enter index 0 - 37: 2
Input character at zero-based position: 2 is: y
*/
定义下标运算符时,如果不允许修改内部数组,则将返回的引用定义为const类型。将函数类型定义为const类型,禁止通过这个函数来修改其他的类成员属性。
如果需要通过这个函数去修改内部属性,则不定义成const。
函数运算符 operator() operator() 让对象像函数,被称为函数运算符。函数运算符用于标准模板库(STL)中,通常是 STL算法中,其用途包括决策。根据使用的操作数数量,这样的函数对象通常称为单目谓词或双目谓词。
#include <iostream>
#include <string>
using namespace std ;
class Display
{
public:
void operator () ( string input ) const
{
cout << input << endl ;
}
};
int main ()
{
Display displayFuncObj ;
// equivalent to displayFuncObj.operator () ("Display this string!");
displayFuncObj ( "Display this string!" );
return 0 ;
}
这个运算符也称为 operator()函数,而 Display 对象也称为函数对象或 functor。
移动构造函数 从上述代码可知,相比于常规赋值构造函数和复制赋值运算符的声明,移动构造函数和移动赋值运算符的不同之处在于,输入参数的类型为 Sample&&。另外,由于输入参数是要移动的源对象,因此不能使用 const 进行限定,因为它将被修改。返回类型没有变,因为它们分别是构造函数和赋值运算符的重载版本。 在需要创建临时右值时,遵循 C++的编译器将使用移动构造函数(而不是复制构造函数)和移动赋值运算符(而不是复制赋值运算符)。
移动构造函数和移动赋值运算符的实现中,只是将资源从源移到目的地,而没有进行复制。
在执行下面的拼接加赋值sayHelloAgain = Hello + World + CPP这个过程中,首先调用Hello的+运算符函数,将World的内容加进来,创造一个临时对象(Hello World),同理再把cpp加进来,创造另一个临时对象(Hello World of C++)。然后编译器会调用sayHelloAgain的移动构造函数,将这个临时对象的内容赋给sayHelloAgain,然后删除临时对象的buffer。这个过程只使用了一次移动构造函数。
完整示例:
#include <iostream>
#include <string.h>
using namespace std ;
class MyString
{
private:
char * buffer ;
MyString () : buffer ( NULL ) // private default constructor
{
cout << "Default constructor called" << endl ;
}
public:
MyString ( const char * initialInput ) // constructor
{
cout << "Constructor called for: " << initialInput << endl ;
if ( initialInput != NULL )
{
buffer = new char [ strlen ( initialInput ) + 1 ];
strcpy ( buffer , initialInput );
}
else
buffer = NULL ;
}
MyString ( MyString && moveSrc ) // move constructor
{
cout << "Move constructor moves: " << moveSrc . buffer << endl ;
if ( moveSrc . buffer != NULL )
{
buffer = moveSrc . buffer ; // take ownership i.e. 'move'
moveSrc . buffer = NULL ; // free move source
}
}
MyString & operator = ( MyString && moveSrc ) // move assignment op.
{
cout << "Move assignment op. moves: " << moveSrc . buffer << endl ;
if (( moveSrc . buffer != NULL ) && ( this != & moveSrc ))
{
delete [] buffer ; // release own buffer
buffer = moveSrc . buffer ; // take ownership i.e. 'move'
moveSrc . buffer = NULL ; // free move source
}
return * this ;
}
MyString ( const MyString & copySrc ) // copy constructor
{
cout << "Copy constructor copies: " << copySrc . buffer << endl ;
if ( copySrc . buffer != NULL )
{
buffer = new char [ strlen ( copySrc . buffer ) + 1 ];
strcpy ( buffer , copySrc . buffer );
}
else
buffer = NULL ;
}
MyString & operator = ( const MyString & copySrc ) // Copy assignment op.
{
cout << "Copy assignment op. copies: " << copySrc . buffer << endl ;
if (( this != & copySrc ) && ( copySrc . buffer != NULL ))
{
if ( buffer != NULL )
delete [] buffer ;
buffer = new char [ strlen ( copySrc . buffer ) + 1 ];
strcpy ( buffer , copySrc . buffer );
}
return * this ;
}
~ MyString () // destructor
{
if ( buffer != NULL )
delete [] buffer ;
}
int GetLength ()
{
return strlen ( buffer );
}
operator const char * ()
{
return buffer ;
}
MyString operator + ( const MyString & addThis )
{
cout << "operator+ called: " << endl ;
MyString newStr ;
if ( addThis . buffer != NULL )
{
newStr . buffer = new char [ GetLength () + strlen ( addThis . buffer ) + 1 ];
strcpy ( newStr . buffer , buffer );
strcat ( newStr . buffer , addThis . buffer );
}
return newStr ;
}
};
int main ()
{
MyString Hello ( "Hello " );
MyString World ( "World" );
MyString CPP ( " of C++" );
MyString sayHelloAgain ( "overwrite this" );
sayHelloAgain = Hello + World + CPP ;
return 0 ;
}
/*
Without move constructor and move assignment operator:
Constructor called for: Hello
Constructor called for: World
Constructor called for: of C++
Constructor called for: overwrite this
operator+ called:
Default constructor called
Copy constructor to copy from: Hello World
operator+ called:
Default constructor called
Copy constructor to copy from: Hello World of C++
Copy assignment operator to copy from: Hello World of C++
With move constructor and move assignment operators:
Constructor called for: Hello
Constructor called for: World
Constructor called for: of C++
Constructor called for: overwrite this
operator+ called:
Default constructor called
Move constructor to move from: Hello World
operator+ called:
Default constructor called
Move constructor to move from: Hello World of C++
Move assignment operator to move from: Hello World of C++
*/
学习过程中复制构造函数的一个问题 当使用临时对象当作函数参数进行值传递时,将不会走复制构造函数,而是直接使用这个对象。
自定义字面量 涉及热力学的温度声明,采用如下方式:
Temperature k1 = 32.15 _F ;
Temperature k2 = 0.0 _C ; ReturnType operator "" YourLiteral ( ValueType value )
{
// conversion code here
}
实例:
#include <iostream>
using namespace std ;
struct Temperature
{
double Kelvin ;
Temperature ( long double kelvin ) : Kelvin ( kelvin ) {}
};
Temperature operator "" _C ( long double celcius )
{
return Temperature ( celcius + 273 );
}
Temperature operator "" _F ( long double fahrenheit )
{
return Temperature (( fahrenheit + 459.67 ) * 5 / 9 );
}
int main ()
{
Temperature k1 = 31.73 _F ;
Temperature k2 = 0.0 _C ;
cout << "k1 is " << k1 . Kelvin << " Kelvin" << endl ;
cout << "k2 is " << k2 . Kelvin << " Kelvin" << endl ;
return 0 ;
}
/**
k1 is 273 Kelvin
k2 is 273 Kelvin
*/
static_cast类型转换 static_cast 用于在相关类型的指针之间进行转换,还可显式地执行标准数据类型的类型转换—这种转换原本将自动或隐式地进行。
将 Derived转换为 Base 被称为向上转换,无需使用任何显式类型转换运算符就能进行这种转换:
Derived objDerived ;
Base * objBase = & objDerived ; // ok!
将 Base转换为 Derived 被称为向下转换,如果不使用显式类型转换运算符,就无法进行这种转换:
Derived objDerived ;
Base * objBase = & objDerived ; // Upcast -> ok!
Derived * objDer = objBase ; // Error: Downcast needs explicit cast
可以利用static_cast进行向下转换,而不会报错。
Base * objBase = new Base ();
Derived * objDer = static_cast < Derived *> ( objBase ); // Still no errors!
然而,static_cast 只验证指针类型是否相关,而不会执行任何运行阶段检查。
因此 objDer ->DerivedFunction() 能够通过编译,但在运行阶段可能导致意外结果。
dynamic_cast隐式转换 给定一个指向基类对象的指针,程序员可使用 dynamic_cast 进行类型转换,并在使用指针前检查指针指向的目标对象的类型。
Base * objBase = new Derived ();
// Perform a downcast
Derived * objDer = dynamic_cast < Derived *> ( objBase );
if ( objDer ) // Check for success of the cast
objDer -> CallDerivedFunction ();
这种在运行阶段识别对象类型的机制称为
运行阶段类型识别(runtime type identification,RTTI)。
#include <iostream>
using namespace std ;
class Fish
{
public:
virtual void Swim ()
{
cout << "Fish swims in water" << endl ;
}
// base class should always have virtual destructor
virtual ~ Fish () {}
};
class Tuna : public Fish
{
public:
void Swim ()
{
cout << "Tuna swims real fast in the sea" << endl ;
}
void BecomeDinner ()
{
cout << "Tuna became dinner in Sushi" << endl ;
}
};
class Carp : public Fish
{
public:
void Swim ()
{
cout << "Carp swims real slow in the lake" << endl ;
}
void Talk ()
{
cout << "Carp talked carp!" << endl ;
}
};
void DetectFishType ( Fish * objFish )
{
Tuna * objTuna = dynamic_cast < Tuna *> ( objFish );
if ( objTuna )
{
cout << "Detected Tuna. Making Tuna dinner: " << endl ;
objTuna -> BecomeDinner (); // calling Tuna::BecomeDinner
}
Carp * objCarp = dynamic_cast < Carp *> ( objFish );
if ( objCarp )
{
cout << "Detected Carp. Making carp talk: " << endl ;
objCarp -> Talk (); // calling Carp::Talk
}
cout << "Verifying type using virtual Fish::Swim: " << endl ;
objFish -> Swim (); // calling virtual function Swim
}
int main ()
{
Carp myLunch ;
Tuna myDinner ;
DetectFishType ( & myDinner );
DetectFishType ( & myLunch );
return 0 ;
}
务必检查 dynamic_cast 的返回值,看它是否有效。如果返回值为 NULL,说明转换失败。
reinterpret_cast强制转换 可以做任何类型转换。
这种类型转换实际上是强制编译器接受 static_cast 通常不允许的类型转换,通常用于低级程序(如驱动程序),在这种程序中,需要将数据转换为 API(应用程序编程接口)能够接受的简单类型(例如,有些 OS 级 API 要求提供的数据为 BYTE 数组,即 unsigned char*)。
由于其他 C++类型转换运算符都不允许执行这种有悖类型安全的转换,因此除非万不得已,否则不要使用 reinterpret_cast 来执行不安全(不可移植)的转换。
const_cast将const类型转换成非const 某些情况,使用的类我们无法修改,其内部如果使用了不合理的非const函数,外部的const对象指针无法使用非const函数,就可以将外部的const对象转换成非const,实现调用。
void DisplayAllData ( const SomeClass * data )
{
// data->DisplayMembers(); Error: attempt to invoke a non-const function!
SomeClass * pCastedData = const_cast < SomeClass *> ( data );
pCastedData -> DisplayMembers (); // Allowed!
}
使用类型转换需要注意 在现代 C++中,除 dynamic_cast 外的类型转换都是可以避免的。仅当需要满足遗留应用程序的需求时,才需要使用其他类型转换运算符。在这种情况下,程序员通常倾向于使用 C 风格类型转换而不是C++类型转换运算符。重要的是,应尽量避免使用类型转换;而一旦使用类型转换,务必要知道幕后发生的情况。
预处理 顾名思义,预处理器在编译器之前运行,换句话说,预处理器根据程序员的指示,决定实际要编译的内容。预处理器编译指令都以#打头。
宏定义常量
#include <iostream>
#include <string>
using namespace std ;
#define ARRAY_LENGTH 25
#define PI 3.1416
#define MY_DOUBLE double
#define FAV_WHISKY "Jack Daniels"
/*
// Superior alternatives (comment those above when you uncomment these)
const int ARRAY_LENGTH = 25;
const double PI = 3.1416;
typedef double MY_DOUBLE;
const char* FAV_WHISKY = "Jack Daniels";
*/
int main ()
{
int MyNumbers [ ARRAY_LENGTH ] = { 0 };
cout << "Array's length: " << sizeof ( MyNumbers ) / sizeof ( int ) << endl ;
cout << "Enter a radius: " ;
MY_DOUBLE Radius = 0 ;
cin >> Radius ;
cout << "Area is: " << PI * Radius * Radius << endl ;
string FavoriteWhisky ( FAV_WHISKY );
cout << "My favorite drink is: " << FAV_WHISKY << endl ;
return 0 ;
}
定义常量时,更好的选择是使用关键字 const 和数据类型,因此下面的定义好得多:
const int ARRAY_LENGTH = 25 ;
const double PI = 3.1416 ;
const char * FAV_WHISKY = "Jack Daniels" ;
typedef double MY_DOUBLE ; // typedef aliases a type
最常用的宏功能 如果在头文件 class1.h 中声明了一个类,而这个类将 class2.h 中声明的类作为其成员,则需要在 class1.h 中包含 class2.h。如果设计非常复杂,即第二个类需要第一个类,则在 class2.h 中也需要包含 class1.h!然而,在预处理器看来,两个头文件彼此包含对方会导致递归问题。
为了防止循环引用,可以使用#ifndef 强制这种引用只执行一次:
#ifndef HEADER1_H _//multiple inclusion guard:
#define HEADER1_H_ // preprocessor will read this and following lines once
#include <header2.h>
class Class1 {
// class members
};
#endif // end of header1.h
header2.h 与此类似,但宏定义不同,且包含的是<header1.h>:
#ifndef HEADER2_H_ //multiple inclusion guard
#define HEADER2_H_
#include <header1.h>
class Class2 {
// class members
};
#endif // end of header2.h
#ifndef 可读作 if-not-defined。这是一个条件处理命令,让预处理器仅在标识符未定义时才继续。#endif 告诉预处理器,条件处理指令到此结束。
因此,预处理器首次处理 header1.h 并遇到#ifndef 后,发现宏 HEADER1H_还未定义,因此继续处理。#ifndef 后面的第一行定义了宏 HEADER1_H ,确保预处理器再次处理该文件时,将在遇到包含#ifndef 的第一行时结束,因为其中的条件为 false.
#define定义宏函数 例如平方计算,#define SQUARE(x) ((x) * (x)) 相比于常规函数调用,宏函数的优点在于,它们将在编译前就地展开,因此在有些情况下有助于改善代码的性能。而且一个宏可使用另一个宏。比如计算面积的宏函数可以使用定义的宏变量PI。 有个缺点是宏函数不考虑数据类型,返回值精度依赖输入的精度。
为什么要加这么多括号?
因为宏是最简单的替换,不会提前计算。如果去掉括号: #define AREA_CIRCLE(r) (PIr r) 如果使用类似于下面的语句调用这个宏,结果将如何呢? cout « AREA_CIRCLE (4+6); 展开后,编译器看到的语句如下: cout « (PI4+6 4+6); // not the same as PI10 10 根据运算符优先级,将先执行乘法运算,再执行加法运算,因此编译器将这样计算面积: cout « (PI*4+24+6); // 42.5664 (which is incorrect) 在省略了括号的情况下,简单的文本替换破坏了编程逻辑!
assert宏 可以插入到某些地方来验证执行结果。需要提前包含<assert.h>
assert ( expression that evaluates to true or false );
如果条件不满足,它将抛出一个错误信息。
由于断言在发布模式下不可用,对于对应用程序正确运行至关重要的检查(如检查dynamic_cast 的返回值),为了确保它们在发布模式下也会执行,应使用 if 语句,这很重要。断言可帮助您找出问题,但不能因此不在代码中对指针做必要的检查。
使用宏的应该和不应该事项 尽可能不要自己编写宏函数。 尽可能使用 const 变量,而不是宏常量。 请牢记,宏并非类型安全的,预处理器不执行类型检查。 在宏函数的定义中,别忘了使用括号将每个变量括起。 为了在头文件中避免多次包含,别忘了使用#ifndef、#define 和#endif。 别忘了在代码中大量使用 assert( ),它们在发行版本中将被禁用,但对提高代码的质量很有帮助。 模板 模板让程序员能够定义一种适用于不同类型对象的行为。这听起来有点像宏(参见前面用于判断两个数中哪个更大的简单宏 MAX),但宏不是类型安全的,而模板是类型安全的。
编写一个比较大小的模板函数,它的接收的类型可以根据传参的类型自动生成多个重载函数。
#include <iostream>
#include <string>
using namespace std ;
template < typename Type >
const Type & GetMax ( const Type & value1 , const Type & value2 )
{
if ( value1 > value2 )
return value1 ;
else
return value2 ;
}
template < typename Type >
void DisplayComparison ( const Type & value1 , const Type & value2 )
{
cout << "GetMax(" << value1 << ", " << value2 << ") = " ;
cout << GetMax ( value1 , value2 ) << endl ;
}
int main ()
{
int num1 = - 101 , num2 = 2011 ;
DisplayComparison < int > ( num1 , num2 );
double d1 = 3.14 , d2 = 3.1416 ;
DisplayComparison ( d1 , d2 );
string name1 ( "Jack" ), name2 ( "John" );
DisplayComparison ( name1 , name2 );
return 0 ;
}
上述代码将导致编译器生成模板函数 GetMax 的两个版本。 如果进行调用的参数不一致,比如传一个int和srting类型一起比较大小,将导致编译错误。
模板类 类是设计对象的蓝图,而模板类就是蓝图的蓝图。
可以在类里面设置模板参数,让同一个类的同一个字段使用不同的类型来表示。
template < typename T1 , typename T2 >
class HoldsPair
{
private:
T1 value1 ;
T2 value2 ;
public:
// Constructor that initializes member variables
HoldsPair ( const T1 & val1 , const T2 & val2 )
{
value1 = val1 ;
value2 = val2 ;
};
// ... Other member functions
};
// 在这里,类 HoldsPair 接受两个模板参数,参数名分别为 T1 和 T2。可使用这个类来存储两个类型
// 相同或不同的对象,如下所示:
// A template instantiation that pairs an int with a double
HoldsPair < int , double > pairIntDouble ( 6 , 1.99 );
// A template instantiation that pairs an int with an int
HoldsPair < int , int > pairIntDouble ( 6 , 500 );
还可以设置默认类型简化使用,如果实例使用的和默认类型相同,则可以简化对象的声明方式。
// template with default params: int & double
template < typename T1 = int , typename T2 = double >
class HoldsPair
{
private:
T1 value1 ;
T2 value2 ;
public:
HoldsPair ( const T1 & val1 , const T2 & val2 ) // constructor
: value1 ( val1 ), value2 ( val2 ) {}
// Accessor functions
const T1 & GetFirstValue () const
{
return value1 ;
}
const T2 & GetSecondValue () const
{
return value2 ;
}
};
#include <iostream>
using namespace std ;
int main ()
{
HoldsPair <> pairIntDbl ( 300 , 10.09 );
HoldsPair < short , const char *> pairShortStr ( 25 , "Learn templates, love C++" );
cout << "The first object contains -" << endl ;
cout << "Value 1: " << pairIntDbl . GetFirstValue () << endl ;
cout << "Value 2: " << pairIntDbl . GetSecondValue () << endl ;
cout << "The second object contains -" << endl ;
cout << "Value 1: " << pairShortStr . GetFirstValue () << endl ;
cout << "Value 2: " << pairShortStr . GetSecondValue () << endl ;
return 0 ;
}
模板实例化和具体化 定义但不使用的模板,编译器将忽略。因此,对模板来说,实例化指的是使用一个或多个模板参数来创建特定的类型。
HoldsPair < int , double > pairIntDbl ;
相当于编译器使用这个模板创建了一个类。
另一方面,在有些情况下,使用特定的类型实例化模板时,需要显式地指定不同的行为。这就是具体化模板,即为特定的类型指定行为。
#include <iostream>
using namespace std ;
template < typename T1 = int , typename T2 = double >
class HoldsPair
{
private:
T1 value1 ;
T2 value2 ;
public:
HoldsPair ( const T1 & val1 , const T2 & val2 ) // constructor
: value1 ( val1 ), value2 ( val2 ) {}
// Accessor functions
const T1 & GetFirstValue () const ;
const T2 & GetSecondValue () const ;
};
// specialization of HoldsPair for types int & int here
template < > class HoldsPair < int , int >
{
private:
int value1 ;
int value2 ;
string strFun ;
public:
HoldsPair ( const int & val1 , const int & val2 ) // constructor
: value1 ( val1 ), value2 ( val2 ) {}
const int & GetFirstValue () const
{
cout << "Returning integer " << value1 << endl ;
return value1 ;
}
};
int main ()
{
HoldsPair < int , int > pairIntInt ( 222 , 333 );
pairIntInt . GetFirstValue ();
return 0 ;
}
带静态变量的模板类 #include <iostream>
using namespace std ;
template < typename T >
class TestStatic
{
public:
static int staticVal ;
};
// static member initialization
template < typename T > int TestStatic < T >:: staticVal ;
int main ()
{
TestStatic < int > intInstance ;
cout << "Setting staticVal for intInstance to 2011" << endl ;
intInstance . staticVal = 2011 ;
TestStatic < double > dblnstance ;
cout << "Setting staticVal for Double_2 to 1011" << endl ;
dblnstance . staticVal = 1011 ;
cout << "intInstance.staticVal = " << intInstance . staticVal << endl ;
cout << "dblnstance.staticVal = " << dblnstance . staticVal << endl ;
return 0 ;
}
/**
Setting staticVal for intInstance to 2011
Setting staticVal for Double_2 to 1011
intInstance.staticVal = 2011
dblnstance.staticVal = 1011
*/
也就是说,如果模板类包含静态成员,该成员将在针对 int 具体化的所有实例之间共享;同样,它还将在针对 double 具体化的所有实例之间共享,且与针对 int 具体化的实例无关。换句话说,可以认为编译器创建了两个版本的 x:x_int 用于针对 int 具体化的实例,而 x_double 针对 double 具体化的实例。
参数数量可变的模板函数 参数数量可变的模板是 2014 年发布的 C++14 新增的。
#include <iostream>
using namespace std ;
template < typename Res , typename ValType >
void Sum ( Res & result , ValType & val )
{
result = result + val ;
}
template < typename Res , typename First , typename ... Rest >
void Sum ( Res & result , First val1 , Rest ... numN )
{
result = result + val1 ;
return Sum ( result , numN ...);
}
int main ()
{
double dResult = 0 ;
Sum ( dResult , 3.14 , 4.56 , 1.1111 );
cout << "dResult = " << dResult << endl ;
string strResult ;
Sum ( strResult , "Hello " , "World" );
cout << "strResult = " << strResult . c_str () << endl ;
return 0 ;
}
您可能注意到了,在前面的代码示例中,使用了省略号…。在 C++中,模板中的省略号告诉编译器,默认类或模板函数可接受任意数量的模板参数,且这些参数可为任何类型。
元组 通过索引访问的一种数据结构,内部可以存储多种不同的数据类型。
#include <iostream>
#include <tuple>
#include <string>
using namespace std ;
template < typename tupleType >
void DisplayTupleInfo ( tupleType & tup )
{
const int numMembers = tuple_size < tupleType >:: value ;
cout << "Num elements in tuple: " << numMembers << endl ;
cout << "Last element value: " << get < numMembers - 1 > ( tup ) << endl ;
}
int main ()
{
tuple < int , char , string > tup1 ( make_tuple ( 101 , 's' , "Hello Tuple!" ));
DisplayTupleInfo ( tup1 );
auto tup2 ( make_tuple ( 3.14 , false ));
DisplayTupleInfo ( tup2 );
auto concatTup ( tuple_cat ( tup2 , tup1 )); // contains tup2, tup1 members
DisplayTupleInfo ( concatTup );
double pi ;
string sentence ;
tie ( pi , ignore , ignore , ignore , sentence ) = concatTup ;
cout << "Unpacked! Pi: " << pi << " and \" " << sentence << " \" " << endl ;
return 0 ;
}
static_assert不满足条件直接禁止编译 static_assert 是 C++11 新增的一项功能,让您能够在不满足指定条件时禁止编译。这好像不可思议,但对模板类来说很有用。例如,您可能想禁止针对 int 实例化模板类,为此可使用 static_assert,它是一种编译阶段断言,可用于在开发环境(或控制台中)显示一条自定义消息。
template < typename T >
class EverythingButInt
{
public:
EverythingButInt ()
{
static_assert ( sizeof ( T ) != sizeof ( int ), "No int please!" );
}
};
int main ()
{
EverythingButInt < int > test ;
return 0 ;
}
待补充STL标准库 最新在KMP的开发过程中,对于一些IOS端的全局性的UI样式代码修改,有些无从下手。Swift语言层面上还比较容易看懂,但是对于系统规则机制,app运行机制等了解尚浅,对此做一个基础的总结。
开发语言层面对比 1. 语言特性对比 特性 Swift Java 异同点与优势 类型系统 强类型,类型推断 强类型,类型推断有限 Swift 的类型推断更强大 ,很多时候无需显式声明变量类型,代码更简洁。内存管理 自动引用计数 (ARC) 垃圾回收 (GC) 这是两者最核心的区别。Swift 的 ARC 性能更高,但需要注意循环引用;Java 的 GC 开发者更省心,但可能带来运行时卡顿。 可选类型 Optional 类型 Null Swift 强制处理 nil,开发者必须显式地用 if let 或 guard let 解包,从而从语言层面杜绝了空指针异常 。Java 的 NullPointerException 是一个常见痛点。 编程范式 面向对象、函数式 纯面向对象 Swift 融合了面向对象、函数式和协议导向编程(Protocol-Oriented Programming, POP)思想,代码更灵活,尤其在泛型和协议方面。 结构体 支持结构体 (Struct) 不支持,只有类 Swift 的结构体是值类型,类是引用类型。这提供了更多的灵活性和性能优化空间,例如在处理轻量级数据时使用结构体可以避免不必要的内存分配和引用计数开销。 函数式 支持高阶函数、闭包 支持 lambda 表达式 Swift 的闭包(Closures)功能强大且易用,是其函数式编程特性的重要体现。 多线程 GCD、Operation Queue Thread, Executor, Coroutines 两者都提供了完善的多线程解决方案,但具体实现方式不同。Swift 的 GCD (Grand Central Dispatch) 是一个非常强大的基于任务队列的并发模型。
2. 运行环境对比 环境 Swift Java 异同点与优势 运行时 原生 (Native) 运行时 虚拟机 (JVM / ART) Swift 代码直接编译成机器码在 CPU 上执行,没有虚拟机 的性能开销,启动更快,执行效率更高。 编译过程 LLVM 编译器 Java 编译器(Javac) Swift 的 LLVM 编译器非常先进,能够生成高度优化的机器码。 跨平台 主要用于 Apple 生态 跨平台能力强大 Swift 主要用于 iOS、macOS、watchOS 等苹果平台,虽然有开源项目尝试跨平台,但生态和工具链远不如 Java。Java 的 JVM 可以运行在 Windows、Linux、Android 等多个操作系统上,“一次编写,到处运行” 。 语言版本 频繁更新 稳定,但更新较慢 Swift 语言发展迅速,版本更新频繁,新特性不断加入。Java 语言相对稳定,版本更新周期较长。
总的来说,Swift 直接编译成机器码,没有虚拟机开销,运行速度快。安全可靠 ,可选类型从语言层面消除了空指针异常,类型推断减少了编程错误。融合了多种编程范式,如函数式、协议导向等,语法简洁、富有表现力。
而 Java 得益于 JVM,Java 具有无可比拟的跨平台能力。其拥有庞大而成熟的社区和工具生态,有无数的框架和库可供选择。语言版本和 API 相对稳定,适合大型企业级应用开发。
代码编写到运行经历了哪些流程 1. 代码编写与编译阶段 在这个阶段,开发者用 Swift 或 Objective-C 语言编写代码。使用 Xcode 这个集成开发环境 (IDE),它包含了所有的工具链,如编译器、调试器等。
编译器 : Xcode 默认使用 LLVM (Low Level Virtual Machine) 编译器。Swift 源码通过 Swift 编译器编译成 LLVM Intermediate Representation (IR) ,然后再编译成机器码。 Objective-C 源码则直接通过 Clang 编译器编译成机器码。 编译优化 : 编译器会对代码进行各种优化,例如 dead code elimination(移除无用代码)、常量折叠等,以提高应用的运行效率。产物 : 编译的最终产物是可执行的机器码文件(Mach-O 文件),以及应用所需的其他资源文件(如图片、UI 布局文件等)。2. 应用打包阶段 编译完成后,Xcode 会将所有必需的文件打包成一个可分发、可安装的格式。
Bundle 概念 : iOS 应用的核心是一个 Bundle 。它是一个特殊的文件夹,其目录结构是固定的。Bundle 内部包含了可执行文件、所有的资源文件(图片、声音、NIB/Storyboards 等)、以及一个重要的 Info.plist 文件。Info.plist 文件IPA 文件 : 最终,整个 Bundle 会被压缩成一个 .ipa 文件。.ipa 文件本质上是一个 ZIP 压缩包,.ipa 的作用就类似于 Android 的 .apk 文件。3. 应用安装阶段 用户从 App Store 下载或通过其他方式获取到 .ipa 文件后,系统会进行安装。
解压与签名验证 : 系统首先解压 .ipa 文件,然后进行严格的数字签名验证 。每一个在 App Store 上发布的 iOS 应用都必须由 Apple 签发证书进行签名。目的 : 签名验证的目的是确保应用没有被篡改,且来自可信的开发者。这是 iOS 安全机制的重要一环。权限配置 : 系统会根据 Info.plist 文件中声明的权限,为应用配置对应的沙盒环境。这决定了应用可以访问哪些系统资源和数据。目录结构 : 应用的 Bundle 会被安装到 /private/var/containers/Bundle/Application 目录下。同时,系统还会为应用创建数据目录,包括 Documents、Library 和 tmp,这些目录位于 /private/var/mobile/Containers/Data/Application 下,用于应用存储数据。4. 应用运行阶段 当用户点击应用图标时,应用开始启动和运行。
main() 函数main() 函数开始执行,这与 C/C++ 程序的入口点相同。UIApplicationmain() 函数会调用 UIApplicationMain 函数来创建一个 UIApplication 对象。UIApplication 是 iOS 应用的单例,负责管理应用的生命周期、事件循环和与系统之间的交互。AppDelegateUIApplication 会将应用的生命周期事件(如应用启动、进入后台、收到内存警告等)通知给 AppDelegateAppDelegate 是应用的代理,开发者可以在其中实现相应的回调方法,来处理这些系统事件。主线程 : UI 更新、事件处理等所有与界面相关的操作都必须在 主线程 上执行。这与 Android 上的 UI 线程(Main thread)是相同的概念,都是为了避免并发问题,保证用户界面的流畅性。沙盒机制 : 应用在运行过程中,其读写操作都严格限制在其沙盒目录内,无法访问沙盒外的其他应用数据,从而保证了系统安全和数据隔离。APP运行环境 Android 应用运行在 ART(Android Runtime) 虚拟机上,这是一个基于 JIT(Just-In-Time)和 AOT(Ahead-Of-Time)编译的运行时环境,负责执行 Java/Kotlin 代码。它提供了垃圾回收、内存管理和沙箱隔离,确保每个应用都在一个独立、受保护的环境中运行。
iOS 应用则直接运行在 原生(Native) 环境下,执行由 Objective-C 或 Swift 编写的代码。这些代码直接编译成机器码,由苹果的 Cocoa Touch 框架和 XNU 内核直接执行。
没有虚拟机 :iOS 不使用虚拟机,这使得其应用的启动速度和执行效率通常更高。内存管理 :iOS 主要通过 ARC(Automatic Reference Counting) 机制来自动管理内存。当一个对象的引用计数变为零时,系统会自动回收它。这与 ART 的垃圾回收机制(Garbage Collection)不同,但目标都是为了简化内存管理。沙盒机制 :和 Android 一样,iOS 也有严格的沙盒机制。每个应用都在一个独立的沙盒中运行,不能随意访问其他应用的数据。内存管理 Android 和 iOS 在内存管理上采用了两种截然不同的策略,这直接影响了开发者编写代码的方式和对性能的考量。简单来说,Android 使用了垃圾回收 (Garbage Collection, GC) ,而 iOS 则依赖于自动引用计数 (Automatic Reference Counting, ARC) 。
1. Android 的内存管理:垃圾回收(GC) 安卓的垃圾回收是一种自动 的内存管理机制。
工作原理 :在 Android 中,当一个对象不再被任何变量引用时,它就成了“垃圾”。 GC 线程会定期扫描内存中的所有对象。当它发现一个不再被引用的对象时,就会将其标记为可回收,并在合适的时机释放这块内存。 开发者无需手动释放内存。 GC 的优缺点 :优点 : 开发者不需要关心何时释放内存,这大大降低了内存管理的复杂性,可以更专注于业务逻辑。缺点 :不可控性 : GC 的执行时机是不确定的。当 GC 运行时,它会暂停应用的主线程(这被称为 “Stop-The-World”),这可能导致应用的卡顿,尤其是在处理大量对象时。内存开销 : GC 需要额外的内存来追踪和管理对象,这可能导致比 ARC 略高的内存占用。内存泄漏 :尽管有 GC,但 Android 仍然会发生内存泄漏。最常见的情况是长生命周期对象引用了短生命周期对象 。 例如,一个 Activity 对象被一个全局的单例对象引用,当 Activity 应该被销毁时,由于单例对象依然持有它的引用,GC 无法回收它,从而导致内存泄漏。开发者需要特别注意这种情况。 2. iOS 的内存管理:自动引用计数(ARC) ARC 是一个编译器级别的 内存管理机制。
工作原理 :每个对象都有一个引用计数器 。当一个对象被创建时,其引用计数为 1。 当一个变量引用了这个对象时,它的引用计数会加 1(称为 retain);当引用被移除时,引用计数会减 1(称为 release)。 当引用计数减到 0 时,说明没有任何变量在使用这个对象,ARC 会立即释放这块内存。 这个过程都是由编译器在编译时自动插入 retain 和 release 代码来实现的,开发者无需手动调用。 ARC 的优缺点 :优点 :性能高 : ARC 的内存管理在编译时完成,没有运行时暂停(Stop-The-World)的开销,因此性能更高,更适合对响应速度要求高的移动应用。可预测性 : 内存释放的时机是确定的,一旦引用计数归零,对象就会立即被释放。缺点 :循环引用(Retain Cycle) : 这是 ARC 最主要的问题。当两个或多个对象相互持有对方的强引用时,它们的引用计数永远不会归零,导致内存无法被释放,造成内存泄漏。如何解决循环引用 :开发者需要使用 弱引用(weak) 和 无主引用(unowned) 来打破循环引用。 weakweak 引用会自动置为 nil。常用于父子关系中,子对象对父对象的引用。unownedweak,也不会增加引用计数,但它假定所引用的对象在它自身生命周期内永远不会被释放。如果引用的对象被释放了,访问 unowned 引用会引发运行时错误。常用于明确知道被引用对象生命周期比自身长的场景。总的来说,Android 的 GC 让开发者更省心,但代价是可能牺牲部分性能。iOS 的 ARC 提供了更精细的控制和更高的性能,但要求开发者对引用关系有清晰的认识,并主动解决循环引用问题。理解这两种机制的优劣,是成为一名优秀的跨平台开发者必备的知识。
界面管理 Android 的 Activity 主要负责管理一个单独的用户界面(UI),并处理用户交互。它的生命周期(如 onCreate、onPause、onDestroy)是开发者需要重点关注的。
iOS 中对应的概念是 UIViewController 。
UIViewController 是 iOS 应用界面的核心。每一个屏幕(或一个屏幕上的一个重要部分)都由一个 UIViewController 来管理。它负责管理视图(View),处理事件,并在用户界面和数据模型之间扮演桥梁角色。生命周期 :UIViewController 同样拥有自己的生命周期方法,例如 viewDidLoad(视图加载完成)、viewWillAppear(视图即将显示)和 viewWillDisappear(视图即将消失)。开发者需要在这几个方法中处理界面的初始化和状态保存。页面跳转 :Android 通常通过 Intent 来启动新的 Activity。在 iOS 中,页面跳转通常通过 UINavigationController(用于堆栈式的页面管理)或 present(_:animated:completion:) 方法(用于模态弹出页面)来实现。后台任务 Android 的 Service 主要用于在后台执行长时间运行的操作,且没有用户界面,比如下载文件或播放音乐。Service 可以在 Activity 被销毁后继续运行。
iOS 并没有一个与 Service 完全对应的组件,它的后台任务管理更加严格和精细化,主要通过以下几种机制实现:
短暂的后台任务(Background Task) :当应用从前台切换到后台时,系统会给它几秒钟的时间(通常是 3 到 10 分钟)来完成一些任务,例如保存数据或结束网络请求。后台模式(Background Modes) :对于需要持续在后台运行的应用,如音乐播放器、位置追踪或 VoIP 电话,开发者需要在 Info.plist 文件中声明特定的“后台模式”。只有被系统明确允许的这些服务(如音乐播放、地理位置更新等)才能在后台持续运行。后台刷新(Background App Refresh) :允许应用定期在后台刷新内容,但刷新时机由系统根据设备电量、网络状态等因素智能决定。静默推送(Silent Push Notifications) :服务器可以向应用发送一种特殊的“静默推送”,唤醒应用在后台执行一小段代码(例如拉取新内容)。在 Kotlin Multiplatform (KMP) 项目中,要在桌面端(通常指 JVM 桌面应用,如 macOS, Windows, Linux)进行 JNI (Java Native Interface) 开发,核心思路是利用 KMP 的 expect/actual 机制,为桌面 JVM 平台提供 JNI 的实际实现。
JNI 简介 JNI 允许 Java 代码(或运行在 JVM 上的 Kotlin 代码)调用原生应用程序(用 C/C++ 等语言编写)或库,反之亦然。在 KMP 桌面端,这通常用于:
集成现有 C/C++ 库: 如果你有成熟的原生库,JNI 是将其集成到 Kotlin 桌面应用的桥梁。访问平台特定功能: 某些操作系统级别的功能可能没有 JVM 或 Kotlin 友好的 API,此时可以通过 JNI 调用原生 API。性能敏感部分: 对于某些计算密集型任务,原生代码可能提供更好的性能。KMP 桌面端 JNI 开发步骤 以下是使用 Kotlin Multiplatform 在桌面端进行 JNI 开发的详细步骤:
1. 设置 KMP 项目结构 确保你的 KMP 项目有一个 JVM 桌面模块。通常,你的 build.gradle.kts 文件会包含类似这样的配置:
// shared/build.gradle.kts
kotlin {
jvm () // 这是针对桌面 JVM 平台的 target
// ... 其他平台,如 android()
sourceSets {
val commonMain by getting {
// ... common code
}
val jvmMain by getting {
dependencies {
// JNI 相关的依赖,通常在原生库编译时用到
// 但在 Kotlin 代码中直接与 JNI 交互不需要额外的 Kotlin/JVM 依赖
}
}
}
}
2. 定义 JNI 接口(Common Main) 在 commonMain 的 expect 类或接口中,定义你希望原生代码提供的功能。这与你在 Android 中使用 expect 声明平台特定功能的方式相同。
// shared/src/commonMain/kotlin/com/example/shared/NativeLib.kt
package com.example.shared
// 期望提供一个获取字符串的本地方法
expect class NativeLib () {
fun getStringFromNative (): String
}
3. 实现 JNI 接口(JVM Main) 在 jvmMain 中,提供 expect 接口的 actual 实现。这个 actual 类将负责加载原生库,并声明 external 函数来映射到原生 C/C++ 方法。
// shared/src/jvmMain/kotlin/com/example/shared/NativeLib.jvm.kt
package com.example.shared
actual class NativeLib {
// 静态代码块用于加载 JNI 库
companion object {
init {
// "native_lib" 是你的 C/C++ 库的名称,不带前缀和后缀(例如 libnative_lib.so, native_lib.dll, libnative_lib.dylib)
System . loadLibrary ( "native_lib" )
}
}
// 声明一个 external 方法,它会映射到 C/C++ 中的 JNI 函数
external fun getStringFromNative (): String
}
4. 生成 JNI 头文件(.h) 编译 jvmMain 模块,它会生成 .class 文件。然后,你可以使用 javah 工具(JDK 自带)或 javac -h 命令来生成 JNI 头文件。这个头文件定义了你需要用 C/C++ 实现的 JNI 函数签名。
步骤:
编译 jvmMain: 运行 Gradle 命令编译你的项目,例如 gradlew :shared:compileJvmMainKotlin。这会在 shared/build/classes/kotlin/jvm/main/com/example/shared/NativeLib.class 生成类文件。
生成头文件: 打开终端,导航到你的项目根目录,然后执行以下命令。
生成的头文件 (com_example_shared_NativeLib.h) 会包含类似以下内容:
/* DO NOT EDIT THIS FILE - it is machine generated */
#include <jni.h>
/* Header for class com_example_shared_NativeLib */
#ifndef _Included_com_example_shared_NativeLib
#define _Included_com_example_shared_NativeLib
#ifdef __cplusplus
extern "C" {
#endif
/*
* Class: com_example_shared_NativeLib
* Method: getStringFromNative
* Signature: ()Ljava/lang/String;
*/
JNIEXPORT jstring JNICALL Java_com_example_shared_NativeLib_getStringFromNative
( JNIEnv * , jobject );
#ifdef __cplusplus
}
#endif
#endif
5. 编写原生 C/C++ 代码 现在,你可以根据生成的 .h 头文件,编写 C/C++ 源文件(例如 native_lib.cpp),实现 Java_com_example_shared_NativeLib_getStringFromNative 函数。
// shared/src/main/c++/native_lib.cpp
#include "com_example_shared_NativeLib.h" // 包含生成的 JNI 头文件
#include <iostream> // 仅作示例
JNIEXPORT jstring JNICALL Java_com_example_shared_NativeLib_getStringFromNative
( JNIEnv * env , jobject obj ) {
// 可以在这里调用其他 C/C++ 库或执行复杂逻辑
std :: string nativeString = "Hello from Native C++ in KMP Desktop!" ;
std :: cout << "Native C++ code executed!" << std :: endl ; // 打印到控制台,调试用
return env -> NewStringUTF ( nativeString . c_str ());
}
6. 编译原生库 你需要一个构建系统来编译你的 C/C++ 代码,并生成共享库文件(.so for Linux, .dylib for macOS, .dll for Windows)。常用的工具是 CMake 或 Gradle 的 Native Build 插件。
使用 CMake (推荐)
创建 CMakeLists.txt: 在你的 shared 模块下创建一个 src/main/c++/CMakeLists.txt 文件。
# shared/src/main/c++/CMakeLists.txt
cmake_minimum_required ( VERSION 3.10)
project ( native_lib CXX)
# 查找 JNI 头文件和库
find_package ( JNI REQUIRED)
# 添加你的 C++ 源文件
add_library ( native_lib SHARED native_lib.cpp)
# 链接 JNI 库
target_link_libraries ( native_lib PRIVATE ${ JNI_LIBRARIES } )
# 设置输出目录,方便 Gradle 查找
set_target_properties ( native_lib PROPERTIES
LIBRARY_OUTPUT_DIRECTORY " ${ CMAKE_BINARY_DIR } /lib" # 输出到 build/lib 目录下
)
配置 Gradle 调用 CMake: 在 shared/build.gradle.kts 中配置 cmake。
// shared/build.gradle.kts
android { // 如果有 Android 平台,通常会在这里配置 externalNativeBuild
// ...
externalNativeBuild {
cmake {
path ( "src/main/c++/CMakeLists.txt" ) // CMakeLists.txt 的路径
}
}
}
// 或者为 JVM 目标单独配置 Native 构建(如果只有 JVM 桌面)
// 通常在 desktop 或 jvm target 的 task 中调用 CMake
tasks . register ( "buildNativeLib" , Exec :: class ) {
dependsOn ( "compileJvmMainKotlin" ) // 确保 NativeLib.class 已生成,方便 javac -h
workingDir = file ( "src/main/c++" ) // CMakeLists.txt 所在目录
commandLine ( "cmake" , "-B" , "build" , "-DCMAKE_BUILD_TYPE=Release" ) // 配置 build 目录
commandLine ( "cmake" , "--build" , "build" ) // 运行构建
}
// 确保在构建 JVM 应用时先构建原生库
tasks . getByName ( "jvmMainClasses" ) {
dependsOn ( "buildNativeLib" )
}
// 或者更简洁地通过 Gradle 的 native 插件来管理,但更复杂
// 或者直接在你的 desktop 模块的 run task 中手动复制库到 classpath
注意: 对于桌面 KMP,最直接的方法是:
手动运行 cmake 和 cmake --build 命令来生成库。 或者使用 Gradle 的 Exec 任务来自动化这个过程。 然后将生成的 .so/.dylib/.dll 文件放置到 JVM 运行时能够找到的路径,例如:打包到 JAR 中(不太常见,因为需要特殊的 ClassLoader) 放在 JVM 应用启动时 java.library.path 指定的目录。 最简单的是,放在运行应用的目录的 libsshared/src/jvmMain/resourcesjava.library.path。更推荐将原生库复制到最终可执行文件的同级目录。 7. 运行 KMP 桌面应用 在你的桌面应用模块(例如 desktop/src/main/kotlin/Main.kt)中,你可以像调用普通 Kotlin 函数一样调用你的 NativeLib。
// desktop/src/jvmMain/kotlin/Main.kt (或其他桌面端入口文件)
import com.example.shared.NativeLib
fun main () {
val nativeLib = NativeLib ()
val message = nativeLib . getStringFromNative ()
println ( "Message from native: $message" )
}
运行注意事项:
原生库路径: 当你运行桌面 JVM 应用程序时,JVM 需要能够找到你编译好的原生库文件。最常见且推荐的做法: 将生成的 .so, .dylib, .dll 文件放置在你的应用程序的可执行 JAR 文件所在的目录,或者一个名为 libs 的子目录中。通过 java.library.path: 你可以在启动 JVM 时通过 -Djava.library.path=/path/to/your/native/libs 参数指定原生库的查找路径。在 Gradle 中打包: 某些 Gradle 插件可以帮助你将原生库打包到最终的可执行文件中(例如 jpackage 或一些 shadowJar 配置),但这会增加复杂性。总结与建议 在 KMP 桌面端进行 JNI 开发是一个相对复杂的过程,因为它涉及到 Kotlin/JVM、C/C++ 和构建系统(Gradle, CMake)之间的协作。
关键点:
expect/actual:external 关键字:System.loadLibrary():actual 实现中加载你的原生库。javah / javac -h:CMake 或其他原生构建系统: 用于编译你的 C/C++ 代码并生成共享库。原生库部署: 确保 JVM 运行时能够找到你的 .so, .dylib, .dll 文件。建议:
只在必要时使用 JNI: JNI 会增加项目的复杂性(需要维护 C/C++ 代码,处理内存管理,平台兼容性等)。如果 Kotlin/JVM 本身可以完成任务,尽量避免使用 JNI。考虑 Kotlin/Native: 如果你的目标平台是完全原生的(例如,直接构建 macOS/Windows/Linux 可执行文件而不是 JVM 应用),Kotlin/Native 可能是更好的选择,它允许你直接调用 C 语言家族的库,而无需 JNI 的开销。但如果你需要利用 JVM 生态系统,JNI 是你的选择。逐步进行: 从一个简单的 JNI 调用开始,逐步添加更复杂的功能。查阅官方文档: JNI 和 Kotlin Multiplatform 的官方文档是最好的资源。Pagination © 2024. All rights reserved. LICENSE | NOTICE | CHANGELOG
Powered by Hydejack v9.2.1